Mastering Photoshop: How to Merge Layers for Efficient Editing

 April 29, 2025

 EricLopez

 0
0
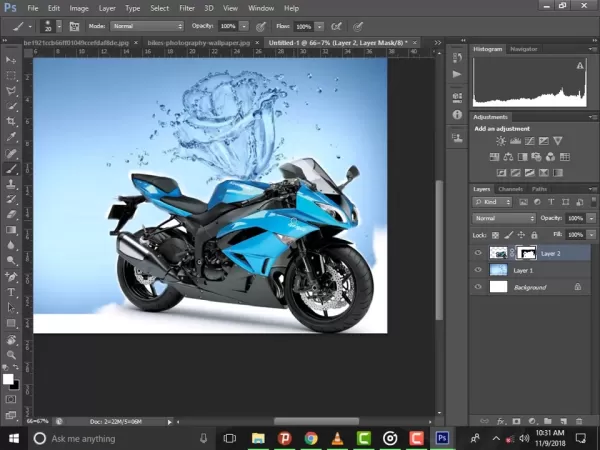
If you're diving into the world of digital image editing with Adobe Photoshop, mastering the art of layer management is essential. Whether you're a novice or a seasoned pro, understanding how to merge layers can transform your workflow from chaotic to streamlined. As your projects grow in complexity, so does the number of layers, which can quickly become a tangled mess if not managed properly. Merging layers not only tidies up your workspace but also boosts your editing efficiency. Let's explore the various ways to merge layers in Photoshop, along with some handy tips and best practices to keep your projects organized and your workflow smooth.
Key Points
- Understanding the benefits of merging layers.
- Different methods for merging layers in Photoshop.
- When to use different merging techniques.
- Non-destructive vs. destructive merging.
- Tips for efficient layer management.
- Optimizing Photoshop workflow with layer merging.
- Avoiding common mistakes when merging layers.
- How to flatten image layers in Photoshop.
Understanding the Basics of Layers and Merging in Photoshop
What are Layers in Photoshop?
Layers are the foundation of Photoshop editing. They allow you to work on different parts of an image independently, without affecting other elements. Each layer can hold a different image, text, adjustment, or effect. This non-destructive approach gives you the flexibility to experiment, which is crucial for intricate image manipulations. Managing Photoshop layers effectively is key to unlocking the full potential of the software.
Why Layer Management is Crucial
As you pile on more elements and effects, your layer count can skyrocket. Without proper management, your workspace can become a cluttered mess, slowing down your workflow, making it tough to locate and edit specific elements, and bloating your file size. Effective layer management involves naming layers, grouping them, and crucially, merging them when it makes sense. It's a cornerstone of using Photoshop efficiently.
Benefits of Merging Layers
Merging layers brings a host of advantages that can make your Photoshop projects more organized and efficient:
- Reduced Clutter:
 Combining multiple layers into one cuts down the number of layers in your panel, making it easier to navigate and manage your project. This is a lifesaver for complex designs with lots of elements.
 - Improved Performance: Fewer layers mean smaller file sizes and less strain on your computer. This can significantly boost Photoshop's performance, especially with large or high-resolution images. Merging can also speed up performance in certain design software.
- Simplified Workflow: With fewer layers to juggle, your workflow becomes more streamlined. It's easier to focus on the big picture rather than getting lost in the minutiae of individual layers.
- Permanent Changes (When Necessary): Merging layers can be handy when you're confident about your edits and want to lock in certain elements of your image. Just remember, it's often a destructive process, so make sure you're ready to commit. You can always duplicate layers before merging to keep the originals intact.
Understanding these benefits helps you make smart choices about when and how to merge layers in your Photoshop projects.
Advanced Layer Merging Techniques for Efficiency
Non-Destructive Merging with Smart Objects
For a non-destructive approach to merging, Smart Objects are your best friend. They let you combine layers while still allowing you to edit them individually later.
- Select the Layers: Hold `Ctrl` (or `Cmd` on Mac) and click on each layer you want to merge in the Layers panel.
- Right-Click: Right-click on one of the selected layers.
- Convert to Smart Object: Choose “Convert to Smart Object” from the context menu.
 This groups the selected layers into a single Smart Object layer. You can double-click it to open a separate window and tweak the individual layers within. This way, you keep your original layers safe for non-destructive edits.
Benefits of Using Smart Objects:
- Non-Destructive Editing: You can always revisit and modify the original layers inside the Smart Object.
- Transformations: Applying transformations like scaling or rotating to Smart Objects keeps the image quality intact.
- Filters: You can apply filters to Smart Objects and adjust or remove them later.
Using Layer Masks for Selective Merging
Layer masks give you a flexible way to control which parts of a layer are visible or hidden. This is particularly useful for merging layers, as it lets you selectively combine certain areas while leaving others untouched.
- Add a Layer Mask: Select the layer you want to selectively merge and click the “Add Layer Mask” icon at the bottom of the Layers panel.
- Paint on the Mask: Use the Brush tool to paint on the layer mask. Black hides the area, while white reveals it.
- Merge Layers: Once you're happy with the mask, you can merge the layer with another using one of the methods below. The mask will be applied during the merge, selectively combining the visible areas of the layer.
Tips for Using Layer Masks:
- Use Gradients: Apply gradient fills on layer masks for smooth transitions between merged areas.
- Experiment with Blending Modes: Try different blending modes for interesting effects when merging layers with masks.
- Use High Resolution Masks: Create high-resolution masks for detailed and precise control.
Organizing Layers with Groups Before Merging
Before you start merging layers, it's a good idea to organize them into groups. This keeps your Layers panel tidy and makes it easier to select and merge related layers.
- Create Groups: Select the layers you want to group and click the “Create a New Group” icon at the bottom of the Layers panel. You can also go to the “Layer” menu and choose “Group Layers.”
- Name Your Groups: Double-click on the group name to rename it, making it easier to identify its contents.
- Merge Groups:
 If you want to merge all layers within a group, simply right-click on the group and choose “Merge Group.” This will combine all layers in the group into a single layer.
Benefits of Using Layer Groups:
- Improved Organization: Layer groups help keep your Layers panel organized, especially in complex projects.
- Easy Selection: You can quickly select all layers within a group by clicking on the group name.
- Efficient Merging: Merging groups allows you to combine related layers in a structured manner.
Step-by-Step Guide to Merging Layers in Photoshop
Method 1: Merging Selected Layers
This method lets you combine specific layers while leaving others untouched. It's perfect for grouping related elements together.
- Select the Layers: Hold down the `Ctrl` key (or `Cmd` on a Mac) and click on each layer you want to merge in the Layers panel.
- Right-Click: Right-click on one of the selected layers.
- Choose 'Merge Layers':
 Select “Merge Layers” from the context menu. This will combine all selected layers into a single layer. Remember, blending modes and properties of the merged layers will now be combined into one. Use this method with caution, as it can't be undone without reverting to a previous snapshot in the History panel.
Method 2: Merging Visible Layers
This method combines all layers that are currently visible in your document. It's useful when you want to create a composite of all visible elements while ignoring hidden layers.
- Ensure Visibility: Make sure only the layers you want to merge are visible (i.e., the eye icon is enabled next to each layer).
- Right-Click: Right-click on any visible layer in the Layers panel.
- Choose 'Merge Visible': Select “Merge Visible” from the context menu. This will merge all visible layers into one, while preserving the visibility settings of any hidden layers.
This method is particularly handy when working on different versions or iterations of your image and you want to quickly combine the elements of a specific version.
Method 3: Flattening the Image
Flattening the image merges all layers into a single background layer, discarding any hidden layers. This method is often used when you're finished editing and want to prepare the image for exporting or printing.
- Open the Layers Panel: Ensure your Layers panel is visible.
- Go to the Layer Menu: Click on the “Layer” menu at the top of the screen.
- Choose 'Flatten Image': Select “Flatten Image” from the dropdown menu. This will merge all layers into a single background layer. Hidden layers will be discarded, and any transparent areas will be filled with white.
Flattening the image is a destructive process, so it's best to save a copy of your layered file before flattening, in case you need to make further edits.
Method 4: Using the 'Merge Down' Option
The 'Merge Down' option allows you to merge a selected layer with the layer directly below it in the Layers panel. It's a quick way to combine two specific layers.
- Select a Layer: Click on the layer you want to merge down in the Layers panel.
- Go to the Layer Menu: Click on the “Layer” menu at the top of the screen.
- Choose 'Merge Down': Select “Merge Down” (or press `Ctrl+E` / `Cmd+E`) from the dropdown menu. This will merge the selected layer with the layer directly below it. If the selected layer is at the bottom of the panel, this option will be grayed out.
Pros and Cons of Merging Layers
Pros
- Simplifies Photoshop workspace.
- Reduces file size and improves performance.
- Streamlines workflow by reducing layer count.
- Useful for finalizing elements.
- Enhances layer organization.
- Useful when the non-destructive feature is not needed.
Cons
- Destructive process (unless using Smart Objects).
- Loss of individual layer editability.
- Can't undo without History panel.
- Transparency issues if not handled carefully.
- Potential loss of effects.
- Can be time-consuming if frequent edits are needed.
Frequently Asked Questions
Is merging layers the same as flattening an image?
No. While both involve combining layers, they're different. Merging combines selected or visible layers into one, while flattening combines all layers into a single background layer, discarding hidden layers.
Can I undo merging layers in Photoshop?
If you've merged layers destructively (i.e., without using Smart Objects), you can undo the action using the History panel. However, once you’ve saved and closed the file, the merged layers are permanent, unless you revert to a previous version.
What happens to blending modes when merging layers?
When you merge layers with different blending modes, the blending modes are applied to the resulting merged layer. The final appearance depends on the specific blending modes used and the content of the layers being merged. Always check the resulting layer to ensure it looks as expected.
How can I merge layers without losing quality?
To merge layers without losing quality, use Smart Objects. This preserves the original layers and allows for non-destructive editing. Alternatively, ensure your image resolution is high enough to accommodate any transformations or effects applied during the merge.
Related Questions
What are the best practices for organizing layers in Photoshop?
Efficient layer organization is key to a smooth Photoshop workflow. Here are some best practices:
- Name Your Layers: Always name your layers descriptively so you can easily identify their contents.
- Use Layer Groups: Group related layers together to keep your Layers panel organized.
- Color-Code Layers: Use color-coding to visually categorize layers.
- Use Layer Masks: Layer masks allow you to selectively show or hide parts of a layer without permanently deleting anything.
- Delete Unnecessary Layers: Regularly review your Layers panel and delete any layers that are no longer needed.
- Use Smart Objects: Convert layers to Smart Objects for non-destructive editing.
- Arrange Layers Logically: Organize layers in a logical order that reflects the structure of your image.
- Lock Layers: Lock layers that you don’t need to edit to prevent accidental changes.
How does merging layers affect file size?
Merging layers generally reduces file size because it combines multiple layers into one, reducing the amount of data Photoshop needs to store. However, the exact impact on file size depends on the complexity of the layers being merged. Layers with complex effects, filters, or adjustments may result in a larger merged layer compared to simple layers with minimal content.
When should I use 'Merge Layers' vs. 'Flatten Image'?
Use 'Merge Layers' when you want to combine specific layers while preserving other layers and their settings. This is useful when you need to simplify certain parts of your image but want to retain the flexibility of individual layers elsewhere. Use 'Flatten Image' when you are completely finished editing and want to prepare the image for exporting or printing. Flattening reduces the file size and simplifies the image into a single layer, but it’s a destructive process and should be done with caution. Always save a backup copy before flattening.
Related article
 Create and Sell Holiday Coloring Books on Amazon KDP
As the festive season rolls around, the demand for fun and budget-friendly activities for kids spikes, and coloring books remain a timeless favorite. They're not just a source of entertainment but also a fantastic way for children to express their creativity. This guide is here to help you dive into
Easy Steps to Create a Professional Football Highlight Video
In the fiercely competitive world of football, a standout highlight video isn't just a nice-to-have; it's your golden ticket to catching the eye of scouts and coaches. This guide will walk you through the process of creating a slick, professional-quality highlight reel that not only showcases your b
Amazon Declares Alexa+ to be 'Model Agnostic'
Amazon Unveils Alexa+: A New Era of AI Assistance
At a recent press event in New York City, Amazon introduced Alexa+, a significantly upgraded version of its popular AI assistant. According to Amazon VP Daniel Rausch, Alexa+ is powered by a "model agnostic" system that dynamically selects the most
Comments (0)
0/200
Create and Sell Holiday Coloring Books on Amazon KDP
As the festive season rolls around, the demand for fun and budget-friendly activities for kids spikes, and coloring books remain a timeless favorite. They're not just a source of entertainment but also a fantastic way for children to express their creativity. This guide is here to help you dive into
Easy Steps to Create a Professional Football Highlight Video
In the fiercely competitive world of football, a standout highlight video isn't just a nice-to-have; it's your golden ticket to catching the eye of scouts and coaches. This guide will walk you through the process of creating a slick, professional-quality highlight reel that not only showcases your b
Amazon Declares Alexa+ to be 'Model Agnostic'
Amazon Unveils Alexa+: A New Era of AI Assistance
At a recent press event in New York City, Amazon introduced Alexa+, a significantly upgraded version of its popular AI assistant. According to Amazon VP Daniel Rausch, Alexa+ is powered by a "model agnostic" system that dynamically selects the most
Comments (0)
0/200
April 29, 2025
EricLopez
0
If you're diving into the world of digital image editing with Adobe Photoshop, mastering the art of layer management is essential. Whether you're a novice or a seasoned pro, understanding how to merge layers can transform your workflow from chaotic to streamlined. As your projects grow in complexity, so does the number of layers, which can quickly become a tangled mess if not managed properly. Merging layers not only tidies up your workspace but also boosts your editing efficiency. Let's explore the various ways to merge layers in Photoshop, along with some handy tips and best practices to keep your projects organized and your workflow smooth.
Key Points
- Understanding the benefits of merging layers.
- Different methods for merging layers in Photoshop.
- When to use different merging techniques.
- Non-destructive vs. destructive merging.
- Tips for efficient layer management.
- Optimizing Photoshop workflow with layer merging.
- Avoiding common mistakes when merging layers.
- How to flatten image layers in Photoshop.
Understanding the Basics of Layers and Merging in Photoshop
What are Layers in Photoshop?
Layers are the foundation of Photoshop editing. They allow you to work on different parts of an image independently, without affecting other elements. Each layer can hold a different image, text, adjustment, or effect. This non-destructive approach gives you the flexibility to experiment, which is crucial for intricate image manipulations. Managing Photoshop layers effectively is key to unlocking the full potential of the software.
Why Layer Management is Crucial
As you pile on more elements and effects, your layer count can skyrocket. Without proper management, your workspace can become a cluttered mess, slowing down your workflow, making it tough to locate and edit specific elements, and bloating your file size. Effective layer management involves naming layers, grouping them, and crucially, merging them when it makes sense. It's a cornerstone of using Photoshop efficiently.
Benefits of Merging Layers
Merging layers brings a host of advantages that can make your Photoshop projects more organized and efficient:
- Reduced Clutter: Combining multiple layers into one cuts down the number of layers in your panel, making it easier to navigate and manage your project. This is a lifesaver for complex designs with lots of elements.
- Improved Performance: Fewer layers mean smaller file sizes and less strain on your computer. This can significantly boost Photoshop's performance, especially with large or high-resolution images. Merging can also speed up performance in certain design software.
- Simplified Workflow: With fewer layers to juggle, your workflow becomes more streamlined. It's easier to focus on the big picture rather than getting lost in the minutiae of individual layers.
- Permanent Changes (When Necessary): Merging layers can be handy when you're confident about your edits and want to lock in certain elements of your image. Just remember, it's often a destructive process, so make sure you're ready to commit. You can always duplicate layers before merging to keep the originals intact.
Understanding these benefits helps you make smart choices about when and how to merge layers in your Photoshop projects.
Advanced Layer Merging Techniques for Efficiency
Non-Destructive Merging with Smart Objects
For a non-destructive approach to merging, Smart Objects are your best friend. They let you combine layers while still allowing you to edit them individually later.
- Select the Layers: Hold `Ctrl` (or `Cmd` on Mac) and click on each layer you want to merge in the Layers panel.
- Right-Click: Right-click on one of the selected layers.
- Convert to Smart Object: Choose “Convert to Smart Object” from the context menu. This groups the selected layers into a single Smart Object layer. You can double-click it to open a separate window and tweak the individual layers within. This way, you keep your original layers safe for non-destructive edits.
Benefits of Using Smart Objects:
- Non-Destructive Editing: You can always revisit and modify the original layers inside the Smart Object.
- Transformations: Applying transformations like scaling or rotating to Smart Objects keeps the image quality intact.
- Filters: You can apply filters to Smart Objects and adjust or remove them later.
Using Layer Masks for Selective Merging
Layer masks give you a flexible way to control which parts of a layer are visible or hidden. This is particularly useful for merging layers, as it lets you selectively combine certain areas while leaving others untouched.
- Add a Layer Mask: Select the layer you want to selectively merge and click the “Add Layer Mask” icon at the bottom of the Layers panel.
- Paint on the Mask: Use the Brush tool to paint on the layer mask. Black hides the area, while white reveals it.
- Merge Layers: Once you're happy with the mask, you can merge the layer with another using one of the methods below. The mask will be applied during the merge, selectively combining the visible areas of the layer.
Tips for Using Layer Masks:
- Use Gradients: Apply gradient fills on layer masks for smooth transitions between merged areas.
- Experiment with Blending Modes: Try different blending modes for interesting effects when merging layers with masks.
- Use High Resolution Masks: Create high-resolution masks for detailed and precise control.
Organizing Layers with Groups Before Merging
Before you start merging layers, it's a good idea to organize them into groups. This keeps your Layers panel tidy and makes it easier to select and merge related layers.
- Create Groups: Select the layers you want to group and click the “Create a New Group” icon at the bottom of the Layers panel. You can also go to the “Layer” menu and choose “Group Layers.”
- Name Your Groups: Double-click on the group name to rename it, making it easier to identify its contents.
- Merge Groups: If you want to merge all layers within a group, simply right-click on the group and choose “Merge Group.” This will combine all layers in the group into a single layer.
Benefits of Using Layer Groups:
- Improved Organization: Layer groups help keep your Layers panel organized, especially in complex projects.
- Easy Selection: You can quickly select all layers within a group by clicking on the group name.
- Efficient Merging: Merging groups allows you to combine related layers in a structured manner.
Step-by-Step Guide to Merging Layers in Photoshop
Method 1: Merging Selected Layers
This method lets you combine specific layers while leaving others untouched. It's perfect for grouping related elements together.
- Select the Layers: Hold down the `Ctrl` key (or `Cmd` on a Mac) and click on each layer you want to merge in the Layers panel.
- Right-Click: Right-click on one of the selected layers.
- Choose 'Merge Layers': Select “Merge Layers” from the context menu. This will combine all selected layers into a single layer. Remember, blending modes and properties of the merged layers will now be combined into one. Use this method with caution, as it can't be undone without reverting to a previous snapshot in the History panel.
Method 2: Merging Visible Layers
This method combines all layers that are currently visible in your document. It's useful when you want to create a composite of all visible elements while ignoring hidden layers.
- Ensure Visibility: Make sure only the layers you want to merge are visible (i.e., the eye icon is enabled next to each layer).
- Right-Click: Right-click on any visible layer in the Layers panel.
- Choose 'Merge Visible': Select “Merge Visible” from the context menu. This will merge all visible layers into one, while preserving the visibility settings of any hidden layers.
This method is particularly handy when working on different versions or iterations of your image and you want to quickly combine the elements of a specific version.
Method 3: Flattening the Image
Flattening the image merges all layers into a single background layer, discarding any hidden layers. This method is often used when you're finished editing and want to prepare the image for exporting or printing.
- Open the Layers Panel: Ensure your Layers panel is visible.
- Go to the Layer Menu: Click on the “Layer” menu at the top of the screen.
- Choose 'Flatten Image': Select “Flatten Image” from the dropdown menu. This will merge all layers into a single background layer. Hidden layers will be discarded, and any transparent areas will be filled with white.
Flattening the image is a destructive process, so it's best to save a copy of your layered file before flattening, in case you need to make further edits.
Method 4: Using the 'Merge Down' Option
The 'Merge Down' option allows you to merge a selected layer with the layer directly below it in the Layers panel. It's a quick way to combine two specific layers.
- Select a Layer: Click on the layer you want to merge down in the Layers panel.
- Go to the Layer Menu: Click on the “Layer” menu at the top of the screen.
- Choose 'Merge Down': Select “Merge Down” (or press `Ctrl+E` / `Cmd+E`) from the dropdown menu. This will merge the selected layer with the layer directly below it. If the selected layer is at the bottom of the panel, this option will be grayed out.
Pros and Cons of Merging Layers
Pros
- Simplifies Photoshop workspace.
- Reduces file size and improves performance.
- Streamlines workflow by reducing layer count.
- Useful for finalizing elements.
- Enhances layer organization.
- Useful when the non-destructive feature is not needed.
Cons
- Destructive process (unless using Smart Objects).
- Loss of individual layer editability.
- Can't undo without History panel.
- Transparency issues if not handled carefully.
- Potential loss of effects.
- Can be time-consuming if frequent edits are needed.
Frequently Asked Questions
Is merging layers the same as flattening an image?
No. While both involve combining layers, they're different. Merging combines selected or visible layers into one, while flattening combines all layers into a single background layer, discarding hidden layers.
Can I undo merging layers in Photoshop?
If you've merged layers destructively (i.e., without using Smart Objects), you can undo the action using the History panel. However, once you’ve saved and closed the file, the merged layers are permanent, unless you revert to a previous version.
What happens to blending modes when merging layers?
When you merge layers with different blending modes, the blending modes are applied to the resulting merged layer. The final appearance depends on the specific blending modes used and the content of the layers being merged. Always check the resulting layer to ensure it looks as expected.
How can I merge layers without losing quality?
To merge layers without losing quality, use Smart Objects. This preserves the original layers and allows for non-destructive editing. Alternatively, ensure your image resolution is high enough to accommodate any transformations or effects applied during the merge.
Related Questions
What are the best practices for organizing layers in Photoshop?
Efficient layer organization is key to a smooth Photoshop workflow. Here are some best practices:
- Name Your Layers: Always name your layers descriptively so you can easily identify their contents.
- Use Layer Groups: Group related layers together to keep your Layers panel organized.
- Color-Code Layers: Use color-coding to visually categorize layers.
- Use Layer Masks: Layer masks allow you to selectively show or hide parts of a layer without permanently deleting anything.
- Delete Unnecessary Layers: Regularly review your Layers panel and delete any layers that are no longer needed.
- Use Smart Objects: Convert layers to Smart Objects for non-destructive editing.
- Arrange Layers Logically: Organize layers in a logical order that reflects the structure of your image.
- Lock Layers: Lock layers that you don’t need to edit to prevent accidental changes.
How does merging layers affect file size?
Merging layers generally reduces file size because it combines multiple layers into one, reducing the amount of data Photoshop needs to store. However, the exact impact on file size depends on the complexity of the layers being merged. Layers with complex effects, filters, or adjustments may result in a larger merged layer compared to simple layers with minimal content.
When should I use 'Merge Layers' vs. 'Flatten Image'?
Use 'Merge Layers' when you want to combine specific layers while preserving other layers and their settings. This is useful when you need to simplify certain parts of your image but want to retain the flexibility of individual layers elsewhere. Use 'Flatten Image' when you are completely finished editing and want to prepare the image for exporting or printing. Flattening reduces the file size and simplifies the image into a single layer, but it’s a destructive process and should be done with caution. Always save a backup copy before flattening.


 Create and Sell Holiday Coloring Books on Amazon KDP
As the festive season rolls around, the demand for fun and budget-friendly activities for kids spikes, and coloring books remain a timeless favorite. They're not just a source of entertainment but also a fantastic way for children to express their creativity. This guide is here to help you dive into
Create and Sell Holiday Coloring Books on Amazon KDP
As the festive season rolls around, the demand for fun and budget-friendly activities for kids spikes, and coloring books remain a timeless favorite. They're not just a source of entertainment but also a fantastic way for children to express their creativity. This guide is here to help you dive into
 Easy Steps to Create a Professional Football Highlight Video
In the fiercely competitive world of football, a standout highlight video isn't just a nice-to-have; it's your golden ticket to catching the eye of scouts and coaches. This guide will walk you through the process of creating a slick, professional-quality highlight reel that not only showcases your b
Easy Steps to Create a Professional Football Highlight Video
In the fiercely competitive world of football, a standout highlight video isn't just a nice-to-have; it's your golden ticket to catching the eye of scouts and coaches. This guide will walk you through the process of creating a slick, professional-quality highlight reel that not only showcases your b
 Amazon Declares Alexa+ to be 'Model Agnostic'
Amazon Unveils Alexa+: A New Era of AI Assistance
At a recent press event in New York City, Amazon introduced Alexa+, a significantly upgraded version of its popular AI assistant. According to Amazon VP Daniel Rausch, Alexa+ is powered by a "model agnostic" system that dynamically selects the most
Amazon Declares Alexa+ to be 'Model Agnostic'
Amazon Unveils Alexa+: A New Era of AI Assistance
At a recent press event in New York City, Amazon introduced Alexa+, a significantly upgraded version of its popular AI assistant. According to Amazon VP Daniel Rausch, Alexa+ is powered by a "model agnostic" system that dynamically selects the most