3D Logo Creation Guide: Importing and Extruding Techniques in 3ds Max

 May 1, 2025

 JamesTaylor

 0
0
If you're looking to make a splash with your brand in today's digital world, creating a stunning 3D logo is a game-changer. This guide will walk you through the process of transforming your 2D designs into eye-catching 3D models using Adobe Illustrator and Autodesk 3ds Max. We'll cover everything from importing your vector logos to adding depth and dimension with extrusion, and finally, preparing your logo for animation or rendering. Let's dive into the world of 3D logo design and boost your brand's visibility!
Key Points
- Importing vector logos from Adobe Illustrator into 3ds Max.
- Understanding and resolving compatibility issues between file formats.
- Preparing Illustrator files for smooth import into 3ds Max.
- Using the Extrude modifier in 3ds Max to add 3D depth.
- Optimizing extruded shapes for better rendering performance.
- Applying materials and textures to enhance your 3D logo.
- Troubleshooting common import and extrusion problems in 3ds Max.
Preparing Your Logo in Adobe Illustrator for 3D Max
Ensuring Compatibility and Resolving Font Issues for Successful 3D Logo Creation
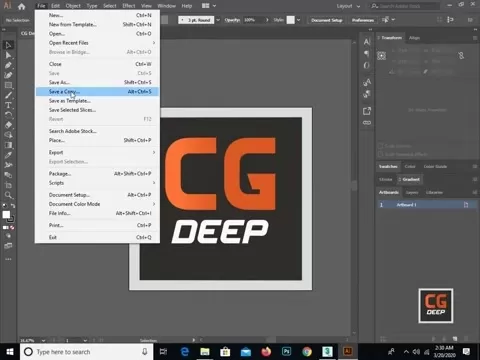
Before you jump into 3ds Max, it's crucial to get your logo ready in Adobe Illustrator. Proper preparation can make all the difference, ensuring a smooth transition and avoiding pesky errors during import. Illustrator and 3ds Max handle vector graphics differently, so keeping these differences in mind is key to creating a successful 3D logo.
File Format Considerations
3ds Max can be finicky with certain Adobe Illustrator file features. Directly importing .AI files can lead to compatibility headaches. To avoid this, save your Illustrator file in an older version, such as .AI version 8 or earlier, to boost compatibility.
 This step is crucial for a seamless transition.
Why Older Versions?
Older .AI formats are simpler, reducing the chance of 3ds Max getting confused by complex features. This is especially important in 3D logo design to keep everything intact.
Font Handling
Fonts can be a real pain during import. 3ds Max might not play nice with newer or custom fonts. To sidestep this issue, convert all text in your logo to outlines in Illustrator before saving. This ensures your 3D logo looks exactly as intended.
Steps to Convert Text to Outlines:
- Select all text layers in your Illustrator document.
- Go to Type > Create Outlines.
- Save the file in Adobe Illustrator 8 format.
Optimizing Paths for Clean Geometry
Clean and simple paths translate into cleaner geometry in 3ds Max. Complex or overlapping paths can throw a wrench in the works during extrusion, leading to unexpected results in your 3D logo. Simplifying paths helps keep everything smooth.
Path Simplification Techniques:
- Remove unnecessary anchor points: Use the Delete Anchor Point Tool to get rid of redundant points without changing the shape.
- Simplify complex shapes: Illustrator's Object > Path > Simplify tool can reduce the number of points while maintaining the overall form.
- Merge overlapping shapes: Use the Pathfinder panel to combine shapes into single, clean paths.
By prepping your file correctly in Adobe Illustrator, you're setting the stage for a successful 3D logo design in 3ds Max. This ensures a smooth import process and keeps your logo's shape and detail intact. Mastering these techniques is essential for effective 3D logo creation.
Customizing Your 3D Logo: Adding Materials, Textures, and Lighting
Enhance Your 3D Logo with Professional Materials, Textures, and Lighting Techniques
Once your logo is extruded, it's time to bring it to life with materials, textures, and lighting. These elements can turn your logo into a professional and visually striking piece, emphasizing key features and setting the right mood.
Applying Materials
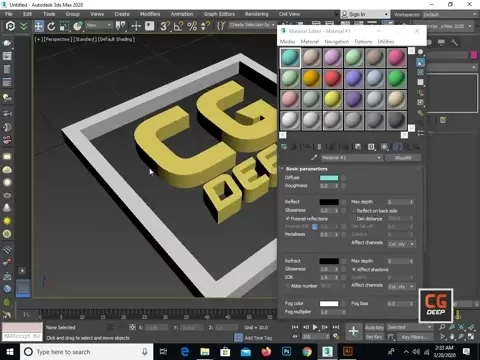
Materials dictate how light interacts with your 3D logo's surface. 3ds Max offers various material types, like Standard, Physical Material, and Arnold Standard Surface, each with unique properties for different visual effects.
- Open the Material Editor: Press M to access it.
- Create a New Material:
- Choose a material type (e.g., Physical Material for realistic rendering).
- Adjust parameters like Base Color, Roughness, Metalness, and Reflectivity to achieve the desired look.
- Assign Material to Selection: Select your 3D logo and click the Assign Material to Selection button in the Material Editor.
Adding Textures
Textures add surface detail that materials alone can't provide. They can simulate roughness, bumps, patterns, and more, adding realism and visual interest to your 3D logo.
- Add Texture Maps:
- In the Material Editor, add texture maps to the appropriate slots (e.g., Base Color, Roughness, Normal Map).
- Use bitmap textures (images) or procedural textures (generated by 3ds Max).
- Adjust UV Mapping: UV mapping determines how the texture wraps around your 3D logo. If it looks stretched or distorted, tweak the UV coordinates using the UVW Map modifier.
Setting Up Lighting
Lighting is crucial for showcasing your 3D logo effectively. 3ds Max supports different types of lights, including Standard lights and Arnold lights, each with unique rendering capabilities.
- Add Lights to the Scene:
- Go to the Create panel and choose Lights.
- Add lights like Area Lights, Spot Lights, or Directional Lights to illuminate your logo.
- Adjust Light Properties:
- Tweak parameters such as Intensity, Color, Falloff, and Shadows to achieve the desired lighting effect.
Customization Ideas
- Metallic Finishes: Use metalness and reflectivity settings to create a sleek, industrial look.
- Emissive Elements: Add subtle glow effects to make certain parts of your logo stand out.
- Textured Surfaces: Use bump maps or displacement maps to add tactile details, enhancing the visual complexity of your 3D logo.
By carefully selecting materials, textures, and lighting, you can transform your extruded shape into a visually stunning 3D logo that elevates your brand's image.
Importing and Extruding the Logo in 3ds Max: a Step-by-Step Tutorial
Step 1: Importing the Illustrator File into 3ds Max
Once your logo is ready in Adobe Illustrator, it's time to bring it into 3ds Max. This step is where the magic starts happening, transforming your 2D design into a 3D masterpiece. Here's how to do it:
- Open 3ds Max: Launch Autodesk 3ds Max to start your 3D logo project.
- Import the File:
- Go to File > Import > Import.
- Navigate to the directory where you saved the Illustrator file.
- Select the file and click Open.
- AI Import Settings Dialog:
- The AI Import dialog box appears.
 Ensure you choose the correct settings:
- Merge Objects with Current Scene: Select this option to add the logo to your current workspace.
- Import Shapes As: Choose Single Object or Multiple Objects depending on how you want the logo elements grouped. If you plan to animate individual parts of the logo, select Multiple Objects.
- Dealing with Import Errors: Sometimes, you might run into errors during import. Common issues include:
- File Format Errors: If 3ds Max doesn't recognize the file, make sure it's saved in the correct Adobe Illustrator version (8 or earlier).
- Corrupted Paths: If specific shapes are missing or distorted, revisit the original Illustrator file to check for and correct any path issues.
Addressing these potential import issues can streamline the 3D logo creation process and ensure a smooth transition to the next steps.
Step 2: Applying the Extrude Modifier for 3D Depth
After importing the logo, it's time to give it some depth using the Extrude modifier. This step is where your 2D vector graphics become a 3D object, adding dimension and making your logo pop. Here's how you do it in 3ds Max:
- Select the Imported Shape: In 3ds Max, select the shape you imported.
- Open the Modifier Panel:
- Go to the Modify panel on the right side of the 3ds Max interface.
 This panel is where you apply various modifiers to alter the shape's geometry.
- Apply the Extrude Modifier:
- In the Modifier List, type "Extrude" to quickly find and apply the Extrude modifier to the selected shape.
- Adjust Extrusion Parameters:
- In the Parameters section of the Extrude modifier, you can adjust the following settings:
- Amount: This value determines the depth of the extrusion. Experiment with different values to achieve the desired thickness for your logo.
- Segments: Increasing segments can smooth out the extrusion for curves.
- Cap Start/End: These options control whether the ends of the extruded shape are capped. Ensure these are checked to create solid ends.
- Output: Ensure the output is set to "Mesh" for compatibility.
- Fine-Tuning the Extrusion:
- Adjust the Amount setting to give your 3D logo the perfect level of depth.
- Consider the segments for smoother curves.
- Adjust the start and end caps as you want. Ensure they are checked if you want them on.
Step 3: Refining the Geometry of Your 3D Logo Design
Once the Extrude modifier is applied, it's time to refine the geometry to ensure your 3D logo looks polished and professional. This involves smoothing out jagged edges, perfecting curves, and optimizing the mesh for rendering. Here's how to do it:
- Convert to Editable Poly:
- Right-click on the extruded shape in the viewport.
- Choose Convert to > Convert to Editable Poly. This allows direct manipulation of the mesh.
- Addressing Jagged Edges: Jagged edges are common when extruding vector shapes.
- Increase Segments: In the Extrude modifier, increasing the number of segments can smooth out the curves.
- MeshSmooth Modifier: Apply a MeshSmooth modifier to further smooth the surface. Adjust the Iterations value to control the level of smoothing. Be careful not to over-smooth, as this can reduce the sharpness of your logo.
- Deleting Unnecessary Elements: Simplify the mesh by removing hidden or unnecessary polygons.
- Go to Polygon selection mode.
- Select and delete any polygons that are not visible or contribute to the overall shape.
- Applying Materials and Textures:
- Open the Material Editor by pressing M.
- Create a new material (e.g., a Standard or Physical Material).
- Adjust the color, reflectivity, and other material properties to match your brand's style.
- Assign the material to your 3D logo by selecting the logo and clicking the Assign Material to Selection button in the Material Editor.
Importance of UV Mapping
Proper UV mapping is crucial when applying textures. If the texture appears stretched or distorted, you'll need to adjust the UV coordinates.
- Add a UVW Map modifier to your object.
- Experiment with different mapping types (Planar, Cylindrical, etc.) to find the one that best fits your logo's shape.
- Adjust the Length, Width, and Height parameters to scale the texture appropriately.
- Use the Gizmo to reposition or rotate the UV map for precise texture placement.
Resources for 3D Modeling Software and Logo Design Tools
Understanding Costs and Tools in 3D Design and Branding
Creating a high-quality 3D logo and using 3D modeling software effectively involves various resources and tools. Understanding the costs associated with software licenses, design assets, and training can help you budget effectively for your 3D logo projects.
Software Licensing Costs
- Autodesk 3ds Max: As a professional-grade 3D modeling and rendering software, 3ds Max offers subscription-based licensing. As of 2025:
- Monthly Subscription: $235
- Annual Subscription: $1,875
- 3-Year Subscription: $5,065
- Adobe Illustrator: Essential for creating vector-based logos, Illustrator is available through Adobe Creative Cloud. The costs for the 3D logo design software include:
- Monthly Subscription: $22.99
- Annual Subscription: $239.88
- Alternative Software:
- Blender (Free): A powerful, open-source 3D creation suite suitable for hobbyists and professionals.
- Cinema 4D: Another industry-standard 3D modeling tool, with pricing comparable to 3ds Max.
Cost of Design Assets
- Stock Models and Textures: High-quality 3D models and textures can significantly enhance your 3D logo. Prices vary widely depending on the complexity and resolution:
- Low-Resolution Models/Textures: $5 - $20 per asset
- High-Resolution Models/Textures: $50 - $200+ per asset
- Logo Templates: Ready-made logo templates offer a quick starting point but might lack uniqueness. The average costs for a 3D logo template include:
- Basic Templates: $10 - $50
- Premium Templates: $50 - $150+
- Custom Design Services: Hiring a professional designer ensures a unique and tailored logo:
- Freelance Designers: $50 - $200 per hour
- Design Agencies: $100 - $500+ per hour
Training and Skill Development Resources
- Online Courses: Platforms like Udemy, Coursera, and LinkedIn Learning offer courses on 3ds Max and Adobe Illustrator:
- Individual Courses: $20 - $200
- Subscription-Based Learning: $20 - $50 per month
- Tutorials and Documentation: Free resources include the official Autodesk and Adobe documentation, as well as numerous YouTube tutorials:
- Free (but time-consuming to curate)
- Books and Guides: Comprehensive guides provide structured learning paths and detailed instructions:
- $30 - $80 per book
Additional Costs
- Hardware Upgrades: High-end 3D modeling requires powerful hardware. This includes:
- High-Performance CPU: $300 - $1000
- Dedicated GPU: $200 - $2000+
- Ample RAM (32GB+): $150+
- Rendering Services: Cloud rendering services can accelerate the rendering process for complex scenes:
- Pay-as-you-go: Varies based on rendering complexity
- Subscription Plans: Ranging from $50 to $500+ per month
These considerations ensure you can successfully manage the costs and effectively utilize the tools for creating professional-grade 3D logos. Budget effectively to bring your 3D logo design to life.
Analyzing the Advantages and Disadvantages of Importing Adobe Illustrator Logos into 3ds Max
Pros
- Vector Precision: Retains sharp, scalable graphics ideal for high-resolution rendering.
- Ease of Design: Leverages Illustrator's powerful vector design tools for initial logo creation.
- Animation Potential: Provides a solid 3D base for animation and dynamic visual effects.
Cons
- Compatibility Issues: Requires careful file preparation to avoid import errors.
- Geometry Complexity: Complex paths can lead to dense, difficult-to-manage meshes.
- Additional Steps: Involves extra steps for text outlining and path simplification to optimize for 3ds Max.
Frequently Asked Questions About 3D Logo Design
What are the best file formats for importing logos into 3ds Max?
For logos created in Adobe Illustrator, the AI (Adobe Illustrator) format is often used. However, compatibility issues can arise. Saving the AI file in an older version (such as version 8) and converting text to outlines can significantly improve the import process. Alternative formats like .DXF or .EPS may also be used, depending on the complexity and specific needs of your project. These alternative formats provide better compatibility and simplified geometry, resulting in a smoother import process.
How do I fix common import errors when bringing logos into 3ds Max?
Import errors can stem from various issues, such as incompatible file versions, unsupported fonts, or complex paths. Always ensure that your Adobe Illustrator file is saved in an older version (AI version 8 or earlier) and that all text is converted to outlines. Simplifying complex paths in Illustrator before importing can also prevent geometry issues in 3ds Max.
Troubleshooting Steps:
- Check File Version: Verify that the AI file is saved in an older, more compatible version.
- Convert Text to Outlines: Ensure all text layers in Adobe Illustrator are converted to outlines to avoid font-related errors.
- Simplify Paths: Reduce complexity by simplifying paths and removing unnecessary anchor points in Illustrator.
- Check for Overlapping Shapes: Overlapping or self-intersecting shapes can cause issues. Use the Pathfinder panel in Illustrator to merge shapes into single, clean paths.
- Review Error Messages: Pay close attention to any error messages in 3ds Max, as they often provide clues to the problem.
What's the best way to add depth to a logo in 3ds Max?
The Extrude modifier is the primary tool for adding depth to a logo in 3ds Max. Select the imported shape, apply the Extrude modifier from the modifier list, and adjust the amount parameter to control the thickness of the logo.
Tips for Effective Extrusion:
- Adjust Amount Carefully: Experiment with different values to achieve the desired thickness for your logo.
- Increase Segments: Add more segments to smooth out curves and prevent jagged edges.
- Cap Start/End: Ensure the Cap Start and Cap End options are checked to create solid, closed shapes.
- Output Type: Set the output type to Mesh for better compatibility and easier editing.
Related Questions for Advancing Your 3D Logo Design Skills
How can I animate a 3D logo in 3ds Max for engaging content?
Animating a 3D logo in 3ds Max involves setting keyframes, adjusting animation curves, and utilizing various modifiers to create dynamic motion. Here's an outline of the process:
Prepare the Logo:
Ensure your 3D logo is properly modeled, with all parts correctly separated if you intend to animate them independently. Use the techniques described above to import your logo into 3ds Max.
Set Up Keyframes:
- Select the object you want to animate.
- Activate the Auto Key button at the bottom of the 3ds Max interface.
- Move the timeline slider to the first frame of your animation.
- Adjust the position, rotation, or scale of the object.
- Move the timeline slider to a different frame and repeat the adjustment. 3ds Max automatically creates a keyframe at each point.
Adjust Animation Curves:
Refine the animation by adjusting the animation curves in the Curve Editor. To access this:
- Go to Graph Editors > Track View - Curve Editor.
- Here, you can smooth out movements, add easing effects, and fine-tune the timing of your animation.
Modifiers for Dynamic Effects:
Incorporate modifiers like Bend, Twist, or Wave to add complexity and interest. Each modifier has parameters that can be animated over time.
Rendering:
Use high-quality rendering settings to output a polished animation. Animating a 3D logo can greatly enhance your brand's visual appeal, making it more memorable and engaging for your audience. Remember, practice and experimentation are key to mastering animation techniques in 3ds Max.
Related article
 Remodel AI Tutorial: Transforming Home Exteriors with AI Editing
Imagine being able to see your home's exterior transformed before you commit to any expensive renovations. That's exactly what Remodel AI offers with its revolutionary Exterior Editor. This tool harnesses the power of artificial intelligence to help you visualize and redesign your home's exterior ef
Weird Al's Polka Medley Collaboration: An In-Depth Look at the Animation
Step into the delightfully bizarre universe of Weird Al Yankovic's animated polka medley, where twelve iconic songs are reborn as polka parodies, crafted by fourteen visionary animators. Each segment of this medley is a feast for the eyes and ears, blending unique animation styles, clever song parod
AI Cold Calling: Streamline Lead Generation and Schedule Appointments
Are you tired of the endless cycle of manual tasks that come with traditional cold calling? Picture a world where an AI solution takes care of everything from finding leads to scheduling appointments, leaving you free to focus on what you do best—closing deals. This article explores the game-changin
Comments (0)
0/200
Remodel AI Tutorial: Transforming Home Exteriors with AI Editing
Imagine being able to see your home's exterior transformed before you commit to any expensive renovations. That's exactly what Remodel AI offers with its revolutionary Exterior Editor. This tool harnesses the power of artificial intelligence to help you visualize and redesign your home's exterior ef
Weird Al's Polka Medley Collaboration: An In-Depth Look at the Animation
Step into the delightfully bizarre universe of Weird Al Yankovic's animated polka medley, where twelve iconic songs are reborn as polka parodies, crafted by fourteen visionary animators. Each segment of this medley is a feast for the eyes and ears, blending unique animation styles, clever song parod
AI Cold Calling: Streamline Lead Generation and Schedule Appointments
Are you tired of the endless cycle of manual tasks that come with traditional cold calling? Picture a world where an AI solution takes care of everything from finding leads to scheduling appointments, leaving you free to focus on what you do best—closing deals. This article explores the game-changin
Comments (0)
0/200
May 1, 2025
JamesTaylor
0
If you're looking to make a splash with your brand in today's digital world, creating a stunning 3D logo is a game-changer. This guide will walk you through the process of transforming your 2D designs into eye-catching 3D models using Adobe Illustrator and Autodesk 3ds Max. We'll cover everything from importing your vector logos to adding depth and dimension with extrusion, and finally, preparing your logo for animation or rendering. Let's dive into the world of 3D logo design and boost your brand's visibility!
Key Points
- Importing vector logos from Adobe Illustrator into 3ds Max.
- Understanding and resolving compatibility issues between file formats.
- Preparing Illustrator files for smooth import into 3ds Max.
- Using the Extrude modifier in 3ds Max to add 3D depth.
- Optimizing extruded shapes for better rendering performance.
- Applying materials and textures to enhance your 3D logo.
- Troubleshooting common import and extrusion problems in 3ds Max.
Preparing Your Logo in Adobe Illustrator for 3D Max
Ensuring Compatibility and Resolving Font Issues for Successful 3D Logo Creation
Before you jump into 3ds Max, it's crucial to get your logo ready in Adobe Illustrator. Proper preparation can make all the difference, ensuring a smooth transition and avoiding pesky errors during import. Illustrator and 3ds Max handle vector graphics differently, so keeping these differences in mind is key to creating a successful 3D logo.
File Format Considerations
3ds Max can be finicky with certain Adobe Illustrator file features. Directly importing .AI files can lead to compatibility headaches. To avoid this, save your Illustrator file in an older version, such as .AI version 8 or earlier, to boost compatibility.
This step is crucial for a seamless transition.
Why Older Versions?
Older .AI formats are simpler, reducing the chance of 3ds Max getting confused by complex features. This is especially important in 3D logo design to keep everything intact.
Font Handling
Fonts can be a real pain during import. 3ds Max might not play nice with newer or custom fonts. To sidestep this issue, convert all text in your logo to outlines in Illustrator before saving. This ensures your 3D logo looks exactly as intended.
Steps to Convert Text to Outlines:
- Select all text layers in your Illustrator document.
- Go to Type > Create Outlines.
- Save the file in Adobe Illustrator 8 format.
Optimizing Paths for Clean Geometry
Clean and simple paths translate into cleaner geometry in 3ds Max. Complex or overlapping paths can throw a wrench in the works during extrusion, leading to unexpected results in your 3D logo. Simplifying paths helps keep everything smooth.
Path Simplification Techniques:
- Remove unnecessary anchor points: Use the Delete Anchor Point Tool to get rid of redundant points without changing the shape.
- Simplify complex shapes: Illustrator's Object > Path > Simplify tool can reduce the number of points while maintaining the overall form.
- Merge overlapping shapes: Use the Pathfinder panel to combine shapes into single, clean paths.
By prepping your file correctly in Adobe Illustrator, you're setting the stage for a successful 3D logo design in 3ds Max. This ensures a smooth import process and keeps your logo's shape and detail intact. Mastering these techniques is essential for effective 3D logo creation.
Customizing Your 3D Logo: Adding Materials, Textures, and Lighting
Enhance Your 3D Logo with Professional Materials, Textures, and Lighting Techniques
Once your logo is extruded, it's time to bring it to life with materials, textures, and lighting. These elements can turn your logo into a professional and visually striking piece, emphasizing key features and setting the right mood.
Applying Materials
Materials dictate how light interacts with your 3D logo's surface. 3ds Max offers various material types, like Standard, Physical Material, and Arnold Standard Surface, each with unique properties for different visual effects.
- Open the Material Editor: Press M to access it.
- Create a New Material:
- Choose a material type (e.g., Physical Material for realistic rendering).
- Adjust parameters like Base Color, Roughness, Metalness, and Reflectivity to achieve the desired look.
- Assign Material to Selection: Select your 3D logo and click the Assign Material to Selection button in the Material Editor.
Adding Textures
Textures add surface detail that materials alone can't provide. They can simulate roughness, bumps, patterns, and more, adding realism and visual interest to your 3D logo.
- Add Texture Maps:
- In the Material Editor, add texture maps to the appropriate slots (e.g., Base Color, Roughness, Normal Map).
- Use bitmap textures (images) or procedural textures (generated by 3ds Max).
- Adjust UV Mapping: UV mapping determines how the texture wraps around your 3D logo. If it looks stretched or distorted, tweak the UV coordinates using the UVW Map modifier.
Setting Up Lighting
Lighting is crucial for showcasing your 3D logo effectively. 3ds Max supports different types of lights, including Standard lights and Arnold lights, each with unique rendering capabilities.
- Add Lights to the Scene:
- Go to the Create panel and choose Lights.
- Add lights like Area Lights, Spot Lights, or Directional Lights to illuminate your logo.
- Adjust Light Properties:
- Tweak parameters such as Intensity, Color, Falloff, and Shadows to achieve the desired lighting effect.
Customization Ideas
- Metallic Finishes: Use metalness and reflectivity settings to create a sleek, industrial look.
- Emissive Elements: Add subtle glow effects to make certain parts of your logo stand out.
- Textured Surfaces: Use bump maps or displacement maps to add tactile details, enhancing the visual complexity of your 3D logo.
By carefully selecting materials, textures, and lighting, you can transform your extruded shape into a visually stunning 3D logo that elevates your brand's image.
Importing and Extruding the Logo in 3ds Max: a Step-by-Step Tutorial
Step 1: Importing the Illustrator File into 3ds Max
Once your logo is ready in Adobe Illustrator, it's time to bring it into 3ds Max. This step is where the magic starts happening, transforming your 2D design into a 3D masterpiece. Here's how to do it:
- Open 3ds Max: Launch Autodesk 3ds Max to start your 3D logo project.
- Import the File:
- Go to File > Import > Import.
- Navigate to the directory where you saved the Illustrator file.
- Select the file and click Open.
- AI Import Settings Dialog:
- The AI Import dialog box appears.
- Ensure you choose the correct settings:
- Merge Objects with Current Scene: Select this option to add the logo to your current workspace.
- Import Shapes As: Choose Single Object or Multiple Objects depending on how you want the logo elements grouped. If you plan to animate individual parts of the logo, select Multiple Objects.
- Dealing with Import Errors: Sometimes, you might run into errors during import. Common issues include:
- File Format Errors: If 3ds Max doesn't recognize the file, make sure it's saved in the correct Adobe Illustrator version (8 or earlier).
- Corrupted Paths: If specific shapes are missing or distorted, revisit the original Illustrator file to check for and correct any path issues.
Addressing these potential import issues can streamline the 3D logo creation process and ensure a smooth transition to the next steps.
Step 2: Applying the Extrude Modifier for 3D Depth
After importing the logo, it's time to give it some depth using the Extrude modifier. This step is where your 2D vector graphics become a 3D object, adding dimension and making your logo pop. Here's how you do it in 3ds Max:
- Select the Imported Shape: In 3ds Max, select the shape you imported.
- Open the Modifier Panel:
- Go to the Modify panel on the right side of the 3ds Max interface.
- This panel is where you apply various modifiers to alter the shape's geometry.
- Apply the Extrude Modifier:
- In the Modifier List, type "Extrude" to quickly find and apply the Extrude modifier to the selected shape.
- Adjust Extrusion Parameters:
- In the Parameters section of the Extrude modifier, you can adjust the following settings:
- Amount: This value determines the depth of the extrusion. Experiment with different values to achieve the desired thickness for your logo.
- Segments: Increasing segments can smooth out the extrusion for curves.
- Cap Start/End: These options control whether the ends of the extruded shape are capped. Ensure these are checked to create solid ends.
- Output: Ensure the output is set to "Mesh" for compatibility.
- Fine-Tuning the Extrusion:
- Adjust the Amount setting to give your 3D logo the perfect level of depth.
- Consider the segments for smoother curves.
- Adjust the start and end caps as you want. Ensure they are checked if you want them on.
Step 3: Refining the Geometry of Your 3D Logo Design
Once the Extrude modifier is applied, it's time to refine the geometry to ensure your 3D logo looks polished and professional. This involves smoothing out jagged edges, perfecting curves, and optimizing the mesh for rendering. Here's how to do it:
- Convert to Editable Poly:
- Right-click on the extruded shape in the viewport.
- Choose Convert to > Convert to Editable Poly. This allows direct manipulation of the mesh.
- Addressing Jagged Edges: Jagged edges are common when extruding vector shapes.
- Increase Segments: In the Extrude modifier, increasing the number of segments can smooth out the curves.
- MeshSmooth Modifier: Apply a MeshSmooth modifier to further smooth the surface. Adjust the Iterations value to control the level of smoothing. Be careful not to over-smooth, as this can reduce the sharpness of your logo.
- Deleting Unnecessary Elements: Simplify the mesh by removing hidden or unnecessary polygons.
- Go to Polygon selection mode.
- Select and delete any polygons that are not visible or contribute to the overall shape.
- Applying Materials and Textures:
- Open the Material Editor by pressing M.
- Create a new material (e.g., a Standard or Physical Material).
- Adjust the color, reflectivity, and other material properties to match your brand's style.
- Assign the material to your 3D logo by selecting the logo and clicking the Assign Material to Selection button in the Material Editor.
Importance of UV Mapping
Proper UV mapping is crucial when applying textures. If the texture appears stretched or distorted, you'll need to adjust the UV coordinates.
- Add a UVW Map modifier to your object.
- Experiment with different mapping types (Planar, Cylindrical, etc.) to find the one that best fits your logo's shape.
- Adjust the Length, Width, and Height parameters to scale the texture appropriately.
- Use the Gizmo to reposition or rotate the UV map for precise texture placement.
Resources for 3D Modeling Software and Logo Design Tools
Understanding Costs and Tools in 3D Design and Branding
Creating a high-quality 3D logo and using 3D modeling software effectively involves various resources and tools. Understanding the costs associated with software licenses, design assets, and training can help you budget effectively for your 3D logo projects.
Software Licensing Costs
- Autodesk 3ds Max: As a professional-grade 3D modeling and rendering software, 3ds Max offers subscription-based licensing. As of 2025:
- Monthly Subscription: $235
- Annual Subscription: $1,875
- 3-Year Subscription: $5,065
- Adobe Illustrator: Essential for creating vector-based logos, Illustrator is available through Adobe Creative Cloud. The costs for the 3D logo design software include:
- Monthly Subscription: $22.99
- Annual Subscription: $239.88
- Alternative Software:
- Blender (Free): A powerful, open-source 3D creation suite suitable for hobbyists and professionals.
- Cinema 4D: Another industry-standard 3D modeling tool, with pricing comparable to 3ds Max.
Cost of Design Assets
- Stock Models and Textures: High-quality 3D models and textures can significantly enhance your 3D logo. Prices vary widely depending on the complexity and resolution:
- Low-Resolution Models/Textures: $5 - $20 per asset
- High-Resolution Models/Textures: $50 - $200+ per asset
- Logo Templates: Ready-made logo templates offer a quick starting point but might lack uniqueness. The average costs for a 3D logo template include:
- Basic Templates: $10 - $50
- Premium Templates: $50 - $150+
- Custom Design Services: Hiring a professional designer ensures a unique and tailored logo:
- Freelance Designers: $50 - $200 per hour
- Design Agencies: $100 - $500+ per hour
Training and Skill Development Resources
- Online Courses: Platforms like Udemy, Coursera, and LinkedIn Learning offer courses on 3ds Max and Adobe Illustrator:
- Individual Courses: $20 - $200
- Subscription-Based Learning: $20 - $50 per month
- Tutorials and Documentation: Free resources include the official Autodesk and Adobe documentation, as well as numerous YouTube tutorials:
- Free (but time-consuming to curate)
- Books and Guides: Comprehensive guides provide structured learning paths and detailed instructions:
- $30 - $80 per book
Additional Costs
- Hardware Upgrades: High-end 3D modeling requires powerful hardware. This includes:
- High-Performance CPU: $300 - $1000
- Dedicated GPU: $200 - $2000+
- Ample RAM (32GB+): $150+
- Rendering Services: Cloud rendering services can accelerate the rendering process for complex scenes:
- Pay-as-you-go: Varies based on rendering complexity
- Subscription Plans: Ranging from $50 to $500+ per month
These considerations ensure you can successfully manage the costs and effectively utilize the tools for creating professional-grade 3D logos. Budget effectively to bring your 3D logo design to life.
Analyzing the Advantages and Disadvantages of Importing Adobe Illustrator Logos into 3ds Max
Pros
- Vector Precision: Retains sharp, scalable graphics ideal for high-resolution rendering.
- Ease of Design: Leverages Illustrator's powerful vector design tools for initial logo creation.
- Animation Potential: Provides a solid 3D base for animation and dynamic visual effects.
Cons
- Compatibility Issues: Requires careful file preparation to avoid import errors.
- Geometry Complexity: Complex paths can lead to dense, difficult-to-manage meshes.
- Additional Steps: Involves extra steps for text outlining and path simplification to optimize for 3ds Max.
Frequently Asked Questions About 3D Logo Design
What are the best file formats for importing logos into 3ds Max?
For logos created in Adobe Illustrator, the AI (Adobe Illustrator) format is often used. However, compatibility issues can arise. Saving the AI file in an older version (such as version 8) and converting text to outlines can significantly improve the import process. Alternative formats like .DXF or .EPS may also be used, depending on the complexity and specific needs of your project. These alternative formats provide better compatibility and simplified geometry, resulting in a smoother import process.
How do I fix common import errors when bringing logos into 3ds Max?
Import errors can stem from various issues, such as incompatible file versions, unsupported fonts, or complex paths. Always ensure that your Adobe Illustrator file is saved in an older version (AI version 8 or earlier) and that all text is converted to outlines. Simplifying complex paths in Illustrator before importing can also prevent geometry issues in 3ds Max.
Troubleshooting Steps:
- Check File Version: Verify that the AI file is saved in an older, more compatible version.
- Convert Text to Outlines: Ensure all text layers in Adobe Illustrator are converted to outlines to avoid font-related errors.
- Simplify Paths: Reduce complexity by simplifying paths and removing unnecessary anchor points in Illustrator.
- Check for Overlapping Shapes: Overlapping or self-intersecting shapes can cause issues. Use the Pathfinder panel in Illustrator to merge shapes into single, clean paths.
- Review Error Messages: Pay close attention to any error messages in 3ds Max, as they often provide clues to the problem.
What's the best way to add depth to a logo in 3ds Max?
The Extrude modifier is the primary tool for adding depth to a logo in 3ds Max. Select the imported shape, apply the Extrude modifier from the modifier list, and adjust the amount parameter to control the thickness of the logo.
Tips for Effective Extrusion:
- Adjust Amount Carefully: Experiment with different values to achieve the desired thickness for your logo.
- Increase Segments: Add more segments to smooth out curves and prevent jagged edges.
- Cap Start/End: Ensure the Cap Start and Cap End options are checked to create solid, closed shapes.
- Output Type: Set the output type to Mesh for better compatibility and easier editing.
Related Questions for Advancing Your 3D Logo Design Skills
How can I animate a 3D logo in 3ds Max for engaging content?
Animating a 3D logo in 3ds Max involves setting keyframes, adjusting animation curves, and utilizing various modifiers to create dynamic motion. Here's an outline of the process:
Prepare the Logo:
Ensure your 3D logo is properly modeled, with all parts correctly separated if you intend to animate them independently. Use the techniques described above to import your logo into 3ds Max.
Set Up Keyframes:
- Select the object you want to animate.
- Activate the Auto Key button at the bottom of the 3ds Max interface.
- Move the timeline slider to the first frame of your animation.
- Adjust the position, rotation, or scale of the object.
- Move the timeline slider to a different frame and repeat the adjustment. 3ds Max automatically creates a keyframe at each point.
Adjust Animation Curves:
Refine the animation by adjusting the animation curves in the Curve Editor. To access this:
- Go to Graph Editors > Track View - Curve Editor.
- Here, you can smooth out movements, add easing effects, and fine-tune the timing of your animation.
Modifiers for Dynamic Effects:
Incorporate modifiers like Bend, Twist, or Wave to add complexity and interest. Each modifier has parameters that can be animated over time.
Rendering:
Use high-quality rendering settings to output a polished animation. Animating a 3D logo can greatly enhance your brand's visual appeal, making it more memorable and engaging for your audience. Remember, practice and experimentation are key to mastering animation techniques in 3ds Max.


 Remodel AI Tutorial: Transforming Home Exteriors with AI Editing
Imagine being able to see your home's exterior transformed before you commit to any expensive renovations. That's exactly what Remodel AI offers with its revolutionary Exterior Editor. This tool harnesses the power of artificial intelligence to help you visualize and redesign your home's exterior ef
Remodel AI Tutorial: Transforming Home Exteriors with AI Editing
Imagine being able to see your home's exterior transformed before you commit to any expensive renovations. That's exactly what Remodel AI offers with its revolutionary Exterior Editor. This tool harnesses the power of artificial intelligence to help you visualize and redesign your home's exterior ef
 Weird Al's Polka Medley Collaboration: An In-Depth Look at the Animation
Step into the delightfully bizarre universe of Weird Al Yankovic's animated polka medley, where twelve iconic songs are reborn as polka parodies, crafted by fourteen visionary animators. Each segment of this medley is a feast for the eyes and ears, blending unique animation styles, clever song parod
Weird Al's Polka Medley Collaboration: An In-Depth Look at the Animation
Step into the delightfully bizarre universe of Weird Al Yankovic's animated polka medley, where twelve iconic songs are reborn as polka parodies, crafted by fourteen visionary animators. Each segment of this medley is a feast for the eyes and ears, blending unique animation styles, clever song parod
 AI Cold Calling: Streamline Lead Generation and Schedule Appointments
Are you tired of the endless cycle of manual tasks that come with traditional cold calling? Picture a world where an AI solution takes care of everything from finding leads to scheduling appointments, leaving you free to focus on what you do best—closing deals. This article explores the game-changin
AI Cold Calling: Streamline Lead Generation and Schedule Appointments
Are you tired of the endless cycle of manual tasks that come with traditional cold calling? Picture a world where an AI solution takes care of everything from finding leads to scheduling appointments, leaving you free to focus on what you do best—closing deals. This article explores the game-changin