


 Home
HomeMastering AI Image Editing: An In-Depth Look at Inpainting Technology
Artificial intelligence image generators are transforming the creative field, but initial results are often not flawless. This is where inpainting AI becomes essential, enabling targeted edits and refinements to AI-generated visuals. This guide provides a complete look at inpainting methods in AI image creation, covering how to alter, fix, and enhance details for professional-level outcomes. Whether you are an experienced AI artist or new to the process, learning inpainting AI is key to realizing your creative goals.
Key Points
Inpainting AI enables precise adjustments to AI-created images.
Using clear prompts is vital for successful inpainting.
The 'editing tab' in AI image tools usually includes inpainting features.
Improving specific areas with focused prompts increases image quality.
Inpainting connects AI generation with individual artistic direction.
Understanding Inpainting AI
What is Inpainting AI?

Inpainting AI is fundamentally an advanced technique for improving and perfecting AI-generated images. The word 'inpainting' describes the action of completing missing or undesirable parts of a picture, smoothly merging the new material with the current scene. For AI image generators, inpainting lets users focus on particular sections of a generated image for adjustment, correction, or improvement. This directed method provides unmatched control, allowing creators to fix flaws, add imaginative features, and customize the image to their precise requirements.
In essence, inpainting AI enables you to rewrite parts of an image using artificial intelligence. Rather than restarting entirely or using conventional photo editing software, you can direct the AI to rebuild or exchange components in the image according to your set conditions. This makes it a highly effective and adaptable tool for perfecting your AI artworks.
Consider it as digital reconstructive surgery for pictures. Need to eliminate a distracting item? Inpaint it out! Wish to alter a dress’s color? Inpaint the new shade! Want a new hairstyle for your AI-generated person? Inpainting allows this, all within the AI system.
The main functionalities are:
- Removing Unwanted Objects
- Correcting Imperfections
- Adding Creative Details
- Changing Colors and Textures
- Refining Specific Elements
The Importance of Prompts in Inpainting
Prompts are the core element of any AI Image Generator, and they hold equal importance in the inpainting process. A prompt is essentially a direction or command provided to the AI, influencing how an image is made or changed. With inpainting, prompts are even more critical because they determine how the AI will modify the chosen section. A carefully written prompt can result in natural and believable outcomes, whereas an unclear or badly phrased prompt might produce unexpected or unsatisfactory results.
To use inpainting AI efficiently, it is important to know how to create straightforward and exact prompts that properly explain your intended edits. This involves identifying the object or feature you want to change, the preferred qualities of the new element, and any relevant background or style details. The more exact and comprehensive your Prompt, the more effectively the AI will interpret and implement your idea.
For instance, to change a shirt's color in an image, your prompt could be: "Change the shirt color to deep blue, keeping the fabric texture and shadow effects." This prompt clearly identifies the focus object (the shirt), the intended adjustment (deep blue color), and key design limits (keeping fabric texture and shadows). This degree of detail aids the AI in creating a result that fits perfectly with the rest of the image.
In contrast, a less useful prompt might state: "Change the shirt." This unclear direction gives the AI too much freedom, possibly causing unplanned and undesired alterations to the shirt's design, texture, or general look.
- Clarity: Use simple and direct wording to prevent misunderstanding.
- Specificity: Identify the target object and desired modifications accurately.
- Context: Include pertinent stylistic or situational details.
- Experimentation: Be willing to test various prompts and improve your method.
- Iteration: Adjust prompts based on early results to reach the best outcome.
OpenArt's Inpainting AI: A Practical Guide
Locating the Inpainting AI Feature in OpenArt
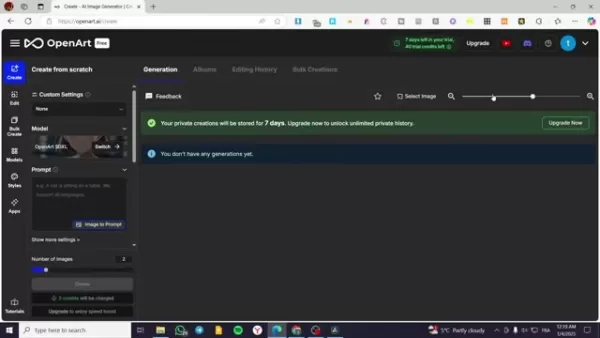
OpenArt is a capable AI image generator that includes a full set of tools, including inpainting functions. Locating the inpainting feature in the OpenArt interface is simple. Generally, you can find it in the 'Editing' tab or a comparable area for post-generation image adjustments. The specific placement might change slightly with platform updates, but it is normally easy to find and use.
After finding the inpainting tool, you will see a workspace where you can upload or pick your AI-generated image. From there, you can employ different selection tools to mark the particular area you wish to adjust. Openart generally provides several selection choices, such as:
- Brush Tool: For manually selecting and covering uneven shapes.
- Rectangle Tool: For marking rectangular sections precisely.
Lasso Tool: For making more detailed and personalized selection boundaries.
After selecting area, you can start to edit.
Step-by-Step Example: Using Inpainting AI in OpenArt
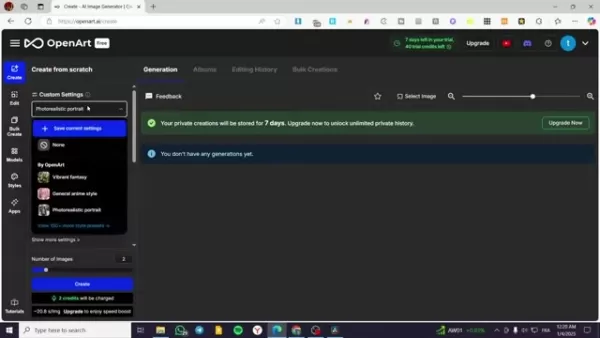
Let's go through a hands-on example of applying inpainting AI in OpenArt to upgrade an AI-generated image. Suppose we have a picture of a fashionable man walking on a New York street and we want to give him sunglasses. Here are the steps to adjust specific parts of your image in OpenArt:
- Upload or Select Image: Start by uploading your current AI-generated image to the OpenArt workspace or choosing a prior image from your OpenArt collection.
- Access the Editing Tab: Go to the 'Editing' tab in OpenArt. This section contains multiple image editing tools, including the inpainting AI function.
- Select the Inpainting Tool: Find the inpainting icon, usually shown as a brush or similar image, and click to start it.
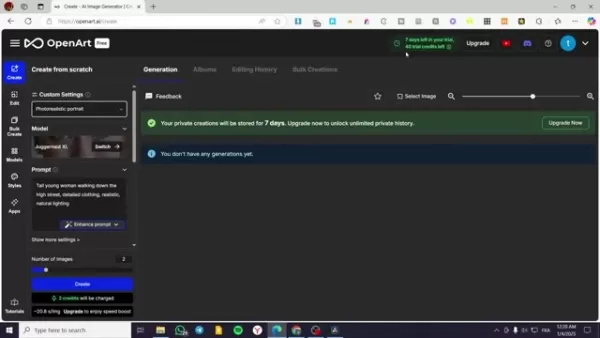
- Choose area for editing: First you need to choose which area you would like to edit. This time, we would like to change the face. In that case, you should select the face in the image
- Define Your Desired Output: Type a detailed prompt that explains the intended change. Here, your prompt might be: "Add realistic sunglasses with dark lenses and a timeless frame design."
- Adjust AI Settings (Optional): Based on the platform, you might have controls to modify factors like the AI's intensity, originality level, or style impact. Try these settings to perfect the output.
- Generate: Start the inpainting process. The AI will examine the chosen section and the prompt, producing a new version of the targeted part that blends naturally with the remaining image.
- Review and Refine: Assess the first result and make any needed modifications. You can improve the prompt, change AI settings, or select another area for inpainting to get the ideal appearance.As you can see on the screen, there are visual instructions about what you should do.
Tips for Mastering Inpainting AI
Effective Prompting Techniques
Creating strong prompts is necessary to achieve the intended outcome with inpainting AI. Be precise, applying descriptive terms to lead the AI and ensure uniformity with the nearby image.
Iterative Refinement
Avoid expecting the best outcome immediately. Test different prompts and settings, repeatedly improving your strategy for the best results.
Understanding AI Controls
Investigate the different options provided by your AI image generator, like strength, creativity, and style impact, to personalize the inpainting procedure.
The Advantages and Disadvantages of Inpainting AI
Pros
Precise Editing: Focus on particular sections for adjustment, providing detailed control.
Seamless Integration: AI-produced content merges smoothly with existing pictures.
Efficiency: Quicker than traditional photo editing methods.
Accessibility: Easy-to-use interfaces allow beginners to access it.
Cons
Prompt Dependency: Outcomes depend significantly on prompt quality.
Potential for Artifacts: Ineffective prompts or too many edits can cause visible artifacts.
Computational Cost: AI operations can demand significant resources, particularly for detailed edits.
Frequently Asked Questions
What is inpainting AI and how does it work?
Inpainting AI is an image editing method employing artificial intelligence to complete absent or undesirable portions of a picture. It functions by assessing adjacent pixels and creating fresh content that integrates smoothly with the current image.
Can I use inpainting AI to remove objects from an image?
Yes, a frequent application of inpainting AI is eliminating unwanted objects from an image. By marking the object and supplying a prompt that defines the preferred background, the AI can smartly fill the area, deleting the object and forming a natural-looking finish.
Is inpainting AI suitable for beginners?
Although advanced methods might need some skill, numerous AI image generators provide intuitive interfaces and preset selections that make inpainting AI approachable for novices. Testing and practice are crucial for learning the method.
Related Questions
What other AI image editing tools are available?
Besides inpainting, various AI-driven image editing tools exist, such as: Outpainting: Expands an image past its original edges.Style Transfer: Implements the artistic style of one image onto another.Image Enhancement: Boosts the general quality, resolution, or sharpness of an image.Object Segmentation: Recognizes and separates particular objects inside an image.
Related article
 Yaoke Media's First AIGC Drama 'The Mystery of the Bronze in Qinling' Launches Today with AI-Signed Leads
Today marks the official launch of Yaoke Media's AIGC fantasy mystery short drama, "The Secret Story of the Qinling Bronze." Starring the company's first two signed AI actors, Qin Lingyue and Lin Xiyanyan, the story unfolds in the enigmatic Qinling m
Satya Nadella ready to exploit new OpenAI deal
On Wednesday, a Wall Street analyst asked Microsoft CEO Satya Nadella directly how the revised OpenAI partnership would affect the company’s financials.Nadella described the new agreement as a win for everyone. “We feel good about our partnership wit
WordPress.com now allows AI agents to write and publish posts, plus more
WordPress.com, the popular web hosting and publishing platform, is now embracing AI agents—a move that could reshape the look and feel of the web. The company announced Friday that it will allow AI agents to draft, edit, and publish content on custom
Related Special Topic Recommendations
Business
Yaoke Media's First AIGC Drama 'The Mystery of the Bronze in Qinling' Launches Today with AI-Signed Leads
Today marks the official launch of Yaoke Media's AIGC fantasy mystery short drama, "The Secret Story of the Qinling Bronze." Starring the company's first two signed AI actors, Qin Lingyue and Lin Xiyanyan, the story unfolds in the enigmatic Qinling m
Satya Nadella ready to exploit new OpenAI deal
On Wednesday, a Wall Street analyst asked Microsoft CEO Satya Nadella directly how the revised OpenAI partnership would affect the company’s financials.Nadella described the new agreement as a win for everyone. “We feel good about our partnership wit
WordPress.com now allows AI agents to write and publish posts, plus more
WordPress.com, the popular web hosting and publishing platform, is now embracing AI agents—a move that could reshape the look and feel of the web. The company announced Friday that it will allow AI agents to draft, edit, and publish content on custom
Related Special Topic Recommendations
Business
 Best AI Expense Trackers: Scan Receipts & Categorize Corporate Spend Automatically
2026 Latest Best AI Expense Trackers: Top-rated tools to scan receipts & categorize corporate spend automatically. Discover powerful, game-changing solutions for effortless expense management, accurate financial tracking, and streamlined compliance. Our curated, weekly-updated comparison of free vs paid options helps you find the perfect fit. Unlock your AI edge with XIX.AI's expert picks.
 10 tools
 xix.ai
Business
Best AI Recruiting Tools: Screen Resumes & Automate Candidate Interview Scheduling
xix.ai
Business
Best AI Recruiting Tools: Screen Resumes & Automate Candidate Interview Scheduling
Discover the 2026 latest top-rated AI recruiting tools on XIX.AI. Our curated list features powerful, game-changing solutions for screening resumes and automating candidate interview scheduling. Compare free vs paid options with real-world tests and weekly updated rankings. Find your perfect hiring assistant and streamline your recruitment today!
10 tools
xix.ai
Productivity
AI Personal Wellness & Focus Coaches: Manage Burnout & Boost Mental Energy Levels
Discover the 2026 best AI personal wellness and focus coaches on XIX.AI. Our curated rankings feature top-rated, game-changing tools to manage burnout and boost mental energy. Compare free vs paid options with real-world insights. Unlock your path to peak productivity and well-being today.
10 tools
xix.ai
chatbot
Top-Rated AI Romantic Chatbots: Build Long-Term Relationships with Consistent Personalities
Discover the 2026 latest top-rated AI romantic chatbots for building genuine, long-term connections. Our curated list features powerful, consistent personalities, free vs paid comparisons, and real-world tests. Find your perfect companion and start building today at XIX.AI.
10 tools
xix.ai
Education and Learning
Best AI Data Science Mentors: Master SQL, Pandas & Machine Learning Workflows
Discover the 2026 best AI data science mentors to master SQL, Pandas & ML workflows. Explore our top-rated, curated selection at XIX.AI for powerful, game-changing guidance. Compare free vs paid options with real-world insights. Unlock your data science mastery today.
10 tools
xix.ai
chatbot
Best AI Flirting & Conversation Trainers: Improve Social Charisma and Confidence in Real-Time
Discover the 2026 best AI flirting and conversation trainers on XIX.AI. Our curated, top-rated selection helps you build social charisma and confidence in real-time. Explore must-try, game-changing tools with free vs paid comparisons and weekly updated rankings. Unlock your social edge today.
10 tools
xix.ai

 Comments (0)
0/500
Comments (0)
0/500
Artificial intelligence image generators are transforming the creative field, but initial results are often not flawless. This is where inpainting AI becomes essential, enabling targeted edits and refinements to AI-generated visuals. This guide provides a complete look at inpainting methods in AI image creation, covering how to alter, fix, and enhance details for professional-level outcomes. Whether you are an experienced AI artist or new to the process, learning inpainting AI is key to realizing your creative goals.
Key Points
Inpainting AI enables precise adjustments to AI-created images.
Using clear prompts is vital for successful inpainting.
The 'editing tab' in AI image tools usually includes inpainting features.
Improving specific areas with focused prompts increases image quality.
Inpainting connects AI generation with individual artistic direction.
Understanding Inpainting AI
What is Inpainting AI?
Inpainting AI is fundamentally an advanced technique for improving and perfecting AI-generated images. The word 'inpainting' describes the action of completing missing or undesirable parts of a picture, smoothly merging the new material with the current scene. For AI image generators, inpainting lets users focus on particular sections of a generated image for adjustment, correction, or improvement. This directed method provides unmatched control, allowing creators to fix flaws, add imaginative features, and customize the image to their precise requirements.
In essence, inpainting AI enables you to rewrite parts of an image using artificial intelligence. Rather than restarting entirely or using conventional photo editing software, you can direct the AI to rebuild or exchange components in the image according to your set conditions. This makes it a highly effective and adaptable tool for perfecting your AI artworks.
Consider it as digital reconstructive surgery for pictures. Need to eliminate a distracting item? Inpaint it out! Wish to alter a dress’s color? Inpaint the new shade! Want a new hairstyle for your AI-generated person? Inpainting allows this, all within the AI system.
The main functionalities are:
- Removing Unwanted Objects
- Correcting Imperfections
- Adding Creative Details
- Changing Colors and Textures
- Refining Specific Elements
The Importance of Prompts in Inpainting
Prompts are the core element of any AI Image Generator, and they hold equal importance in the inpainting process. A prompt is essentially a direction or command provided to the AI, influencing how an image is made or changed. With inpainting, prompts are even more critical because they determine how the AI will modify the chosen section. A carefully written prompt can result in natural and believable outcomes, whereas an unclear or badly phrased prompt might produce unexpected or unsatisfactory results.
To use inpainting AI efficiently, it is important to know how to create straightforward and exact prompts that properly explain your intended edits. This involves identifying the object or feature you want to change, the preferred qualities of the new element, and any relevant background or style details. The more exact and comprehensive your Prompt, the more effectively the AI will interpret and implement your idea.
For instance, to change a shirt's color in an image, your prompt could be: "Change the shirt color to deep blue, keeping the fabric texture and shadow effects." This prompt clearly identifies the focus object (the shirt), the intended adjustment (deep blue color), and key design limits (keeping fabric texture and shadows). This degree of detail aids the AI in creating a result that fits perfectly with the rest of the image.
In contrast, a less useful prompt might state: "Change the shirt." This unclear direction gives the AI too much freedom, possibly causing unplanned and undesired alterations to the shirt's design, texture, or general look.
- Clarity: Use simple and direct wording to prevent misunderstanding.
- Specificity: Identify the target object and desired modifications accurately.
- Context: Include pertinent stylistic or situational details.
- Experimentation: Be willing to test various prompts and improve your method.
- Iteration: Adjust prompts based on early results to reach the best outcome.
OpenArt's Inpainting AI: A Practical Guide
Locating the Inpainting AI Feature in OpenArt
OpenArt is a capable AI image generator that includes a full set of tools, including inpainting functions. Locating the inpainting feature in the OpenArt interface is simple. Generally, you can find it in the 'Editing' tab or a comparable area for post-generation image adjustments. The specific placement might change slightly with platform updates, but it is normally easy to find and use.
After finding the inpainting tool, you will see a workspace where you can upload or pick your AI-generated image. From there, you can employ different selection tools to mark the particular area you wish to adjust. Openart generally provides several selection choices, such as:
- Brush Tool: For manually selecting and covering uneven shapes.
- Rectangle Tool: For marking rectangular sections precisely.
Lasso Tool: For making more detailed and personalized selection boundaries.
After selecting area, you can start to edit.
Step-by-Step Example: Using Inpainting AI in OpenArt
Let's go through a hands-on example of applying inpainting AI in OpenArt to upgrade an AI-generated image. Suppose we have a picture of a fashionable man walking on a New York street and we want to give him sunglasses. Here are the steps to adjust specific parts of your image in OpenArt:
- Upload or Select Image: Start by uploading your current AI-generated image to the OpenArt workspace or choosing a prior image from your OpenArt collection.
- Access the Editing Tab: Go to the 'Editing' tab in OpenArt. This section contains multiple image editing tools, including the inpainting AI function.
- Select the Inpainting Tool: Find the inpainting icon, usually shown as a brush or similar image, and click to start it.
- Choose area for editing: First you need to choose which area you would like to edit. This time, we would like to change the face. In that case, you should select the face in the image
- Define Your Desired Output: Type a detailed prompt that explains the intended change. Here, your prompt might be: "Add realistic sunglasses with dark lenses and a timeless frame design."
- Adjust AI Settings (Optional): Based on the platform, you might have controls to modify factors like the AI's intensity, originality level, or style impact. Try these settings to perfect the output.
- Generate: Start the inpainting process. The AI will examine the chosen section and the prompt, producing a new version of the targeted part that blends naturally with the remaining image.
- Review and Refine: Assess the first result and make any needed modifications. You can improve the prompt, change AI settings, or select another area for inpainting to get the ideal appearance.As you can see on the screen, there are visual instructions about what you should do.
Tips for Mastering Inpainting AI
Effective Prompting Techniques
Creating strong prompts is necessary to achieve the intended outcome with inpainting AI. Be precise, applying descriptive terms to lead the AI and ensure uniformity with the nearby image.
Iterative Refinement
Avoid expecting the best outcome immediately. Test different prompts and settings, repeatedly improving your strategy for the best results.
Understanding AI Controls
Investigate the different options provided by your AI image generator, like strength, creativity, and style impact, to personalize the inpainting procedure.
The Advantages and Disadvantages of Inpainting AI
Pros
Precise Editing: Focus on particular sections for adjustment, providing detailed control.
Seamless Integration: AI-produced content merges smoothly with existing pictures.
Efficiency: Quicker than traditional photo editing methods.
Accessibility: Easy-to-use interfaces allow beginners to access it.
Cons
Prompt Dependency: Outcomes depend significantly on prompt quality.
Potential for Artifacts: Ineffective prompts or too many edits can cause visible artifacts.
Computational Cost: AI operations can demand significant resources, particularly for detailed edits.
Frequently Asked Questions
What is inpainting AI and how does it work?
Inpainting AI is an image editing method employing artificial intelligence to complete absent or undesirable portions of a picture. It functions by assessing adjacent pixels and creating fresh content that integrates smoothly with the current image.
Can I use inpainting AI to remove objects from an image?
Yes, a frequent application of inpainting AI is eliminating unwanted objects from an image. By marking the object and supplying a prompt that defines the preferred background, the AI can smartly fill the area, deleting the object and forming a natural-looking finish.
Is inpainting AI suitable for beginners?
Although advanced methods might need some skill, numerous AI image generators provide intuitive interfaces and preset selections that make inpainting AI approachable for novices. Testing and practice are crucial for learning the method.
Related Questions
What other AI image editing tools are available?
Besides inpainting, various AI-driven image editing tools exist, such as: Outpainting: Expands an image past its original edges.Style Transfer: Implements the artistic style of one image onto another.Image Enhancement: Boosts the general quality, resolution, or sharpness of an image.Object Segmentation: Recognizes and separates particular objects inside an image.


 Yaoke Media's First AIGC Drama 'The Mystery of the Bronze in Qinling' Launches Today with AI-Signed Leads
Today marks the official launch of Yaoke Media's AIGC fantasy mystery short drama, "The Secret Story of the Qinling Bronze." Starring the company's first two signed AI actors, Qin Lingyue and Lin Xiyanyan, the story unfolds in the enigmatic Qinling m
Yaoke Media's First AIGC Drama 'The Mystery of the Bronze in Qinling' Launches Today with AI-Signed Leads
Today marks the official launch of Yaoke Media's AIGC fantasy mystery short drama, "The Secret Story of the Qinling Bronze." Starring the company's first two signed AI actors, Qin Lingyue and Lin Xiyanyan, the story unfolds in the enigmatic Qinling m
 Satya Nadella ready to exploit new OpenAI deal
On Wednesday, a Wall Street analyst asked Microsoft CEO Satya Nadella directly how the revised OpenAI partnership would affect the company’s financials.Nadella described the new agreement as a win for everyone. “We feel good about our partnership wit
Satya Nadella ready to exploit new OpenAI deal
On Wednesday, a Wall Street analyst asked Microsoft CEO Satya Nadella directly how the revised OpenAI partnership would affect the company’s financials.Nadella described the new agreement as a win for everyone. “We feel good about our partnership wit
 WordPress.com now allows AI agents to write and publish posts, plus more
WordPress.com, the popular web hosting and publishing platform, is now embracing AI agents—a move that could reshape the look and feel of the web. The company announced Friday that it will allow AI agents to draft, edit, and publish content on custom
WordPress.com now allows AI agents to write and publish posts, plus more
WordPress.com, the popular web hosting and publishing platform, is now embracing AI agents—a move that could reshape the look and feel of the web. The company announced Friday that it will allow AI agents to draft, edit, and publish content on custom

2026 Latest Best AI Expense Trackers: Top-rated tools to scan receipts & categorize corporate spend automatically. Discover powerful, game-changing solutions for effortless expense management, accurate financial tracking, and streamlined compliance. Our curated, weekly-updated comparison of free vs paid options helps you find the perfect fit. Unlock your AI edge with XIX.AI's expert picks.
10 tools
xix.ai
Discover the 2026 latest top-rated AI recruiting tools on XIX.AI. Our curated list features powerful, game-changing solutions for screening resumes and automating candidate interview scheduling. Compare free vs paid options with real-world tests and weekly updated rankings. Find your perfect hiring assistant and streamline your recruitment today!
10 tools
xix.ai
Discover the 2026 best AI personal wellness and focus coaches on XIX.AI. Our curated rankings feature top-rated, game-changing tools to manage burnout and boost mental energy. Compare free vs paid options with real-world insights. Unlock your path to peak productivity and well-being today.
10 tools
xix.ai
Discover the 2026 latest top-rated AI romantic chatbots for building genuine, long-term connections. Our curated list features powerful, consistent personalities, free vs paid comparisons, and real-world tests. Find your perfect companion and start building today at XIX.AI.
10 tools
xix.ai

Discover the 2026 best AI data science mentors to master SQL, Pandas & ML workflows. Explore our top-rated, curated selection at XIX.AI for powerful, game-changing guidance. Compare free vs paid options with real-world insights. Unlock your data science mastery today.
10 tools
xix.ai

Discover the 2026 best AI flirting and conversation trainers on XIX.AI. Our curated, top-rated selection helps you build social charisma and confidence in real-time. Explore must-try, game-changing tools with free vs paid comparisons and weekly updated rankings. Unlock your social edge today.
10 tools
xix.ai


