


 Home
HomeAI Voice Changer: Transform Your Voice in Real-Time
Ever wondered what it would be like to sound like your favorite YouTuber, an anime character, or even a celebrity? With AI voice changer software, you can transform your voice in real time, opening up a world of possibilities for content creation, gaming, and online interactions. In this blog, we'll dive into how you can harness the power of AI to morph your voice into something entirely new and exciting.
Key Points
- AI voice changer software enables real-time voice transformation.
- Tools like W-Okada's Voice Changer provide a variety of voice models to choose from.
- You can download voice models from platforms such as Hugging Face.
- A virtual audio cable can help integrate the AI voice changer with other applications like Discord.
- Experimentation and fine-tuning are crucial to finding the perfect settings and models for your unique voice.
Getting Started with AI Voice Changers
What is an AI Voice Changer?
An AI Voice Changer is a software tool that uses artificial intelligence to modify the characteristics of your voice in real-time or near real-time. It can change the pitch, tone, and timbre to mimic another person or create an entirely new vocal identity. These tools leverage advanced machine learning techniques like Voice Cloning and deep learning to analyze and manipulate audio signals. With the rise of online voice changer apps, their popularity is soaring.

AI voice changers are incredibly versatile. Gamers use them for anonymity or to role-play characters, content creators use them for voice-overs and narrations, and musicians experiment with unique vocal effects. As technology continues to evolve, the potential applications are endless.
Popular AI Voice Changer: W-Okada's Voice Changer
W-Okada's Voice Changer is a powerful tool that lets you transform your voice using AI. It's compatible with Windows, Mac, and Linux. Let's walk through how to get started with this software.

Downloading W-Okada's Voice Changer
- Access the Download Link: Head over to W-Okada’s GitHub page and scroll down to find the download link. You'll find it in the description below, just click on it—it's the top link.
- Choose the Correct Version: Scroll to the chart at the bottom. If you have a dedicated graphics card, go for the Windows CUDA version. There's also a Mac version available.
- Dealing with Download Issues: This software is popular, so you might need to download it from Hugging Face or Google Drive. It's just a zip file, so don't worry.
Once you've downloaded the file, extract it to a dedicated folder on your computer. Keeping things organized makes the process smoother.
Downloading the Software: It's a big file, and since I already have it installed, I'll cancel my download. But you'll want to let it finish—it's safe, I promise.
Downloading and Configuring Voice Models
The real fun begins with the variety of voice models you can use. Here's how to get them set up:
- Creating the Required Folders: While the zip file is downloading, create a new folder to house all your AI voice changer files. Once the download is complete, move the zip file into this folder and create another folder named "models."
- Where to Get These Voice Models: You'll need voice models for this to work. We'll show you how to download them once the program is up and running. The tutorial recommends using a Discord Server for this.
- What to Do After Making All the Folders: After placing the zip file in your new folder, extract it. You'll see a bunch of files inside.
- Start the Program: The main file you need to focus on is at the bottom, named "start_http.bat." Just double-click it to start the program, and you won't need to go back into that folder unless you're troubleshooting.
- Start Command Prompts: When you double-click "start_http.bat," it will open a command prompt. Let it load; it might be slow at first.
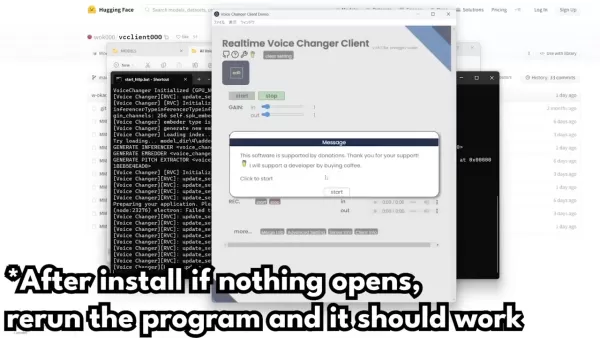
- Open App Window: Depending on your Python setup, it might take a while to install everything. If Windows tries to block it, click "More info" and then "Run anyway." You'll also need to allow access through your firewall when prompted.
- What to Do if the App Does Not Open: If you run into issues, remember that the software uses Pytorch. You might need to look up tutorials on how to install Pytorch. If the app doesn't open, just rerun it to try again.
Configure the Software
Interface Basics:
Once you're in the actual voice changer, here's what you'll see:
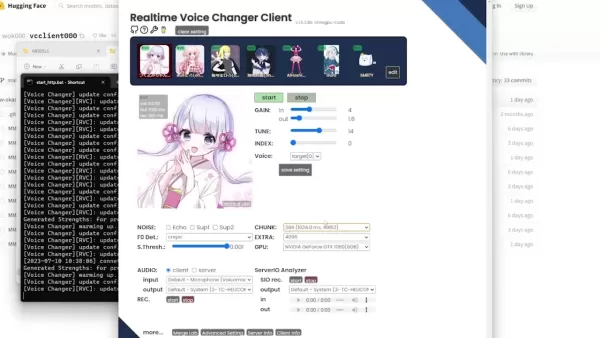
- Built-in Voices: The four voices at the top are the preloaded starting options.
- Already Imported Voices: These are three voices I've already installed. I'll guide you through adding a fourth one as we go through the settings.
Models Setting: If the model you have works with the software, great! If not, you might need to tweak the settings a bit. 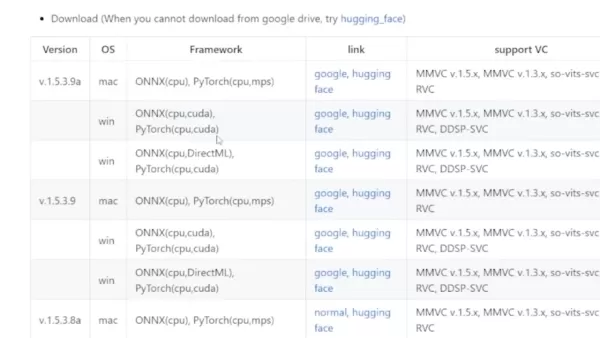
The Japanese models often sound better in Japanese than in English, but usually, English works best. To properly set up an individual character, follow these steps:
Step-by-Step Tuning Guide:
- Check the Settings: Ensure your input and output are set to your default settings. The input should be your microphone, and the output should be your default headphone or speaker setting.
- Audio Output: This setting determines how many seconds the audio will be output. We'll cover the rest of the basic settings later. For now, leave everything else the same and see how it sounds.
- Troubleshooting: You might notice it takes a few seconds to start up. Switching from Harvest to Crepe can improve the sound and make the cut-off less harsh.
- The Chunky Voice: To avoid choppy or bad-sounding voices, adjust your volume. If the issue persists, use your graphics settings to make the game run smoother.
Setting Description Gain Adjust the input and output volume of the voice Tune Modifies the pitch to better fit individual voices Index Tries to match the voice with a person or individual
Remember, if you haven't checked your GPU settings, make sure to select your GPU instead of your CPU for faster performance.
Related article
 WordPress.com now allows AI agents to write and publish posts, plus more
WordPress.com, the popular web hosting and publishing platform, is now embracing AI agents—a move that could reshape the look and feel of the web. The company announced Friday that it will allow AI agents to draft, edit, and publish content on custom
Anthropic's experimental AI Claude completes negotiations and transactions in e-commerce test
As artificial intelligence advances rapidly, Anthropic quietly rolled out an internal experiment called "Project Deal" last Friday, showcasing AI's potential in e-commerce. The experiment had its AI model Claude autonomously handle buying, selling, a
DeepSeek Code poised for launch
As AI technology accelerates, DeepSeek is at a thrilling juncture. The AI company recently revealed it has secured over 70 billion yuan in funding. Leadership has emphasized a commitment to groundbreaking AI research over immediate commercial gains.
Related Special Topic Recommendations
Business
WordPress.com now allows AI agents to write and publish posts, plus more
WordPress.com, the popular web hosting and publishing platform, is now embracing AI agents—a move that could reshape the look and feel of the web. The company announced Friday that it will allow AI agents to draft, edit, and publish content on custom
Anthropic's experimental AI Claude completes negotiations and transactions in e-commerce test
As artificial intelligence advances rapidly, Anthropic quietly rolled out an internal experiment called "Project Deal" last Friday, showcasing AI's potential in e-commerce. The experiment had its AI model Claude autonomously handle buying, selling, a
DeepSeek Code poised for launch
As AI technology accelerates, DeepSeek is at a thrilling juncture. The AI company recently revealed it has secured over 70 billion yuan in funding. Leadership has emphasized a commitment to groundbreaking AI research over immediate commercial gains.
Related Special Topic Recommendations
Business
 Best AI Expense Trackers: Scan Receipts & Categorize Corporate Spend Automatically
2026 Latest Best AI Expense Trackers: Top-rated tools to scan receipts & categorize corporate spend automatically. Discover powerful, game-changing solutions for effortless expense management, accurate financial tracking, and streamlined compliance. Our curated, weekly-updated comparison of free vs paid options helps you find the perfect fit. Unlock your AI edge with XIX.AI's expert picks.
 10 tools
 xix.ai
Business
Best AI Recruiting Tools: Screen Resumes & Automate Candidate Interview Scheduling
xix.ai
Business
Best AI Recruiting Tools: Screen Resumes & Automate Candidate Interview Scheduling
Discover the 2026 latest top-rated AI recruiting tools on XIX.AI. Our curated list features powerful, game-changing solutions for screening resumes and automating candidate interview scheduling. Compare free vs paid options with real-world tests and weekly updated rankings. Find your perfect hiring assistant and streamline your recruitment today!
10 tools
xix.ai
Productivity
AI Personal Wellness & Focus Coaches: Manage Burnout & Boost Mental Energy Levels
Discover the 2026 best AI personal wellness and focus coaches on XIX.AI. Our curated rankings feature top-rated, game-changing tools to manage burnout and boost mental energy. Compare free vs paid options with real-world insights. Unlock your path to peak productivity and well-being today.
10 tools
xix.ai
chatbot
Top-Rated AI Romantic Chatbots: Build Long-Term Relationships with Consistent Personalities
Discover the 2026 latest top-rated AI romantic chatbots for building genuine, long-term connections. Our curated list features powerful, consistent personalities, free vs paid comparisons, and real-world tests. Find your perfect companion and start building today at XIX.AI.
10 tools
xix.ai
Education and Learning
Best AI Data Science Mentors: Master SQL, Pandas & Machine Learning Workflows
Discover the 2026 best AI data science mentors to master SQL, Pandas & ML workflows. Explore our top-rated, curated selection at XIX.AI for powerful, game-changing guidance. Compare free vs paid options with real-world insights. Unlock your data science mastery today.
10 tools
xix.ai
chatbot
Best AI Flirting & Conversation Trainers: Improve Social Charisma and Confidence in Real-Time
Discover the 2026 best AI flirting and conversation trainers on XIX.AI. Our curated, top-rated selection helps you build social charisma and confidence in real-time. Explore must-try, game-changing tools with free vs paid comparisons and weekly updated rankings. Unlock your social edge today.
10 tools
xix.ai

 Comments (4)
0/500
Comments (4)
0/500
![DavidMartínez]()
這技術太酷了吧!實時變聲讓直播和遊戲互動多了好多樂趣,不過要是被濫用來冒充他人就麻煩了... 大家覺得該怎麼防範這種風險呢?🤔
![KennethRoberts]()
Unglaublich, wie weit diese Technik schon ist! Aber mal ehrlich, gibt es nicht auch ein großes Missbrauchspotenzial? Stell dir vor, jemand imitiert die Stimme eines Politikers... 🧐
![RyanGonzalez]()
This AI voice changer sounds like a game-changer for streamers! I can’t wait to troll my friends in Discord as a celebrity voice. 😎 But, is it easy to use or just overhyped tech?
![FredWhite]()
This AI voice changer sounds like a game-changer for streamers! Imagine trolling in games with a celebrity voice—hilarious! But, is it too good to be true? 🤔 Worried about misuse in scams or deepfakes.
Ever wondered what it would be like to sound like your favorite YouTuber, an anime character, or even a celebrity? With AI voice changer software, you can transform your voice in real time, opening up a world of possibilities for content creation, gaming, and online interactions. In this blog, we'll dive into how you can harness the power of AI to morph your voice into something entirely new and exciting.
Key Points
- AI voice changer software enables real-time voice transformation.
- Tools like W-Okada's Voice Changer provide a variety of voice models to choose from.
- You can download voice models from platforms such as Hugging Face.
- A virtual audio cable can help integrate the AI voice changer with other applications like Discord.
- Experimentation and fine-tuning are crucial to finding the perfect settings and models for your unique voice.
Getting Started with AI Voice Changers
What is an AI Voice Changer?
An AI Voice Changer is a software tool that uses artificial intelligence to modify the characteristics of your voice in real-time or near real-time. It can change the pitch, tone, and timbre to mimic another person or create an entirely new vocal identity. These tools leverage advanced machine learning techniques like Voice Cloning and deep learning to analyze and manipulate audio signals. With the rise of online voice changer apps, their popularity is soaring.
AI voice changers are incredibly versatile. Gamers use them for anonymity or to role-play characters, content creators use them for voice-overs and narrations, and musicians experiment with unique vocal effects. As technology continues to evolve, the potential applications are endless.
Popular AI Voice Changer: W-Okada's Voice Changer
W-Okada's Voice Changer is a powerful tool that lets you transform your voice using AI. It's compatible with Windows, Mac, and Linux. Let's walk through how to get started with this software.
Downloading W-Okada's Voice Changer
- Access the Download Link: Head over to W-Okada’s GitHub page and scroll down to find the download link. You'll find it in the description below, just click on it—it's the top link.
- Choose the Correct Version: Scroll to the chart at the bottom. If you have a dedicated graphics card, go for the Windows CUDA version. There's also a Mac version available.
- Dealing with Download Issues: This software is popular, so you might need to download it from Hugging Face or Google Drive. It's just a zip file, so don't worry.
Once you've downloaded the file, extract it to a dedicated folder on your computer. Keeping things organized makes the process smoother.
Downloading the Software: It's a big file, and since I already have it installed, I'll cancel my download. But you'll want to let it finish—it's safe, I promise.
Downloading and Configuring Voice Models
The real fun begins with the variety of voice models you can use. Here's how to get them set up:
- Creating the Required Folders: While the zip file is downloading, create a new folder to house all your AI voice changer files. Once the download is complete, move the zip file into this folder and create another folder named "models."
- Where to Get These Voice Models: You'll need voice models for this to work. We'll show you how to download them once the program is up and running. The tutorial recommends using a Discord Server for this.
- What to Do After Making All the Folders: After placing the zip file in your new folder, extract it. You'll see a bunch of files inside.
- Start the Program: The main file you need to focus on is at the bottom, named "start_http.bat." Just double-click it to start the program, and you won't need to go back into that folder unless you're troubleshooting.
- Start Command Prompts: When you double-click "start_http.bat," it will open a command prompt. Let it load; it might be slow at first.
- Open App Window: Depending on your Python setup, it might take a while to install everything. If Windows tries to block it, click "More info" and then "Run anyway." You'll also need to allow access through your firewall when prompted.
- What to Do if the App Does Not Open: If you run into issues, remember that the software uses Pytorch. You might need to look up tutorials on how to install Pytorch. If the app doesn't open, just rerun it to try again.
Configure the Software
Interface Basics:
Once you're in the actual voice changer, here's what you'll see:
- Built-in Voices: The four voices at the top are the preloaded starting options.
- Already Imported Voices: These are three voices I've already installed. I'll guide you through adding a fourth one as we go through the settings.
Models Setting: If the model you have works with the software, great! If not, you might need to tweak the settings a bit.
The Japanese models often sound better in Japanese than in English, but usually, English works best. To properly set up an individual character, follow these steps:
Step-by-Step Tuning Guide:
- Check the Settings: Ensure your input and output are set to your default settings. The input should be your microphone, and the output should be your default headphone or speaker setting.
- Audio Output: This setting determines how many seconds the audio will be output. We'll cover the rest of the basic settings later. For now, leave everything else the same and see how it sounds.
- Troubleshooting: You might notice it takes a few seconds to start up. Switching from Harvest to Crepe can improve the sound and make the cut-off less harsh.
- The Chunky Voice: To avoid choppy or bad-sounding voices, adjust your volume. If the issue persists, use your graphics settings to make the game run smoother.
| Setting | Description |
|---|---|
| Gain | Adjust the input and output volume of the voice |
| Tune | Modifies the pitch to better fit individual voices |
| Index | Tries to match the voice with a person or individual |
Remember, if you haven't checked your GPU settings, make sure to select your GPU instead of your CPU for faster performance.


 WordPress.com now allows AI agents to write and publish posts, plus more
WordPress.com, the popular web hosting and publishing platform, is now embracing AI agents—a move that could reshape the look and feel of the web. The company announced Friday that it will allow AI agents to draft, edit, and publish content on custom
WordPress.com now allows AI agents to write and publish posts, plus more
WordPress.com, the popular web hosting and publishing platform, is now embracing AI agents—a move that could reshape the look and feel of the web. The company announced Friday that it will allow AI agents to draft, edit, and publish content on custom
 Anthropic's experimental AI Claude completes negotiations and transactions in e-commerce test
As artificial intelligence advances rapidly, Anthropic quietly rolled out an internal experiment called "Project Deal" last Friday, showcasing AI's potential in e-commerce. The experiment had its AI model Claude autonomously handle buying, selling, a
Anthropic's experimental AI Claude completes negotiations and transactions in e-commerce test
As artificial intelligence advances rapidly, Anthropic quietly rolled out an internal experiment called "Project Deal" last Friday, showcasing AI's potential in e-commerce. The experiment had its AI model Claude autonomously handle buying, selling, a
 DeepSeek Code poised for launch
As AI technology accelerates, DeepSeek is at a thrilling juncture. The AI company recently revealed it has secured over 70 billion yuan in funding. Leadership has emphasized a commitment to groundbreaking AI research over immediate commercial gains.
DeepSeek Code poised for launch
As AI technology accelerates, DeepSeek is at a thrilling juncture. The AI company recently revealed it has secured over 70 billion yuan in funding. Leadership has emphasized a commitment to groundbreaking AI research over immediate commercial gains.

2026 Latest Best AI Expense Trackers: Top-rated tools to scan receipts & categorize corporate spend automatically. Discover powerful, game-changing solutions for effortless expense management, accurate financial tracking, and streamlined compliance. Our curated, weekly-updated comparison of free vs paid options helps you find the perfect fit. Unlock your AI edge with XIX.AI's expert picks.
10 tools
xix.ai

Discover the 2026 latest top-rated AI recruiting tools on XIX.AI. Our curated list features powerful, game-changing solutions for screening resumes and automating candidate interview scheduling. Compare free vs paid options with real-world tests and weekly updated rankings. Find your perfect hiring assistant and streamline your recruitment today!
10 tools
xix.ai
Discover the 2026 best AI personal wellness and focus coaches on XIX.AI. Our curated rankings feature top-rated, game-changing tools to manage burnout and boost mental energy. Compare free vs paid options with real-world insights. Unlock your path to peak productivity and well-being today.
10 tools
xix.ai
Discover the 2026 latest top-rated AI romantic chatbots for building genuine, long-term connections. Our curated list features powerful, consistent personalities, free vs paid comparisons, and real-world tests. Find your perfect companion and start building today at XIX.AI.
10 tools
xix.ai

Discover the 2026 best AI data science mentors to master SQL, Pandas & ML workflows. Explore our top-rated, curated selection at XIX.AI for powerful, game-changing guidance. Compare free vs paid options with real-world insights. Unlock your data science mastery today.
10 tools
xix.ai

Discover the 2026 best AI flirting and conversation trainers on XIX.AI. Our curated, top-rated selection helps you build social charisma and confidence in real-time. Explore must-try, game-changing tools with free vs paid comparisons and weekly updated rankings. Unlock your social edge today.
10 tools
xix.ai

這技術太酷了吧!實時變聲讓直播和遊戲互動多了好多樂趣,不過要是被濫用來冒充他人就麻煩了... 大家覺得該怎麼防範這種風險呢?🤔
Unglaublich, wie weit diese Technik schon ist! Aber mal ehrlich, gibt es nicht auch ein großes Missbrauchspotenzial? Stell dir vor, jemand imitiert die Stimme eines Politikers... 🧐
This AI voice changer sounds like a game-changer for streamers! I can’t wait to troll my friends in Discord as a celebrity voice. 😎 But, is it easy to use or just overhyped tech?
This AI voice changer sounds like a game-changer for streamers! Imagine trolling in games with a celebrity voice—hilarious! But, is it too good to be true? 🤔 Worried about misuse in scams or deepfakes.


