Step-by-Step Guide to Creating Player Highlight Effects in Filmora

 May 3, 2025

 MarkWilson

 1
1
Creating player highlight effects can significantly boost the visual appeal and engagement of sports videos. Whether you're a coach analyzing player performance or a content creator looking to captivate your audience, mastering these effects is crucial. Filmora, with its easy-to-use interface and robust features, offers a great platform for both beginners and seasoned editors to create professional-quality player highlight effects. This guide will walk you through the process step-by-step, helping you make your sports videos stand out.
Key Points
- Learn to use Filmora's motion tracking feature to accurately follow players.
- Discover how to add spotlight and circle highlight effects to emphasize key players.
- Explore Filmora's templates for quick and easy sports video creation.
- Understand how to adjust opacity and blending modes for the best visual results.
- Find out how to customize text, scores, and other elements for a polished finish.
Understanding Player Highlight Effects in Video Editing
What are Player Highlight Effects?
Player highlight effects are visual techniques used to draw attention to specific players during a game or event. These can range from simple spotlights to more intricate animations and graphics that track the player's movements. The aim is to highlight key moments and performances, making the video more engaging and informative for viewers. These effects are often seen in sports broadcasts, highlight reels, and training videos to showcase standout plays or analyze specific player actions.
Creating effective player highlight effects involves several key steps:
- Motion Tracking: Accurately tracking the player's movements throughout the scene.
- Visual Emphasis: Using visual cues like circles, spotlights, or color changes to highlight the player.
- Customization: Adding text, scores, and other graphics to provide context and information.
- Refinement: Adjusting opacity, blending modes, and other settings to achieve the desired visual impact.
By mastering these techniques, you can turn ordinary sports footage into compelling narratives that capture the excitement and drama of the game. Understanding these concepts will help you create videos that entertain and provide valuable insights for players, coaches, and fans. With the demand for engaging sports content at an all-time high, knowing how to create player highlight effects is a valuable skill in today's digital world.
Player highlight effects serve multiple purposes. They not only enhance the visual experience but also guide viewers' attention to critical actions within a dynamic scene. In a fast-paced game, it's easy to miss subtle yet crucial plays, and highlights ensure viewers catch the most impactful moments.
Moreover, these effects can be tailored to specific audiences. Coaches can use detailed highlight reels to provide feedback and identify areas for improvement. Fans enjoy the polished and engaging experience, which can deepen their connection to the sport and the athletes. Ultimately, well-executed player highlight effects elevate the storytelling aspect of sports videos, making them more memorable and impactful.
Why Use Filmora for Creating Highlight Effects?
Filmora is an excellent choice for creating player highlight effects due to its intuitive interface and powerful features. Unlike more complex video editing software, Filmora has a gentle learning curve, making it accessible to users of all skill levels.
Its drag-and-drop functionality and pre-built templates streamline the editing process, allowing you to quickly create professional-quality videos without extensive training. Here are several reasons why Filmora stands out:
- User-Friendly Interface: Filmora's clean and intuitive interface makes it easy to navigate and find the tools you need.
- Motion Tracking: The motion tracking feature allows you to accurately follow players' movements, ensuring your highlight effects stay on target.
- Pre-built Templates: Filmora offers a variety of templates specifically designed for sports videos, saving you time and effort.
- Customization Options: You can customize text, colors, and graphics to match your brand or team's aesthetic.
- Affordable Pricing: Filmora offers competitive pricing plans, making it an accessible option for individuals and small businesses.
Filmora's strength lies in balancing simplicity with functionality. It provides a robust set of tools without overwhelming the user, making it perfect for creating engaging player highlight effects. Whether you're editing a short clip for social media or creating a comprehensive highlight reel, Filmora equips you with the features needed to achieve a professional and polished result. Additionally, Filmora regularly updates its software to incorporate new trends and technologies, ensuring you always have access to the latest tools and effects. The availability of extensive tutorials and support further enhances the user experience, providing assistance whenever you need it.
Another compelling reason to choose Filmora is its versatility. While it excels at creating sports highlight videos, it is equally capable of handling a wide range of video editing tasks. This makes it a valuable tool for anyone involved in content creation, regardless of their specific niche. Filmora's comprehensive feature set, combined with its ease of use, ensures you can consistently produce high-quality videos that capture your audience's attention.
Elevating Sports Video with Color Grading Techniques
Understanding Color Grading and Its Importance
Color grading is a critical aspect of video editing that can dramatically impact the visual appeal and emotional resonance of your content. In sports videos, effective color grading can amplify the intensity of the game, highlight key moments, and create a consistent brand aesthetic. This section will guide you through fundamental color grading techniques to transform your sports footage.
Why Color Grading Matters
Color grading involves adjusting the colors, tones, and overall look of your video to achieve a specific mood or style. It's not just about making the video look pretty; it's about enhancing the narrative and creating an immersive viewing experience. In sports videos, color grading can:
- Enhance Excitement: Boost saturation and contrast to make action sequences more thrilling.
- Create Consistency: Ensure different shots blend seamlessly, even if filmed under varying conditions.
- Reflect Brand Identity: Use a specific color palette to align with your team's colors or brand.
- Highlight Player Performance: Draw attention to key moments by adjusting colors to create emphasis.
By mastering color grading, you can elevate your sports videos from amateur footage to professional productions that captivate and engage your audience.
Basic Color Correction vs. Color Grading
Before diving into advanced techniques, it's essential to understand the difference between color correction and color grading:
- Color Correction: Focuses on fixing issues like incorrect exposure, white balance, and contrast to ensure the footage looks natural.
- Color Grading: Involves creative adjustments to enhance the aesthetic and convey a specific mood or style.
Think of color correction as the foundation upon which color grading builds. You need to correct any technical issues in your footage before you can start making creative color adjustments.
Color Grading in Filmora
Filmora provides a robust set of color grading tools that are easy to use and can significantly enhance your sports videos. Let's explore some essential techniques:
Step-by-Step: Applying Color Grading Techniques
Now that you understand the importance and basics of color grading, let's walk through a step-by-step process using Filmora:
- Import Your Footage
Start by importing your sports footage into Filmora and placing it on the timeline. Ensure your project settings match the resolution and frame rate of your video to avoid any quality loss.
- Access Color Correction Tools
Select the video clip on the timeline and click on the "Color" icon in the toolbar. This will open the Color Correction panel, where you can access a variety of tools.
- Basic Adjustments
Begin with basic color correction to fix any technical issues in your footage:
- White Balance: Adjust the temperature and tint to ensure colors look natural.
- Exposure: Control the overall brightness of the shot.
- Contrast: Adjust the difference between the highlights and shadows to enhance detail.
- Highlights and Shadows: Fine-tune the brightness of the brightest and darkest parts of the image.
- Whites and Blacks: Set the white and black points to ensure a full tonal range.
Start by adjusting the white balance to correct any color casts. Use the temperature and tint sliders to achieve a natural look. Next, adjust the exposure and contrast to ensure the footage is properly lit and has sufficient detail. Pay close attention to the highlights and shadows, fine-tuning them to balance the brightness of the image.
- Creative Color Grading
Once you've corrected the basic issues, you can start making creative color adjustments to enhance the aesthetic:
- Saturation: Increase or decrease the intensity of the colors to achieve a specific mood.
- Vibrance: Adjust the intensity of the more muted colors without affecting the already saturated ones.
- HSL (Hue, Saturation, Luminance): Adjust the hue, saturation, and luminance of individual colors to create a unique color palette.
For sports videos, consider boosting the saturation and vibrance to make the action more thrilling. Adjust the HSL settings to fine-tune individual colors, creating a distinct look for your footage.
- LUTs (Lookup Tables)
Filmora also supports LUTs, which are pre-designed color grades that you can apply to your footage. You can find LUTs online or create your own to achieve a specific style quickly.
- Import LUTs: Click on the "Advanced" tab in the Color Correction panel and select "Load 3D LUT." Choose the LUT file you want to apply.
LUTs can be a quick and easy way to apply a consistent color grade to all your footage. However, it's important to adjust the settings to match the specific characteristics of your shots.
- Advanced Adjustments
For more precise control, use the Advanced Color Correction tools:
- Curves: Adjust the tonal range of your footage using curves.
- Color Wheels: Fine-tune the colors in the shadows, midtones, and highlights.
The Curves tool allows you to precisely control the tonal range of your footage, creating subtle or dramatic effects. The Color Wheels enable you to fine-tune the colors in the shadows, midtones, and highlights, creating a balanced and harmonious look.
- Apply to All Footage
Once you've achieved a color grade you're happy with, you can apply it to all your footage to ensure consistency. Copy the color correction settings from the first clip and paste them onto the other clips.
Adjust the settings as needed to match the specific characteristics of each shot.
- Export Your Video
Finally, export your video and enjoy the result of your efforts!
By following these steps, you can use Filmora's color grading tools to transform your sports footage and create visually stunning videos that captivate your audience.
Step-by-Step Guide: Creating a Player Highlight Effect in Filmora
Step 1: Importing Your Footage
The first step in creating a player highlight effect is importing your footage into Filmora. Start by opening Filmora and creating a new project. Then, click on the "Import" button to select the video file you want to edit.
Filmora supports a wide range of video formats, so you shouldn't have any issues importing your footage. Once your video is imported, drag and drop it onto the timeline at the bottom of the screen. This is where you'll be making all your edits. Ensure the video is properly aligned and trimmed to the section you want to highlight. Clear organization at this stage sets the foundation for a smooth editing process.
Before proceeding, take a moment to review your footage. Identify the key moments where you want to apply the highlight effects. This will help you plan your edits and ensure you don't miss any important plays. Good preparation is key to efficient and effective video editing.
For those new to Filmora, familiarizing yourself with the interface is crucial. The timeline is your main workspace, but also pay attention to the toolbar at the top, which includes essential tools like trimming, cropping, and color correction. Understanding these basic functions will enhance your editing workflow and enable you to create more polished highlight videos.
Moreover, consider the resolution and frame rate of your footage. Adjusting your project settings to match these specifications can prevent quality loss during the editing process. This ensures your final video retains the clarity and sharpness of the original footage.
Step 2: Using Motion Tracking
Motion tracking is a crucial feature for accurately highlighting players. To use it, select your video clip in the timeline and click on the "Video AI Tools". Find the Motion Tracking option and adjust the size of the tracking box to fit snugly around the player you want to highlight.
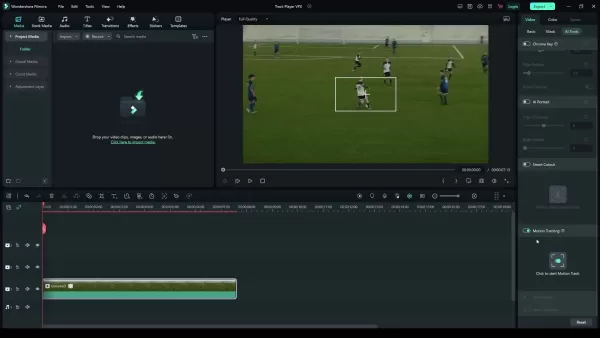
Click "Start tracking" and let Filmora analyze the footage. This feature automatically follows the player's movements, making the highlight effect stay precisely on the target. If the tracking isn't perfect, you can manually adjust the tracking points. This ensures the effect remains accurate even when the player's movements are complex or partially obscured. Precise motion tracking is essential for creating a professional-looking highlight video.
Motion tracking saves a significant amount of time compared to manually adjusting the highlight effect frame by frame. It also results in a smoother, more consistent highlight that enhances the viewing experience. The accuracy and reliability of Filmora's motion tracking make it a standout feature for sports video editing.
Consider using motion tracking in conjunction with other editing techniques, such as stabilization, to create even more polished and professional videos. This combination can significantly improve the overall quality and engagement of your content.
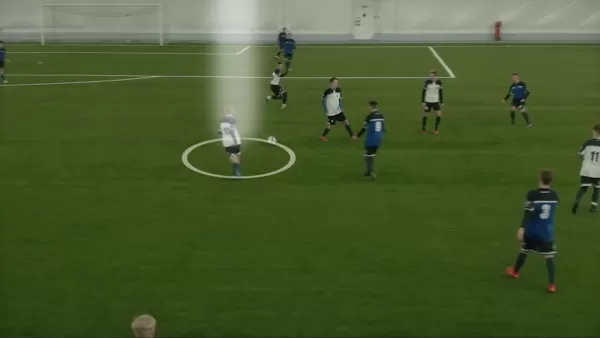
Step 3: Adding Spotlight and Circle Highlight Effects
After motion tracking, add visual elements to highlight the player. A common technique is using a spotlight or a circle. While Filmora has limited built-in options, you can find these as PNG images online.
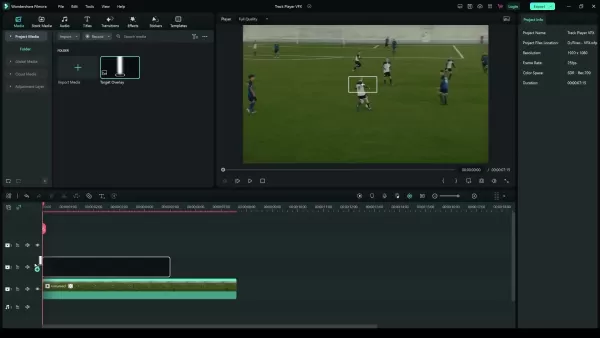
Search for "border white circle" and "God rays" on Google Images, then import your chosen highlight image into Filmora. Drag the highlight image onto a new layer in the timeline above your video. Adjust its size and position so it perfectly surrounds the player. Use the blending mode "Screen" to remove the black background from the image and adjust the opacity to around 50% to create a subtle, yet effective, highlight.
You can also use other shapes or effects to draw attention to the player. Experiment with different colors, sizes, and animations to find what works best for your video. The key is to make the highlight visually appealing without being too distracting. A well-placed highlight effect can significantly enhance the viewing experience, making key plays more impactful.
Step 4: Linking the Highlight to Motion Tracking
To ensure the highlight effect follows the player, link it to the motion tracking data. Select the original video clip in the timeline, then navigate back to the motion tracking settings. In the "Track Element" section, select the layer containing your highlight image.
This links the highlight effect to the tracked player's movement, ensuring it stays synchronized throughout the scene. Once linked, you might need to fine-tune the size and position of the highlight effect. Use the Transform settings to make these adjustments, ensuring the highlight remains properly aligned with the player. This final touch is essential for creating a professional-looking highlight effect.
By linking the highlight effect to the motion tracking data, you ensure a seamless and accurate visual emphasis that enhances the viewing experience. This technique is a cornerstone of effective sports video editing, allowing you to draw attention to key players and moments with precision.
Step 5: Adding Text, Scores, and Other Graphics
To provide context and information, add text, scores, and other graphics to your highlight video. Filmora offers a variety of text templates and graphic elements that you can easily customize. Navigate to the "Titles" and "Elements" tabs to explore the available options.
Drag your chosen text template onto a new layer in the timeline. Customize the text to display the player's name, score, or any other relevant information. Adjust the font, size, color, and position to match your video's aesthetic. Ensure the text is readable and doesn't obstruct the view of the action. Adding clear and concise text can significantly enhance the viewer's understanding and engagement.
Similarly, you can add graphic elements like arrows, circles, or animations to further emphasize key moments. These elements can help illustrate player movements, tactical strategies, or important statistics. Use these graphics sparingly to avoid cluttering the screen and distracting from the main action.
Remember to synchronize the text and graphics with the video. Use Filmora's timeline to precisely align these elements with the relevant moments, ensuring they appear at the right time and disappear when no longer needed. Effective use of text and graphics can transform a simple highlight video into a compelling and informative piece of content.
Step 6: Using Built-in Templates for a Professional Look
Filmora offers several built-in templates specifically designed for sports videos. These templates can save you time and effort by providing pre-designed layouts, animations, and effects. To use them, navigate to the "Templates" tab and search for "sport opener".
Drag your chosen template onto the timeline and replace the placeholder content with your own footage, text, and graphics. Customize the template to match your brand or team's aesthetic. Adjust the colors, fonts, and graphic elements to create a cohesive and professional look. Filmora's templates are highly customizable, allowing you to create unique videos that stand out from the crowd.
While templates can be a great starting point, it's important to add your own personal touch to make the video truly unique. Experiment with different effects, transitions, and animations to create a video that reflects your style and vision. Over-reliance on templates can result in generic-looking videos, so strive for a balance between convenience and creativity.
Templates are an excellent resource for quickly creating professional-quality sports videos. They provide a solid foundation for your edits and save you countless hours of design work. By leveraging Filmora's templates, you can produce engaging and visually appealing content with minimal effort.
Step 7: Final Refinements and Exporting
Before exporting your video, take time to make any final refinements. Adjust the volume levels, color correction, and transition effects to ensure a polished and professional result. Preview your video multiple times to catch any errors or inconsistencies.
Once you're satisfied with your edits, click on the "Export" button. Choose your desired video format, resolution, and frame rate. Filmora offers a variety of export presets optimized for different platforms, such as YouTube, Vimeo, and social media. Select the preset that best suits your needs or customize your own settings.
Be mindful of the file size and video quality. Higher resolutions and frame rates will result in larger file sizes and longer upload times, but they will also provide a better viewing experience. Strike a balance between these factors to ensure your video looks great without being too cumbersome to share.
After exporting, review your video one last time to ensure everything looks and sounds as intended. If you spot any issues, go back to Filmora and make the necessary adjustments. This final check is essential for delivering a high-quality product.
By following these steps, you can create compelling player highlight effects that captivate your audience and elevate your sports videos. Filmora's user-friendly interface and powerful features make this process accessible to editors of all skill levels, enabling you to produce professional-quality content with ease.
Related article
 Top 5 AI Content Detectors That Consistently Identify AI-Generated Text
Back in January 2023, I delved into the fascinating world of AI-generated plagiarism and the tools designed to combat it. At that time, the buzz around generative AI was just starting to pick up steam. Fast forward to now, and I've got a fresh update on my hands, reflecting the latest developments i
Launch NFT Projects with Creator Lab: A No-Code Platform
If you're an innovative NFT creator eager to launch your project but feel overwhelmed by the tech side of things, Creator Lab is here to help. This no-code platform is tailored for creators like you, enabling you to bring your NFT projects to life without writing a single line of code. In this detai
Build Your Own AI Assistant for LinkedIn Automation Using n8n and Telegram
Ever felt overwhelmed by the constant need to manage your LinkedIn account? Dreamed of a virtual assistant that could take care of connection requests, follow-up messages, and content management? Thanks to the marvels of AI, that dream can become a reality. In this blog post, we'll explore how you c
Comments (0)
0/200
Top 5 AI Content Detectors That Consistently Identify AI-Generated Text
Back in January 2023, I delved into the fascinating world of AI-generated plagiarism and the tools designed to combat it. At that time, the buzz around generative AI was just starting to pick up steam. Fast forward to now, and I've got a fresh update on my hands, reflecting the latest developments i
Launch NFT Projects with Creator Lab: A No-Code Platform
If you're an innovative NFT creator eager to launch your project but feel overwhelmed by the tech side of things, Creator Lab is here to help. This no-code platform is tailored for creators like you, enabling you to bring your NFT projects to life without writing a single line of code. In this detai
Build Your Own AI Assistant for LinkedIn Automation Using n8n and Telegram
Ever felt overwhelmed by the constant need to manage your LinkedIn account? Dreamed of a virtual assistant that could take care of connection requests, follow-up messages, and content management? Thanks to the marvels of AI, that dream can become a reality. In this blog post, we'll explore how you c
Comments (0)
0/200
May 3, 2025
MarkWilson
1
Creating player highlight effects can significantly boost the visual appeal and engagement of sports videos. Whether you're a coach analyzing player performance or a content creator looking to captivate your audience, mastering these effects is crucial. Filmora, with its easy-to-use interface and robust features, offers a great platform for both beginners and seasoned editors to create professional-quality player highlight effects. This guide will walk you through the process step-by-step, helping you make your sports videos stand out.
Key Points
- Learn to use Filmora's motion tracking feature to accurately follow players.
- Discover how to add spotlight and circle highlight effects to emphasize key players.
- Explore Filmora's templates for quick and easy sports video creation.
- Understand how to adjust opacity and blending modes for the best visual results.
- Find out how to customize text, scores, and other elements for a polished finish.
Understanding Player Highlight Effects in Video Editing
What are Player Highlight Effects?
Player highlight effects are visual techniques used to draw attention to specific players during a game or event. These can range from simple spotlights to more intricate animations and graphics that track the player's movements. The aim is to highlight key moments and performances, making the video more engaging and informative for viewers. These effects are often seen in sports broadcasts, highlight reels, and training videos to showcase standout plays or analyze specific player actions.
Creating effective player highlight effects involves several key steps:
- Motion Tracking: Accurately tracking the player's movements throughout the scene.
- Visual Emphasis: Using visual cues like circles, spotlights, or color changes to highlight the player.
- Customization: Adding text, scores, and other graphics to provide context and information.
- Refinement: Adjusting opacity, blending modes, and other settings to achieve the desired visual impact.
By mastering these techniques, you can turn ordinary sports footage into compelling narratives that capture the excitement and drama of the game. Understanding these concepts will help you create videos that entertain and provide valuable insights for players, coaches, and fans. With the demand for engaging sports content at an all-time high, knowing how to create player highlight effects is a valuable skill in today's digital world.
Player highlight effects serve multiple purposes. They not only enhance the visual experience but also guide viewers' attention to critical actions within a dynamic scene. In a fast-paced game, it's easy to miss subtle yet crucial plays, and highlights ensure viewers catch the most impactful moments.
Moreover, these effects can be tailored to specific audiences. Coaches can use detailed highlight reels to provide feedback and identify areas for improvement. Fans enjoy the polished and engaging experience, which can deepen their connection to the sport and the athletes. Ultimately, well-executed player highlight effects elevate the storytelling aspect of sports videos, making them more memorable and impactful.
Why Use Filmora for Creating Highlight Effects?
Filmora is an excellent choice for creating player highlight effects due to its intuitive interface and powerful features. Unlike more complex video editing software, Filmora has a gentle learning curve, making it accessible to users of all skill levels.
Its drag-and-drop functionality and pre-built templates streamline the editing process, allowing you to quickly create professional-quality videos without extensive training. Here are several reasons why Filmora stands out:
- User-Friendly Interface: Filmora's clean and intuitive interface makes it easy to navigate and find the tools you need.
- Motion Tracking: The motion tracking feature allows you to accurately follow players' movements, ensuring your highlight effects stay on target.
- Pre-built Templates: Filmora offers a variety of templates specifically designed for sports videos, saving you time and effort.
- Customization Options: You can customize text, colors, and graphics to match your brand or team's aesthetic.
- Affordable Pricing: Filmora offers competitive pricing plans, making it an accessible option for individuals and small businesses.
Filmora's strength lies in balancing simplicity with functionality. It provides a robust set of tools without overwhelming the user, making it perfect for creating engaging player highlight effects. Whether you're editing a short clip for social media or creating a comprehensive highlight reel, Filmora equips you with the features needed to achieve a professional and polished result. Additionally, Filmora regularly updates its software to incorporate new trends and technologies, ensuring you always have access to the latest tools and effects. The availability of extensive tutorials and support further enhances the user experience, providing assistance whenever you need it.
Another compelling reason to choose Filmora is its versatility. While it excels at creating sports highlight videos, it is equally capable of handling a wide range of video editing tasks. This makes it a valuable tool for anyone involved in content creation, regardless of their specific niche. Filmora's comprehensive feature set, combined with its ease of use, ensures you can consistently produce high-quality videos that capture your audience's attention.
Elevating Sports Video with Color Grading Techniques
Understanding Color Grading and Its Importance
Color grading is a critical aspect of video editing that can dramatically impact the visual appeal and emotional resonance of your content. In sports videos, effective color grading can amplify the intensity of the game, highlight key moments, and create a consistent brand aesthetic. This section will guide you through fundamental color grading techniques to transform your sports footage.
Why Color Grading Matters
Color grading involves adjusting the colors, tones, and overall look of your video to achieve a specific mood or style. It's not just about making the video look pretty; it's about enhancing the narrative and creating an immersive viewing experience. In sports videos, color grading can:
- Enhance Excitement: Boost saturation and contrast to make action sequences more thrilling.
- Create Consistency: Ensure different shots blend seamlessly, even if filmed under varying conditions.
- Reflect Brand Identity: Use a specific color palette to align with your team's colors or brand.
- Highlight Player Performance: Draw attention to key moments by adjusting colors to create emphasis.
By mastering color grading, you can elevate your sports videos from amateur footage to professional productions that captivate and engage your audience.
Basic Color Correction vs. Color Grading
Before diving into advanced techniques, it's essential to understand the difference between color correction and color grading:
- Color Correction: Focuses on fixing issues like incorrect exposure, white balance, and contrast to ensure the footage looks natural.
- Color Grading: Involves creative adjustments to enhance the aesthetic and convey a specific mood or style.
Think of color correction as the foundation upon which color grading builds. You need to correct any technical issues in your footage before you can start making creative color adjustments.
Color Grading in Filmora
Filmora provides a robust set of color grading tools that are easy to use and can significantly enhance your sports videos. Let's explore some essential techniques:
Step-by-Step: Applying Color Grading Techniques
Now that you understand the importance and basics of color grading, let's walk through a step-by-step process using Filmora:
- Import Your Footage
Start by importing your sports footage into Filmora and placing it on the timeline. Ensure your project settings match the resolution and frame rate of your video to avoid any quality loss.
- Access Color Correction Tools
Select the video clip on the timeline and click on the "Color" icon in the toolbar. This will open the Color Correction panel, where you can access a variety of tools.
- Basic Adjustments
Begin with basic color correction to fix any technical issues in your footage:
- White Balance: Adjust the temperature and tint to ensure colors look natural.
- Exposure: Control the overall brightness of the shot.
- Contrast: Adjust the difference between the highlights and shadows to enhance detail.
- Highlights and Shadows: Fine-tune the brightness of the brightest and darkest parts of the image.
- Whites and Blacks: Set the white and black points to ensure a full tonal range.
Start by adjusting the white balance to correct any color casts. Use the temperature and tint sliders to achieve a natural look. Next, adjust the exposure and contrast to ensure the footage is properly lit and has sufficient detail. Pay close attention to the highlights and shadows, fine-tuning them to balance the brightness of the image.
- Creative Color Grading
Once you've corrected the basic issues, you can start making creative color adjustments to enhance the aesthetic:
- Saturation: Increase or decrease the intensity of the colors to achieve a specific mood.
- Vibrance: Adjust the intensity of the more muted colors without affecting the already saturated ones.
- HSL (Hue, Saturation, Luminance): Adjust the hue, saturation, and luminance of individual colors to create a unique color palette.
For sports videos, consider boosting the saturation and vibrance to make the action more thrilling. Adjust the HSL settings to fine-tune individual colors, creating a distinct look for your footage.
- LUTs (Lookup Tables)
Filmora also supports LUTs, which are pre-designed color grades that you can apply to your footage. You can find LUTs online or create your own to achieve a specific style quickly.
- Import LUTs: Click on the "Advanced" tab in the Color Correction panel and select "Load 3D LUT." Choose the LUT file you want to apply.
LUTs can be a quick and easy way to apply a consistent color grade to all your footage. However, it's important to adjust the settings to match the specific characteristics of your shots.
- Advanced Adjustments
For more precise control, use the Advanced Color Correction tools:
- Curves: Adjust the tonal range of your footage using curves.
- Color Wheels: Fine-tune the colors in the shadows, midtones, and highlights.
The Curves tool allows you to precisely control the tonal range of your footage, creating subtle or dramatic effects. The Color Wheels enable you to fine-tune the colors in the shadows, midtones, and highlights, creating a balanced and harmonious look.
- Apply to All Footage
Once you've achieved a color grade you're happy with, you can apply it to all your footage to ensure consistency. Copy the color correction settings from the first clip and paste them onto the other clips.
Adjust the settings as needed to match the specific characteristics of each shot.
- Export Your Video
Finally, export your video and enjoy the result of your efforts!
By following these steps, you can use Filmora's color grading tools to transform your sports footage and create visually stunning videos that captivate your audience.
Step-by-Step Guide: Creating a Player Highlight Effect in Filmora
Step 1: Importing Your Footage
The first step in creating a player highlight effect is importing your footage into Filmora. Start by opening Filmora and creating a new project. Then, click on the "Import" button to select the video file you want to edit.
Filmora supports a wide range of video formats, so you shouldn't have any issues importing your footage. Once your video is imported, drag and drop it onto the timeline at the bottom of the screen. This is where you'll be making all your edits. Ensure the video is properly aligned and trimmed to the section you want to highlight. Clear organization at this stage sets the foundation for a smooth editing process.
Before proceeding, take a moment to review your footage. Identify the key moments where you want to apply the highlight effects. This will help you plan your edits and ensure you don't miss any important plays. Good preparation is key to efficient and effective video editing.
For those new to Filmora, familiarizing yourself with the interface is crucial. The timeline is your main workspace, but also pay attention to the toolbar at the top, which includes essential tools like trimming, cropping, and color correction. Understanding these basic functions will enhance your editing workflow and enable you to create more polished highlight videos.
Moreover, consider the resolution and frame rate of your footage. Adjusting your project settings to match these specifications can prevent quality loss during the editing process. This ensures your final video retains the clarity and sharpness of the original footage.
Step 2: Using Motion Tracking
Motion tracking is a crucial feature for accurately highlighting players. To use it, select your video clip in the timeline and click on the "Video AI Tools". Find the Motion Tracking option and adjust the size of the tracking box to fit snugly around the player you want to highlight.
Click "Start tracking" and let Filmora analyze the footage. This feature automatically follows the player's movements, making the highlight effect stay precisely on the target. If the tracking isn't perfect, you can manually adjust the tracking points. This ensures the effect remains accurate even when the player's movements are complex or partially obscured. Precise motion tracking is essential for creating a professional-looking highlight video.
Motion tracking saves a significant amount of time compared to manually adjusting the highlight effect frame by frame. It also results in a smoother, more consistent highlight that enhances the viewing experience. The accuracy and reliability of Filmora's motion tracking make it a standout feature for sports video editing.
Consider using motion tracking in conjunction with other editing techniques, such as stabilization, to create even more polished and professional videos. This combination can significantly improve the overall quality and engagement of your content.
Step 3: Adding Spotlight and Circle Highlight Effects
After motion tracking, add visual elements to highlight the player. A common technique is using a spotlight or a circle. While Filmora has limited built-in options, you can find these as PNG images online.
Search for "border white circle" and "God rays" on Google Images, then import your chosen highlight image into Filmora. Drag the highlight image onto a new layer in the timeline above your video. Adjust its size and position so it perfectly surrounds the player. Use the blending mode "Screen" to remove the black background from the image and adjust the opacity to around 50% to create a subtle, yet effective, highlight.
You can also use other shapes or effects to draw attention to the player. Experiment with different colors, sizes, and animations to find what works best for your video. The key is to make the highlight visually appealing without being too distracting. A well-placed highlight effect can significantly enhance the viewing experience, making key plays more impactful.
Step 4: Linking the Highlight to Motion Tracking
To ensure the highlight effect follows the player, link it to the motion tracking data. Select the original video clip in the timeline, then navigate back to the motion tracking settings. In the "Track Element" section, select the layer containing your highlight image.
This links the highlight effect to the tracked player's movement, ensuring it stays synchronized throughout the scene. Once linked, you might need to fine-tune the size and position of the highlight effect. Use the Transform settings to make these adjustments, ensuring the highlight remains properly aligned with the player. This final touch is essential for creating a professional-looking highlight effect.
By linking the highlight effect to the motion tracking data, you ensure a seamless and accurate visual emphasis that enhances the viewing experience. This technique is a cornerstone of effective sports video editing, allowing you to draw attention to key players and moments with precision.
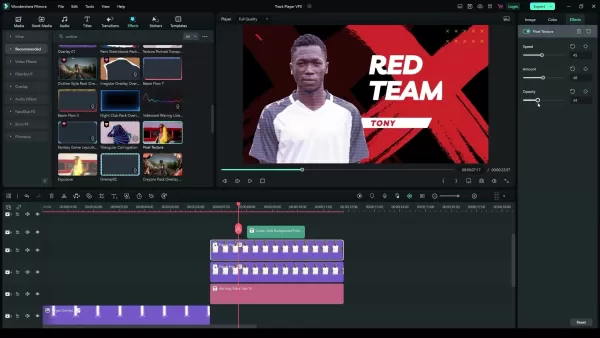
Step 5: Adding Text, Scores, and Other Graphics
To provide context and information, add text, scores, and other graphics to your highlight video. Filmora offers a variety of text templates and graphic elements that you can easily customize. Navigate to the "Titles" and "Elements" tabs to explore the available options.
Drag your chosen text template onto a new layer in the timeline. Customize the text to display the player's name, score, or any other relevant information. Adjust the font, size, color, and position to match your video's aesthetic. Ensure the text is readable and doesn't obstruct the view of the action. Adding clear and concise text can significantly enhance the viewer's understanding and engagement.
Similarly, you can add graphic elements like arrows, circles, or animations to further emphasize key moments. These elements can help illustrate player movements, tactical strategies, or important statistics. Use these graphics sparingly to avoid cluttering the screen and distracting from the main action.
Remember to synchronize the text and graphics with the video. Use Filmora's timeline to precisely align these elements with the relevant moments, ensuring they appear at the right time and disappear when no longer needed. Effective use of text and graphics can transform a simple highlight video into a compelling and informative piece of content.
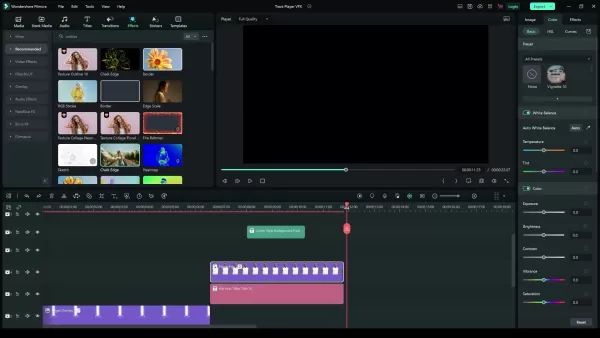
Step 6: Using Built-in Templates for a Professional Look
Filmora offers several built-in templates specifically designed for sports videos. These templates can save you time and effort by providing pre-designed layouts, animations, and effects. To use them, navigate to the "Templates" tab and search for "sport opener".
Drag your chosen template onto the timeline and replace the placeholder content with your own footage, text, and graphics. Customize the template to match your brand or team's aesthetic. Adjust the colors, fonts, and graphic elements to create a cohesive and professional look. Filmora's templates are highly customizable, allowing you to create unique videos that stand out from the crowd.
While templates can be a great starting point, it's important to add your own personal touch to make the video truly unique. Experiment with different effects, transitions, and animations to create a video that reflects your style and vision. Over-reliance on templates can result in generic-looking videos, so strive for a balance between convenience and creativity.
Templates are an excellent resource for quickly creating professional-quality sports videos. They provide a solid foundation for your edits and save you countless hours of design work. By leveraging Filmora's templates, you can produce engaging and visually appealing content with minimal effort.
Step 7: Final Refinements and Exporting
Before exporting your video, take time to make any final refinements. Adjust the volume levels, color correction, and transition effects to ensure a polished and professional result. Preview your video multiple times to catch any errors or inconsistencies.
Once you're satisfied with your edits, click on the "Export" button. Choose your desired video format, resolution, and frame rate. Filmora offers a variety of export presets optimized for different platforms, such as YouTube, Vimeo, and social media. Select the preset that best suits your needs or customize your own settings.
Be mindful of the file size and video quality. Higher resolutions and frame rates will result in larger file sizes and longer upload times, but they will also provide a better viewing experience. Strike a balance between these factors to ensure your video looks great without being too cumbersome to share.
After exporting, review your video one last time to ensure everything looks and sounds as intended. If you spot any issues, go back to Filmora and make the necessary adjustments. This final check is essential for delivering a high-quality product.
By following these steps, you can create compelling player highlight effects that captivate your audience and elevate your sports videos. Filmora's user-friendly interface and powerful features make this process accessible to editors of all skill levels, enabling you to produce professional-quality content with ease.


 Top 5 AI Content Detectors That Consistently Identify AI-Generated Text
Back in January 2023, I delved into the fascinating world of AI-generated plagiarism and the tools designed to combat it. At that time, the buzz around generative AI was just starting to pick up steam. Fast forward to now, and I've got a fresh update on my hands, reflecting the latest developments i
Top 5 AI Content Detectors That Consistently Identify AI-Generated Text
Back in January 2023, I delved into the fascinating world of AI-generated plagiarism and the tools designed to combat it. At that time, the buzz around generative AI was just starting to pick up steam. Fast forward to now, and I've got a fresh update on my hands, reflecting the latest developments i
 Launch NFT Projects with Creator Lab: A No-Code Platform
If you're an innovative NFT creator eager to launch your project but feel overwhelmed by the tech side of things, Creator Lab is here to help. This no-code platform is tailored for creators like you, enabling you to bring your NFT projects to life without writing a single line of code. In this detai
Launch NFT Projects with Creator Lab: A No-Code Platform
If you're an innovative NFT creator eager to launch your project but feel overwhelmed by the tech side of things, Creator Lab is here to help. This no-code platform is tailored for creators like you, enabling you to bring your NFT projects to life without writing a single line of code. In this detai
 Build Your Own AI Assistant for LinkedIn Automation Using n8n and Telegram
Ever felt overwhelmed by the constant need to manage your LinkedIn account? Dreamed of a virtual assistant that could take care of connection requests, follow-up messages, and content management? Thanks to the marvels of AI, that dream can become a reality. In this blog post, we'll explore how you c
Build Your Own AI Assistant for LinkedIn Automation Using n8n and Telegram
Ever felt overwhelmed by the constant need to manage your LinkedIn account? Dreamed of a virtual assistant that could take care of connection requests, follow-up messages, and content management? Thanks to the marvels of AI, that dream can become a reality. In this blog post, we'll explore how you c