Launch NFT Projects with Creator Lab: A No-Code Platform

 May 4, 2025

 DouglasAdams

 9
9
If you're an innovative NFT creator eager to launch your project but feel overwhelmed by the tech side of things, Creator Lab is here to help. This no-code platform is tailored for creators like you, enabling you to bring your NFT projects to life without writing a single line of code. In this detailed guide, we'll take you through the process of creating and deploying your NFT smart contract using Creator Lab. Get ready to transform your creative visions into tangible digital assets with just a few clicks!
Key Points
- Creator Lab is a no-code platform designed for NFT creation.
- It allows you to launch NFT projects without coding skills.
- The platform simplifies the process of generating smart contracts.
- Users can easily customize project configurations.
- It provides the ability to test the smart contract before deployment.
- Creator Lab enables NFT minting directly from Etherscan.
- The final outcome is an NFT collection available on OpenSea.
- The alpha launch includes an easy-to-follow tutorial.
Understanding Creator Lab: A No-Code NFT Platform
What is Creator Lab?
Creator Lab is a game-changer for NFT creators. It's a codeless platform that lets you launch NFT projects without getting bogged down by blockchain complexities. By simplifying the creation and deployment of NFT smart contracts, it opens up a world of possibilities for artists, designers, and anyone with a creative spark, regardless of their coding expertise. With Creator Lab, you can focus on crafting stunning digital assets, while the platform handles the techy stuff behind the scenes.

Creator Lab empowers creators by eliminating the need for deep programming knowledge. Its user-friendly interface and intuitive tools streamline the entire NFT project lifecycle. From setting up your initial project parameters to deploying your smart contract on the blockchain, Creator Lab makes each step straightforward, ensuring that even those without a tech background can successfully launch their projects.
The platform's simplicity doesn't mean it skimps on features. NFT creators can customize various project aspects, like collection size, token symbol, and whitelisting options, to match their unique vision and goals. This customization ensures that each project stands out while enjoying the benefits of a no-code approach. Creator Lab's mission is to make NFT technology accessible, making it easier than ever for artists and creators to dive into the digital asset world.
Launching Your NFT Project on Creator Lab: A Step-by-Step Guide
Step 1: Setting Up a New Project
Your journey starts on the Creator Lab website. To kick off your NFT project, simply click the 'New Project' button.
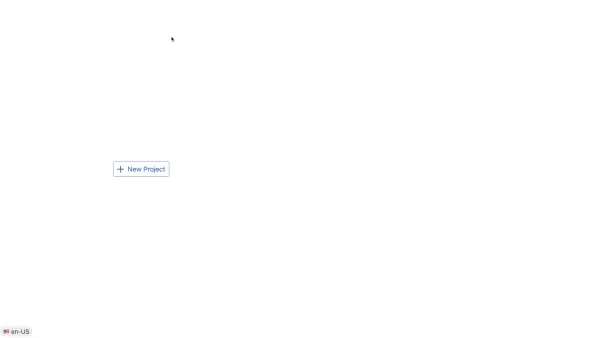
This action creates a basic project template with default configurations, which you can later tweak to fit your vision. It's like having a canvas ready for your artistic touch, saving you time and effort right from the start.
Step 2: Editing Project Details
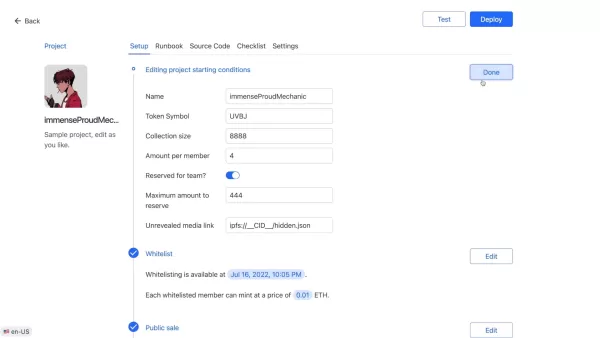
With your basic template ready, it's time to personalize it. Click on your newly created project to access the editing interface, where you'll find three main sections: Basic Project Setup, Whitelist Mint, and Public Sales Mint.
In the Basic Project Setup, you'll define the essentials of your NFT collection. This includes the project name, token symbol, collection size, mint limits per member, team reservations, and the unrevealed media link for your NFTs' initial reveal.
The Whitelist Mint section lets you set up whitelisting, specifying when it's available and the minting price for your early supporters. It's a great way to reward your community and build anticipation.
Lastly, the Public Sales Mint section sets the stage for the public sale, where you decide the start date and price per NFT. This is your chance to make your NFTs accessible to the wider public.
For a demo, you might want to name your project something catchy like 'CreatorLabNFT', set the token symbol to 'CL', and define a collection size. Don't forget to replace the default IPFS link with your own to reflect your project accurately.
Remember to save your changes once you've input all the details.
Step 3: Testing Your Smart Contract
After setting up your project details, it's crucial to test your smart contract. Creator Lab offers a 'Test' button that lets you simulate the deployment without actually going live on the mainnet.
By clicking 'Test', you trigger a series of checks to ensure your smart contract works as intended. The platform shows a progress bar as it goes through generation, validation, and signing stages. During this process, MetaMask might pop up to ask for your permission, ensuring you're in the loop and authorizing the transaction.
This testing phase is a lifesaver for NFT creators, allowing you to catch and fix any issues before the real deployment.
Step 4: Deploying Your Smart Contract
Once your smart contract passes the test, it's time to go live. Click the 'Deploy' button to publish your smart contract to the blockchain, making it public.
The deployment process mirrors the testing phase, with steps like generation, validation, signing, and deployment. A progress bar keeps you updated on your contract's journey to the blockchain. Again, MetaMask will ask for your permission, and by confirming, you officially take ownership of your smart contract.
Deployment might take a bit, depending on network conditions and contract complexity. Once it's done, you'll get the smart contract address, which is your project's unique identifier on the blockchain.
Congrats! You've successfully launched your NFT smart contract using Creator Lab. Your NFTs are now live and ready for minting.
Step 5: Minting NFTs on Etherscan
With your smart contract deployed, it's time to mint your NFTs. While Creator Lab handles the creation and deployment, minting happens on Etherscan.
Head to your smart contract address on Etherscan, click on the 'Contract' tab, and then 'Write Contract'. Connect your MetaMask wallet by clicking 'Connect to Web3' and selecting 'MetaMask'. This links your wallet to Etherscan, allowing you to interact with your contract.
Find the 'devMint' function and enter the number of NFTs you want to mint. Click 'Write', and MetaMask will ask you to confirm the transaction. Once confirmed, you'll receive a transaction hash as proof of minting.
Check your wallet balance or view your collection on OpenSea to verify the minting.
Step 6: Viewing Your NFT Collection on OpenSea
Now that your NFTs are minted, it's time to showcase them on OpenSea. Go to your OpenSea account and refresh your collection to see your new NFTs.
OpenSea automatically adds new NFTs to your collection, though it might take a few minutes to appear. If they're not showing up right away, try refreshing or checking your settings.
Once visible, you can customize the metadata, like names, descriptions, and properties, to make your NFTs more appealing. Set a price and list them for sale to connect with collectors worldwide.
Congrats again! You've used Creator Lab to create, deploy, mint, and showcase your NFT collection on OpenSea. Your creative vision is now a tangible asset on the blockchain, ready to be shared with the world.
Pricing
Creator Lab Pricing Structure
Creator Lab offers accessible solutions for NFT creators of all sizes. Their pricing details are available on their website, with plans tailored to different project needs:
- Free Tier: Basic functionality for experimenting and starting out, with limited project scope and features.
- Subscription Plans: Monthly or annual subscriptions offering increased project capacity, advanced customization, and priority support.
- Custom Enterprise Solutions: Tailored for large-scale NFT projects, with dedicated support, custom development, and advanced security features.
Pricing varies based on the chosen blockchain network, level of support, and additional tools required by the NFT creator.
Pros and Cons of Using Creator Lab
Pros
- No-code smart contract generation
- Customizable project configurations
- Simplified deployment process
- Integration with popular NFT marketplaces
- Automated metadata management
- User-friendly interface
- Cost-effective solution
Cons
- Limited customization compared to manual coding
- Dependence on platform features and updates
- Potential for vendor lock-in
- Reliance on the platform's security measures
- Possible higher fees than self-hosting
Core Features of Creator Lab
No-Code Smart Contract Generation
Creator Lab's standout feature is its ability to generate smart contracts without any coding. The platform's user-friendly interface lets you set up your NFT collection's parameters, like size, token name, and royalties, through a simple process. Once set, Creator Lab auto-generates the smart contract code, making NFT technology accessible to all.
Customizable Project Configurations
Creator Lab allows for extensive customization, enabling you to tailor your NFT project to your unique vision. You can adjust token symbols, collection sizes, whitelisting options, and minting prices. This customization ensures your project stands out while benefiting from the no-code approach.
Simplified Deployment Process
Deploying a smart contract can be complex, but Creator Lab simplifies it with a one-click deployment feature. A single click deploys your contract to the blockchain, saving you time and effort for other project aspects like marketing and community building.
Integration with Popular NFT Marketplaces
Creator Lab integrates seamlessly with popular NFT marketplaces like OpenSea, allowing you to showcase and sell your NFTs to a broader audience. The platform automatically adds your minted NFTs to your collection on the marketplace, streamlining the listing and selling process.
Automated Metadata Management
Managing metadata for a large NFT collection can be daunting, but Creator Lab automates this process. You can define attributes and properties, and the platform generates the corresponding metadata files, saving you time and ensuring accurate representation on the blockchain.
Use Cases
Digital Art Collections
Artists can use Creator Lab to launch digital art collections, offering unique and verifiable ownership to collectors. The no-code approach lets artists focus on their art while the platform handles the technical details of minting and deployment.
Collectible Card Games
Game developers can create collectible card games where each card is an NFT. Creator Lab's customizable configurations allow developers to define rarity and attributes, while automated metadata ensures accurate representation on the blockchain.
Membership Passes
Organizations can issue membership passes as NFTs, granting exclusive access to events and communities. Whitelisting options reward loyal members with early access and discounts, while the smart contract ensures authenticity and non-transferability.
Virtual Land Ownership
Metaverse developers can represent virtual land ownership as NFTs. Customizable configurations define land parcel size and properties, while the smart contract ensures verifiable and secure ownership.

Music and Entertainment
Musicians and entertainers can create and sell exclusive content like songs, videos, and merchandise as NFTs. Integration with popular marketplaces allows artists to reach a wider audience and monetize their creations in new ways.
FAQ
Do I need coding experience to use Creator Lab?
No, Creator Lab is designed for creators without coding experience. Its user-friendly interface and tools guide you through the entire process.
What blockchain networks does Creator Lab support?
Creator Lab supports multiple blockchain networks. Check their website for an updated list.
Can I customize the smart contract generated by Creator Lab?
Yes, you can customize various aspects of your NFT collection, like token symbol, collection size, whitelisting options, and minting prices.
How do I deploy my smart contract to the blockchain?
Creator Lab simplifies deployment with a one-click feature. Just click 'Deploy', and the platform will handle the rest.
How do I mint my NFTs after deploying the smart contract?
After deployment, mint your NFTs on Etherscan by interacting with your smart contract's functions. Connect your MetaMask wallet, locate the 'devMint' function, and specify the quantity of NFTs you want to mint.
Can I sell my NFTs on OpenSea using Creator Lab?
Yes, Creator Lab integrates with OpenSea. Your NFTs will be automatically added after minting, and you can customize metadata and set prices.
Related Questions
What are the benefits of using a no-code platform for NFT creation?
No-code platforms like Creator Lab make NFT creation accessible to more people by eliminating the need for coding skills. They streamline the entire project lifecycle, from smart contract generation to deployment and minting, saving creators time and effort. They reduce the risk of errors, ensure a smooth deployment process, and offer a cost-effective solution for launching NFT projects.
What are the key considerations when choosing an NFT platform?
When choosing an NFT platform, consider ease of use, customization options, supported blockchain networks, marketplace integration, security features, pricing, and community support. Find a platform that aligns with your goals and provides the tools you need to succeed.
How can I promote my NFT project and attract collectors?
Promoting your NFT project involves building a strong community, engaging on social media and forums, creating high-quality content, collaborating with other creators, and participating in events. List your NFTs on multiple marketplaces to reach a wider audience, and be patient and persistent in your efforts.
What are the legal considerations when creating and selling NFTs?
When creating and selling NFTs, ensure you have the rights to the content, comply with copyright laws, define clear terms of sale, and consider royalties or usage rights. Consult a legal professional to ensure compliance with all applicable laws and regulations.
How can I secure my NFTs and protect them from theft?
To secure your NFTs, use a secure wallet like a hardware wallet, enable two-factor authentication, be cautious of phishing scams, and never share your private keys. Store your keys safely, back up regularly, and consider using multi-signature wallets for added security. Stay informed about the latest security threats and best practices in the NFT space.
Related article
 A quarter of startups in YC’s current cohort have codebases that are almost entirely AI-generated
AI's Growing Role in Code Generation: Insights from Y Combinator
The landscape of software development is evolving rapidly, with AI playing an increasingly central role. A notable example of this trend is evident in the latest cohort from Y Combinator, the renowned Silicon Valley startup accelerato
Hugging Face Launches AI Comic Factory: A Comprehensive Guide
If you've ever dreamed of crafting your own comics but felt daunted by the artistic skills required, AI might just be your new best friend. The AI Comic Factory, hosted on Hugging Face, is a game-changer, making comic creation accessible to everyone. This guide will walk you through how this innovat
Top 5 AI Content Detectors That Consistently Identify AI-Generated Text
Back in January 2023, I delved into the fascinating world of AI-generated plagiarism and the tools designed to combat it. At that time, the buzz around generative AI was just starting to pick up steam. Fast forward to now, and I've got a fresh update on my hands, reflecting the latest developments i
Comments (0)
0/200
A quarter of startups in YC’s current cohort have codebases that are almost entirely AI-generated
AI's Growing Role in Code Generation: Insights from Y Combinator
The landscape of software development is evolving rapidly, with AI playing an increasingly central role. A notable example of this trend is evident in the latest cohort from Y Combinator, the renowned Silicon Valley startup accelerato
Hugging Face Launches AI Comic Factory: A Comprehensive Guide
If you've ever dreamed of crafting your own comics but felt daunted by the artistic skills required, AI might just be your new best friend. The AI Comic Factory, hosted on Hugging Face, is a game-changer, making comic creation accessible to everyone. This guide will walk you through how this innovat
Top 5 AI Content Detectors That Consistently Identify AI-Generated Text
Back in January 2023, I delved into the fascinating world of AI-generated plagiarism and the tools designed to combat it. At that time, the buzz around generative AI was just starting to pick up steam. Fast forward to now, and I've got a fresh update on my hands, reflecting the latest developments i
Comments (0)
0/200
May 4, 2025
DouglasAdams
9
If you're an innovative NFT creator eager to launch your project but feel overwhelmed by the tech side of things, Creator Lab is here to help. This no-code platform is tailored for creators like you, enabling you to bring your NFT projects to life without writing a single line of code. In this detailed guide, we'll take you through the process of creating and deploying your NFT smart contract using Creator Lab. Get ready to transform your creative visions into tangible digital assets with just a few clicks!
Key Points
- Creator Lab is a no-code platform designed for NFT creation.
- It allows you to launch NFT projects without coding skills.
- The platform simplifies the process of generating smart contracts.
- Users can easily customize project configurations.
- It provides the ability to test the smart contract before deployment.
- Creator Lab enables NFT minting directly from Etherscan.
- The final outcome is an NFT collection available on OpenSea.
- The alpha launch includes an easy-to-follow tutorial.
Understanding Creator Lab: A No-Code NFT Platform
What is Creator Lab?
Creator Lab is a game-changer for NFT creators. It's a codeless platform that lets you launch NFT projects without getting bogged down by blockchain complexities. By simplifying the creation and deployment of NFT smart contracts, it opens up a world of possibilities for artists, designers, and anyone with a creative spark, regardless of their coding expertise. With Creator Lab, you can focus on crafting stunning digital assets, while the platform handles the techy stuff behind the scenes.
Creator Lab empowers creators by eliminating the need for deep programming knowledge. Its user-friendly interface and intuitive tools streamline the entire NFT project lifecycle. From setting up your initial project parameters to deploying your smart contract on the blockchain, Creator Lab makes each step straightforward, ensuring that even those without a tech background can successfully launch their projects.
The platform's simplicity doesn't mean it skimps on features. NFT creators can customize various project aspects, like collection size, token symbol, and whitelisting options, to match their unique vision and goals. This customization ensures that each project stands out while enjoying the benefits of a no-code approach. Creator Lab's mission is to make NFT technology accessible, making it easier than ever for artists and creators to dive into the digital asset world.
Launching Your NFT Project on Creator Lab: A Step-by-Step Guide
Step 1: Setting Up a New Project
Your journey starts on the Creator Lab website. To kick off your NFT project, simply click the 'New Project' button.
This action creates a basic project template with default configurations, which you can later tweak to fit your vision. It's like having a canvas ready for your artistic touch, saving you time and effort right from the start.
Step 2: Editing Project Details
With your basic template ready, it's time to personalize it. Click on your newly created project to access the editing interface, where you'll find three main sections: Basic Project Setup, Whitelist Mint, and Public Sales Mint.
In the Basic Project Setup, you'll define the essentials of your NFT collection. This includes the project name, token symbol, collection size, mint limits per member, team reservations, and the unrevealed media link for your NFTs' initial reveal.
The Whitelist Mint section lets you set up whitelisting, specifying when it's available and the minting price for your early supporters. It's a great way to reward your community and build anticipation.
Lastly, the Public Sales Mint section sets the stage for the public sale, where you decide the start date and price per NFT. This is your chance to make your NFTs accessible to the wider public.
For a demo, you might want to name your project something catchy like 'CreatorLabNFT', set the token symbol to 'CL', and define a collection size. Don't forget to replace the default IPFS link with your own to reflect your project accurately.
Remember to save your changes once you've input all the details.
Step 3: Testing Your Smart Contract
After setting up your project details, it's crucial to test your smart contract. Creator Lab offers a 'Test' button that lets you simulate the deployment without actually going live on the mainnet.
By clicking 'Test', you trigger a series of checks to ensure your smart contract works as intended. The platform shows a progress bar as it goes through generation, validation, and signing stages. During this process, MetaMask might pop up to ask for your permission, ensuring you're in the loop and authorizing the transaction.
This testing phase is a lifesaver for NFT creators, allowing you to catch and fix any issues before the real deployment.
Step 4: Deploying Your Smart Contract
Once your smart contract passes the test, it's time to go live. Click the 'Deploy' button to publish your smart contract to the blockchain, making it public.
The deployment process mirrors the testing phase, with steps like generation, validation, signing, and deployment. A progress bar keeps you updated on your contract's journey to the blockchain. Again, MetaMask will ask for your permission, and by confirming, you officially take ownership of your smart contract.
Deployment might take a bit, depending on network conditions and contract complexity. Once it's done, you'll get the smart contract address, which is your project's unique identifier on the blockchain.
Congrats! You've successfully launched your NFT smart contract using Creator Lab. Your NFTs are now live and ready for minting.
Step 5: Minting NFTs on Etherscan
With your smart contract deployed, it's time to mint your NFTs. While Creator Lab handles the creation and deployment, minting happens on Etherscan.
Head to your smart contract address on Etherscan, click on the 'Contract' tab, and then 'Write Contract'. Connect your MetaMask wallet by clicking 'Connect to Web3' and selecting 'MetaMask'. This links your wallet to Etherscan, allowing you to interact with your contract.
Find the 'devMint' function and enter the number of NFTs you want to mint. Click 'Write', and MetaMask will ask you to confirm the transaction. Once confirmed, you'll receive a transaction hash as proof of minting.
Check your wallet balance or view your collection on OpenSea to verify the minting.
Step 6: Viewing Your NFT Collection on OpenSea
Now that your NFTs are minted, it's time to showcase them on OpenSea. Go to your OpenSea account and refresh your collection to see your new NFTs.
OpenSea automatically adds new NFTs to your collection, though it might take a few minutes to appear. If they're not showing up right away, try refreshing or checking your settings.
Once visible, you can customize the metadata, like names, descriptions, and properties, to make your NFTs more appealing. Set a price and list them for sale to connect with collectors worldwide.
Congrats again! You've used Creator Lab to create, deploy, mint, and showcase your NFT collection on OpenSea. Your creative vision is now a tangible asset on the blockchain, ready to be shared with the world.
Pricing
Creator Lab Pricing Structure
Creator Lab offers accessible solutions for NFT creators of all sizes. Their pricing details are available on their website, with plans tailored to different project needs:
- Free Tier: Basic functionality for experimenting and starting out, with limited project scope and features.
- Subscription Plans: Monthly or annual subscriptions offering increased project capacity, advanced customization, and priority support.
- Custom Enterprise Solutions: Tailored for large-scale NFT projects, with dedicated support, custom development, and advanced security features.
Pricing varies based on the chosen blockchain network, level of support, and additional tools required by the NFT creator.
Pros and Cons of Using Creator Lab
Pros
- No-code smart contract generation
- Customizable project configurations
- Simplified deployment process
- Integration with popular NFT marketplaces
- Automated metadata management
- User-friendly interface
- Cost-effective solution
Cons
- Limited customization compared to manual coding
- Dependence on platform features and updates
- Potential for vendor lock-in
- Reliance on the platform's security measures
- Possible higher fees than self-hosting
Core Features of Creator Lab
No-Code Smart Contract Generation
Creator Lab's standout feature is its ability to generate smart contracts without any coding. The platform's user-friendly interface lets you set up your NFT collection's parameters, like size, token name, and royalties, through a simple process. Once set, Creator Lab auto-generates the smart contract code, making NFT technology accessible to all.
Customizable Project Configurations
Creator Lab allows for extensive customization, enabling you to tailor your NFT project to your unique vision. You can adjust token symbols, collection sizes, whitelisting options, and minting prices. This customization ensures your project stands out while benefiting from the no-code approach.
Simplified Deployment Process
Deploying a smart contract can be complex, but Creator Lab simplifies it with a one-click deployment feature. A single click deploys your contract to the blockchain, saving you time and effort for other project aspects like marketing and community building.
Integration with Popular NFT Marketplaces
Creator Lab integrates seamlessly with popular NFT marketplaces like OpenSea, allowing you to showcase and sell your NFTs to a broader audience. The platform automatically adds your minted NFTs to your collection on the marketplace, streamlining the listing and selling process.
Automated Metadata Management
Managing metadata for a large NFT collection can be daunting, but Creator Lab automates this process. You can define attributes and properties, and the platform generates the corresponding metadata files, saving you time and ensuring accurate representation on the blockchain.
Use Cases
Digital Art Collections
Artists can use Creator Lab to launch digital art collections, offering unique and verifiable ownership to collectors. The no-code approach lets artists focus on their art while the platform handles the technical details of minting and deployment.
Collectible Card Games
Game developers can create collectible card games where each card is an NFT. Creator Lab's customizable configurations allow developers to define rarity and attributes, while automated metadata ensures accurate representation on the blockchain.
Membership Passes
Organizations can issue membership passes as NFTs, granting exclusive access to events and communities. Whitelisting options reward loyal members with early access and discounts, while the smart contract ensures authenticity and non-transferability.
Virtual Land Ownership
Metaverse developers can represent virtual land ownership as NFTs. Customizable configurations define land parcel size and properties, while the smart contract ensures verifiable and secure ownership.
Music and Entertainment
Musicians and entertainers can create and sell exclusive content like songs, videos, and merchandise as NFTs. Integration with popular marketplaces allows artists to reach a wider audience and monetize their creations in new ways.
FAQ
Do I need coding experience to use Creator Lab?
No, Creator Lab is designed for creators without coding experience. Its user-friendly interface and tools guide you through the entire process.
What blockchain networks does Creator Lab support?
Creator Lab supports multiple blockchain networks. Check their website for an updated list.
Can I customize the smart contract generated by Creator Lab?
Yes, you can customize various aspects of your NFT collection, like token symbol, collection size, whitelisting options, and minting prices.
How do I deploy my smart contract to the blockchain?
Creator Lab simplifies deployment with a one-click feature. Just click 'Deploy', and the platform will handle the rest.
How do I mint my NFTs after deploying the smart contract?
After deployment, mint your NFTs on Etherscan by interacting with your smart contract's functions. Connect your MetaMask wallet, locate the 'devMint' function, and specify the quantity of NFTs you want to mint.
Can I sell my NFTs on OpenSea using Creator Lab?
Yes, Creator Lab integrates with OpenSea. Your NFTs will be automatically added after minting, and you can customize metadata and set prices.
Related Questions
What are the benefits of using a no-code platform for NFT creation?
No-code platforms like Creator Lab make NFT creation accessible to more people by eliminating the need for coding skills. They streamline the entire project lifecycle, from smart contract generation to deployment and minting, saving creators time and effort. They reduce the risk of errors, ensure a smooth deployment process, and offer a cost-effective solution for launching NFT projects.
What are the key considerations when choosing an NFT platform?
When choosing an NFT platform, consider ease of use, customization options, supported blockchain networks, marketplace integration, security features, pricing, and community support. Find a platform that aligns with your goals and provides the tools you need to succeed.
How can I promote my NFT project and attract collectors?
Promoting your NFT project involves building a strong community, engaging on social media and forums, creating high-quality content, collaborating with other creators, and participating in events. List your NFTs on multiple marketplaces to reach a wider audience, and be patient and persistent in your efforts.
What are the legal considerations when creating and selling NFTs?
When creating and selling NFTs, ensure you have the rights to the content, comply with copyright laws, define clear terms of sale, and consider royalties or usage rights. Consult a legal professional to ensure compliance with all applicable laws and regulations.
How can I secure my NFTs and protect them from theft?
To secure your NFTs, use a secure wallet like a hardware wallet, enable two-factor authentication, be cautious of phishing scams, and never share your private keys. Store your keys safely, back up regularly, and consider using multi-signature wallets for added security. Stay informed about the latest security threats and best practices in the NFT space.


 A quarter of startups in YC’s current cohort have codebases that are almost entirely AI-generated
AI's Growing Role in Code Generation: Insights from Y Combinator
The landscape of software development is evolving rapidly, with AI playing an increasingly central role. A notable example of this trend is evident in the latest cohort from Y Combinator, the renowned Silicon Valley startup accelerato
A quarter of startups in YC’s current cohort have codebases that are almost entirely AI-generated
AI's Growing Role in Code Generation: Insights from Y Combinator
The landscape of software development is evolving rapidly, with AI playing an increasingly central role. A notable example of this trend is evident in the latest cohort from Y Combinator, the renowned Silicon Valley startup accelerato
 Hugging Face Launches AI Comic Factory: A Comprehensive Guide
If you've ever dreamed of crafting your own comics but felt daunted by the artistic skills required, AI might just be your new best friend. The AI Comic Factory, hosted on Hugging Face, is a game-changer, making comic creation accessible to everyone. This guide will walk you through how this innovat
Hugging Face Launches AI Comic Factory: A Comprehensive Guide
If you've ever dreamed of crafting your own comics but felt daunted by the artistic skills required, AI might just be your new best friend. The AI Comic Factory, hosted on Hugging Face, is a game-changer, making comic creation accessible to everyone. This guide will walk you through how this innovat
 Top 5 AI Content Detectors That Consistently Identify AI-Generated Text
Back in January 2023, I delved into the fascinating world of AI-generated plagiarism and the tools designed to combat it. At that time, the buzz around generative AI was just starting to pick up steam. Fast forward to now, and I've got a fresh update on my hands, reflecting the latest developments i
Top 5 AI Content Detectors That Consistently Identify AI-Generated Text
Back in January 2023, I delved into the fascinating world of AI-generated plagiarism and the tools designed to combat it. At that time, the buzz around generative AI was just starting to pick up steam. Fast forward to now, and I've got a fresh update on my hands, reflecting the latest developments i