


 Home
HomeTransform Color Correction with AI LUTs in Video Editing
Are you ready to revolutionize your approach to color correction in video editing? AI-driven tools are now making it simpler than ever to achieve professional, cinematic looks. With the emergence of advanced AI models, creating custom LUTs (Look-Up Tables) tailored to specific aesthetics is now accessible to every video editor. This article explores how you can use AI, especially ChatGPT, to generate unique LUTs and enhance the visual storytelling in your video projects. Transform your color grading workflow and explore new creative horizons with the power of artificial intelligence. Dive in and discover the future of video editing!
Revolutionizing Color Correction with AI
The Power of AI in Video Editing
Color correction and grading have traditionally been complex processes requiring a deep understanding and a sharp eye. However, AI is changing the game, making these tasks more approachable for both novice and seasoned editors. AI algorithms can now analyze the color palettes, tones, and overall aesthetic of reference images or videos and translate those characteristics into a LUT. This approach simplifies creating visually consistent and appealing video content. The real advantage lies in the speed and accessibility—AI can significantly reduce the time spent on manual adjustments, freeing up creators to focus on the creative aspects of storytelling.
The introduction of AI into video editing marks a significant advancement, giving creators unparalleled control over their work's visual appearance. The rapid generation of LUTs opens up new avenues for experimentation and creative expression, making it easier to bring a unique vision to life.
Understanding LUTs (Look-Up Tables)
Before diving into AI-driven LUT creation, it's crucial to grasp what LUTs are and how they work. A Look-Up Table (LUT) is a color transformation preset, essentially a file with mathematical instructions that alter the colors in an image or video. It's like applying a filter in post-production.
LUTs help achieve a specific aesthetic or mood, correct color imbalances, or ensure consistency across multiple clips. They are non-destructive, meaning the original data remains untouched, allowing for easy experimentation and the ability to revert to the original look if needed.
There are two main types of LUTs:
- Technical LUTs: Used for color space conversions and camera log profiles.
- Creative LUTs: Designed to add a particular style or mood to the footage.
Understanding these types and their purposes is essential for effectively using AI to create LUTs that align with your desired outcome.
AI-Powered LUT Generation: A Step-by-Step Guide Using ChatGPT
Harnessing ChatGPT for Custom LUT Creation
One of the most exciting developments in AI video editing is the ability to use conversational AI models like ChatGPT to generate custom LUTs. Here’s how you can do it:
Step 1: Define Your Desired Aesthetic
Before engaging with ChatGPT, clearly define the visual style you want to achieve. Consider the colors, tones, and overall mood. Are you aiming for a desaturated, gritty look reminiscent of the film 'Joker'? Or perhaps a vibrant, warm aesthetic like a tropical sunset? Having a clear vision is essential for guiding the AI.
Step 2: Gather Reference Images
Collect reference images or stills from films, photographs, or other videos that embody the visual style you're aiming for. The more references you provide, the better ChatGPT can understand your needs. These can be stills from a movie, photographs, or even conceptual art pieces that convey the color palette and mood. Ensure the images accurately represent the overall look you desire.
Step 3: Craft Your Prompt for ChatGPT
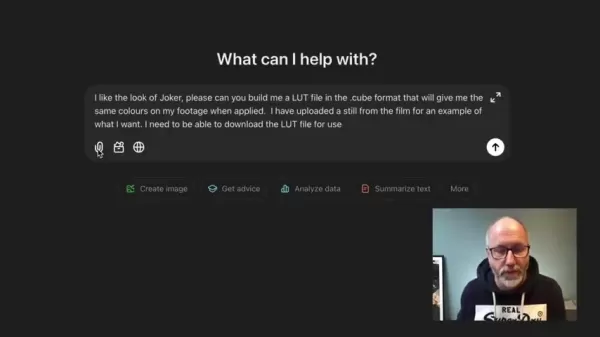
Now, communicate your vision to ChatGPT. Be as specific as possible in your prompt, providing details about the colors, tones, and style you want the LUT to emulate. For instance, you might say:
"I like the look of the movie Joker. Can you build me a LUT file in the .cube format that will give me the same colors on my footage when applied? I have uploaded a still from the film for an example of what I want. I need to be able to download the LUT file for use."
Step 4: Upload Your Reference Image
Most AI tools, including ChatGPT, allow you to upload reference images. This step is crucial as it provides the AI with a visual guide for understanding your aesthetic preferences. Upload the reference image directly to the AI interface along with your prompt.
Step 5: Generate the LUT
Once you've submitted your prompt and reference image, instruct ChatGPT to generate the LUT. The AI will analyze the image, identify its color characteristics, and create a .cube file that replicates those colors. This process usually takes a few moments, depending on the complexity of the request.
Step 6: Download the LUT File
After the LUT is generated, you should be able to download it directly from ChatGPT. Ensure that the file is in a compatible format (.cube is widely supported) before proceeding.
Step 7: Apply the LUT in Your NLE
Import the downloaded LUT file into your preferred Non-Linear Editing (NLE) software, such as Final Cut Pro, Premiere Pro, or DaVinci Resolve. Apply the LUT to your footage and fine-tune the settings as needed.
Step 8: Iterate and Refine
Don't be afraid to experiment and refine the LUT. AI-generated LUTs are a great starting point, but you may need to make adjustments to perfectly match your desired look. Try different reference images, modify your prompts, and iterate on the process until you achieve the perfect visual style for your video.
By following these steps, you can effectively use ChatGPT and other AI tools to create custom LUTs that transform your video editing workflow. This approach saves time and unlocks new creative possibilities, allowing you to achieve professional-grade color grading with ease.
Troubleshooting LUT Download Issues with ChatGPT
Sometimes, technical glitches can occur when trying to download the generated LUT from ChatGPT. Here's how to address some common issues:
- Link Issues: If the initial download link doesn't work, ask ChatGPT to provide a corrected or alternative link. AI systems can sometimes generate temporary links that expire.
- Format Compatibility: Double-check that the LUT file is in the .cube format, which is widely supported across different NLEs. If not, request ChatGPT to generate the LUT specifically in this format.
- Browser Compatibility: Try using a different web browser to download the LUT. Sometimes, browser-specific settings or extensions can interfere with the download process.
If you're still unable to download the LUT, consider trying a different AI tool or platform. There are several alternatives available, each with its own strengths and features. By being proactive and resourceful, you can overcome these technical challenges and successfully obtain your custom LUT.
Applying AI-Generated LUTs in Popular NLEs
How to Use the Generated LUTs in Final Cut Pro
- Import Your Footage: Launch Final Cut Pro and import the video clip you want to color grade into your project.
- Apply the Custom LUT:
- Navigate to the Effects browser on the right-hand side of the Final Cut Pro interface.
- Search for the “Custom LUT” effect, usually found under the Color category.
- Drag and drop the “Custom LUT” effect onto your video clip in the timeline.
- Load the LUT File:
- With the clip selected, go to the Inspector panel (usually located at the top right).
- In the Inspector, you’ll see the “Custom LUT” settings.
- Click on the “Choose Custom LUT” dropdown menu.
- Select “Choose Custom LUT” again to open a Finder window.
- Locate the .cube file that was downloaded and click “Open”.
- Adjust the Intensity: Once the LUT is applied, you can adjust the intensity using the “Mix” slider in the “Custom LUT” settings. This allows you to fine-tune the effect and prevent it from being too overpowering.
- Make Additional Adjustments: After applying the LUT, you may want to make additional color adjustments to perfect the look of your footage. Use the built-in color correction tools in Final Cut Pro to adjust the exposure, contrast, saturation, and more. Be mindful of preserving skin tones, and make sure that the adjustments complement the overall aesthetic of the LUT. Remember, LUTs are a great starting point, but they rarely provide the complete solution to color grading.
How to Use the Generated LUTs in Adobe Premiere Pro
- Import Your Footage: Launch Adobe Premiere Pro and import the video clip you intend to color grade into your project.
- Create an Adjustment Layer:
- Go to the “Project” panel (usually at the bottom left).
- Click the “New Item” icon (it looks like a page being turned). Select “Adjustment Layer”.
- Drag the adjustment layer from the Project panel onto the timeline, above your video clip. Adjust the duration of the adjustment layer to match the length of your video clip.
- Open the Lumetri Color Panel:
- Select the adjustment layer in the timeline.
- Navigate to the “Color” workspace at the top of Premiere Pro. The “Lumetri Color” panel will appear on the right-hand side of the interface.
- Apply the LUT:
- In the Lumetri Color panel, go to the “Creative” tab.
- Under “Look,” click the dropdown menu. Select “Browse…” to open a file explorer window.
- Locate the .cube file and click “Open” to apply the LUT to the adjustment layer.
- Adjust the Intensity: Use the “Intensity” slider under the “Look” dropdown menu to adjust how much the LUT affects your footage. A lower intensity will result in a more subtle effect, while a higher intensity will make the effect more pronounced.
- Additional Adjustments: As with Final Cut Pro, you can use the other tools in the Lumetri Color panel to further refine the color grade. Adjust the basic correction settings such as exposure, contrast, highlights, shadows, whites, and blacks to achieve the desired look. Pay attention to skin tones and ensure that the LUT enhances rather than detracts from the overall visual quality of your video.
Pricing and Accessibility of AI LUT Generation Tools
Cost Considerations for AI-Powered LUT Creation
The pricing for AI LUT generation tools varies significantly. Some platforms offer free tiers with limited features, while others operate on a subscription-based model or charge per LUT generated. ChatGPT, for example, requires a subscription for advanced features, including image analysis and file generation.
When evaluating pricing, consider the following factors:
- Monthly Subscription Fees: Some AI tools offer monthly subscriptions that provide access to a range of features, including LUT generation, image enhancement, and more.
- Pay-Per-Use Costs: Other platforms charge a fee for each LUT generated. This can be a cost-effective option for users who only need to create LUTs occasionally.
It's essential to research and compare pricing models to find the option that best aligns with your budget and usage needs. Free tiers can be a great way to experiment with AI LUT generation, but paid subscriptions often offer more advanced features and greater flexibility. Subscriptions can range from $20/month to upwards of $100/month.
Weighing the Benefits and Drawbacks of AI LUTs
Pros
- Increased Efficiency: AI can significantly speed up the color grading process by automatically generating LUTs based on reference images.
- Accessibility for All Skill Levels: AI-powered tools make professional-grade color grading accessible to video editors of all skill levels.
- Creative Experimentation: AI allows for quick and easy experimentation with different visual styles, unlocking new creative possibilities.
- Consistency Across Clips: AI-generated LUTs can ensure consistent color grading across multiple clips, even if they were shot under different lighting conditions.
- Cost-Effective Solution: AI LUT generation can be a cost-effective alternative to traditional color grading techniques, especially for independent creators and small businesses.
Cons
- Potential for Generic Looks: AI-generated LUTs can sometimes produce generic or uninspired looks, especially if the reference images are not carefully selected.
- Limited Customization: Some AI tools offer limited customization options, making it difficult to fine-tune the LUT to perfectly match your desired look.
- Dependency on Reference Images: The quality of the AI-generated LUT is highly dependent on the quality and relevance of the reference images.
- Subscription Costs: Many AI LUT generation tools operate on a subscription-based model, which can be expensive for users who only need to create LUTs occasionally.
- Ethical Considerations: The use of AI in video editing raises ethical concerns about the potential for manipulation and the displacement of human color graders.
Key Features of AI LUT Generation Tools
Core Functionalities of AI LUT Creation Platforms
AI LUT generation tools come equipped with a variety of features designed to simplify and enhance the color grading process. Here are some of the most important functionalities:
- Image Analysis: AI algorithms can analyze reference images and extract their color characteristics, identifying the dominant hues, tones, and saturation levels.
- LUT Generation: Based on the image analysis, the AI can generate a .cube file that replicates the colors of the reference image. This file can then be imported into your NLE and applied to your footage.
- Customization Options: Some AI tools offer customization options that allow you to fine-tune the generated LUT. You can adjust the intensity, contrast, and saturation to achieve the desired look.
- Format Compatibility: AI LUT generation tools typically support a range of file formats, including .cube, .3dl, and .look. This ensures compatibility with different NLEs and color grading software.
- Batch Processing: Some platforms offer batch processing capabilities that allow you to generate multiple LUTs at once. This can save time when working on large projects.
By leveraging these features, video editors can streamline their color grading workflow and achieve professional-grade results with ease.
Practical Applications of AI-Generated LUTs
Real-World Scenarios for Using AI LUTs
AI-generated LUTs can be used in a variety of real-world scenarios to enhance the visual appearance of video content. Here are some examples:
- Cinematic Look: Replicate the color grading style of your favorite films to give your footage a cinematic aesthetic.
- Consistency Across Clips: Ensure consistent color grading across multiple clips, even if they were shot under different lighting conditions.
- Brand Identity: Create a custom LUT that aligns with your brand's visual identity to ensure consistent branding across all video content.
- Mood Enhancement: Use LUTs to evoke a specific mood or emotion in your footage, such as warmth, nostalgia, or suspense.
- Quick Color Correction: Correct color imbalances and exposure issues quickly and efficiently, saving time in post-production.
By leveraging AI-generated LUTs, video editors can elevate the visual quality of their work and achieve professional-grade results with ease.
Frequently Asked Questions About AI LUT Generation
Is AI LUT generation suitable for professional video editing?
Yes, AI LUT generation can be a valuable tool for professional video editing. While it may not replace traditional color grading techniques entirely, it can significantly speed up the workflow and provide a great starting point for achieving the desired look. AI-generated LUTs can be particularly useful for quickly applying a consistent style across multiple clips or for experimenting with different looks. Professional video editors can leverage AI to enhance their efficiency and unlock new creative possibilities, but they should still rely on their expertise to fine-tune the results and ensure the highest quality.
Exploring Further Possibilities with AI and Video Editing
What other AI tools can enhance my video editing workflow?
AI's influence extends far beyond LUT generation, offering a plethora of tools to enhance various aspects of video editing. Here are some exciting applications:
- AI-Powered Noise Reduction: Eliminate unwanted noise from your footage with AI-driven noise reduction tools. These algorithms can intelligently identify and remove noise without sacrificing image quality.
- AI-Based Object Removal: Remove unwanted objects from your video with AI-powered object removal tools. These tools can seamlessly fill the area where the object was, creating a natural-looking result.
- AI-Driven Content-Aware Editing: Automate repetitive tasks and streamline your editing process with AI-driven content-aware editing tools. These tools can analyze your footage and make intelligent editing suggestions.
- AI-Enhanced Upscaling: Increase the resolution of your video footage with AI-enhanced upscaling tools. These algorithms can add detail and sharpness to low-resolution footage, making it suitable for larger displays.
By exploring these AI tools, video editors can unlock new levels of efficiency, creativity, and visual quality in their work.
Related article
 WordPress.com now allows AI agents to write and publish posts, plus more
WordPress.com, the popular web hosting and publishing platform, is now embracing AI agents—a move that could reshape the look and feel of the web. The company announced Friday that it will allow AI agents to draft, edit, and publish content on custom
Anthropic's experimental AI Claude completes negotiations and transactions in e-commerce test
As artificial intelligence advances rapidly, Anthropic quietly rolled out an internal experiment called "Project Deal" last Friday, showcasing AI's potential in e-commerce. The experiment had its AI model Claude autonomously handle buying, selling, a
DeepSeek Code poised for launch
As AI technology accelerates, DeepSeek is at a thrilling juncture. The AI company recently revealed it has secured over 70 billion yuan in funding. Leadership has emphasized a commitment to groundbreaking AI research over immediate commercial gains.
Related Special Topic Recommendations
Business
WordPress.com now allows AI agents to write and publish posts, plus more
WordPress.com, the popular web hosting and publishing platform, is now embracing AI agents—a move that could reshape the look and feel of the web. The company announced Friday that it will allow AI agents to draft, edit, and publish content on custom
Anthropic's experimental AI Claude completes negotiations and transactions in e-commerce test
As artificial intelligence advances rapidly, Anthropic quietly rolled out an internal experiment called "Project Deal" last Friday, showcasing AI's potential in e-commerce. The experiment had its AI model Claude autonomously handle buying, selling, a
DeepSeek Code poised for launch
As AI technology accelerates, DeepSeek is at a thrilling juncture. The AI company recently revealed it has secured over 70 billion yuan in funding. Leadership has emphasized a commitment to groundbreaking AI research over immediate commercial gains.
Related Special Topic Recommendations
Business
 Best AI Expense Trackers: Scan Receipts & Categorize Corporate Spend Automatically
2026 Latest Best AI Expense Trackers: Top-rated tools to scan receipts & categorize corporate spend automatically. Discover powerful, game-changing solutions for effortless expense management, accurate financial tracking, and streamlined compliance. Our curated, weekly-updated comparison of free vs paid options helps you find the perfect fit. Unlock your AI edge with XIX.AI's expert picks.
 10 tools
 xix.ai
Business
Best AI Recruiting Tools: Screen Resumes & Automate Candidate Interview Scheduling
xix.ai
Business
Best AI Recruiting Tools: Screen Resumes & Automate Candidate Interview Scheduling
Discover the 2026 latest top-rated AI recruiting tools on XIX.AI. Our curated list features powerful, game-changing solutions for screening resumes and automating candidate interview scheduling. Compare free vs paid options with real-world tests and weekly updated rankings. Find your perfect hiring assistant and streamline your recruitment today!
10 tools
xix.ai
Productivity
AI Personal Wellness & Focus Coaches: Manage Burnout & Boost Mental Energy Levels
Discover the 2026 best AI personal wellness and focus coaches on XIX.AI. Our curated rankings feature top-rated, game-changing tools to manage burnout and boost mental energy. Compare free vs paid options with real-world insights. Unlock your path to peak productivity and well-being today.
10 tools
xix.ai
chatbot
Top-Rated AI Romantic Chatbots: Build Long-Term Relationships with Consistent Personalities
Discover the 2026 latest top-rated AI romantic chatbots for building genuine, long-term connections. Our curated list features powerful, consistent personalities, free vs paid comparisons, and real-world tests. Find your perfect companion and start building today at XIX.AI.
10 tools
xix.ai
Education and Learning
Best AI Data Science Mentors: Master SQL, Pandas & Machine Learning Workflows
Discover the 2026 best AI data science mentors to master SQL, Pandas & ML workflows. Explore our top-rated, curated selection at XIX.AI for powerful, game-changing guidance. Compare free vs paid options with real-world insights. Unlock your data science mastery today.
10 tools
xix.ai
chatbot
Best AI Flirting & Conversation Trainers: Improve Social Charisma and Confidence in Real-Time
Discover the 2026 best AI flirting and conversation trainers on XIX.AI. Our curated, top-rated selection helps you build social charisma and confidence in real-time. Explore must-try, game-changing tools with free vs paid comparisons and weekly updated rankings. Unlock your social edge today.
10 tools
xix.ai

 Comments (15)
0/500
Comments (15)
0/500
![JoeLewis]()
Die Idee, KI für LUTs zu nutzen, ist echt clever! 🎬 Endlich muss man nicht mehr stundenlang manuell an den Farben feilen. Aber ich frage mich, ob das am Ende dazu führt, dass alle Videos gleich aussehen... Hoffentlich bleibt da noch Raum für individuelle Kreativität. Trotzdem, ein spannender Schritt für Hobby-Editoren wie mich!
![PaulMartínez]()
Als Hobbyfilmer fand ich die manuelle Farbkorrektur immer super kompliziert 🎬. Dass KI jetzt individuelle LUTs erstellt, klingt nach einem Gamechanger! Aber macht uns das zu abhängig von Algorithmen? Die Beispiele im Artikel sehen schon krass professionell aus.
![WilliamAnderson]()
This AI LUT stuff sounds like a game-changer for video editing! I’m no pro, but making cinematic looks this easy? Count me in! 🎥
![PeterJohnson]()
AI LUTs sound like a game-changer for video editing! Can't wait to try them out and see if they really make my footage pop like a Hollywood film. 🎥
![BrianBaker]()
This AI LUT stuff sounds like a game-changer for video editing! I’m stoked to try it out and see if it can make my vids look like a Hollywood blockbuster. Anyone else excited about this? 🎥
![BrianWalker]()
ビデオ編集でのAI LUTs?ぜひお願いします!色補正がずっと簡単になりました。ただ、結果が時々ずれることがあります。でも、大きな時間の節約になります!🎥✨
Are you ready to revolutionize your approach to color correction in video editing? AI-driven tools are now making it simpler than ever to achieve professional, cinematic looks. With the emergence of advanced AI models, creating custom LUTs (Look-Up Tables) tailored to specific aesthetics is now accessible to every video editor. This article explores how you can use AI, especially ChatGPT, to generate unique LUTs and enhance the visual storytelling in your video projects. Transform your color grading workflow and explore new creative horizons with the power of artificial intelligence. Dive in and discover the future of video editing!
Revolutionizing Color Correction with AI
The Power of AI in Video Editing
Color correction and grading have traditionally been complex processes requiring a deep understanding and a sharp eye. However, AI is changing the game, making these tasks more approachable for both novice and seasoned editors. AI algorithms can now analyze the color palettes, tones, and overall aesthetic of reference images or videos and translate those characteristics into a LUT. This approach simplifies creating visually consistent and appealing video content. The real advantage lies in the speed and accessibility—AI can significantly reduce the time spent on manual adjustments, freeing up creators to focus on the creative aspects of storytelling.
The introduction of AI into video editing marks a significant advancement, giving creators unparalleled control over their work's visual appearance. The rapid generation of LUTs opens up new avenues for experimentation and creative expression, making it easier to bring a unique vision to life.
Understanding LUTs (Look-Up Tables)
Before diving into AI-driven LUT creation, it's crucial to grasp what LUTs are and how they work. A Look-Up Table (LUT) is a color transformation preset, essentially a file with mathematical instructions that alter the colors in an image or video. It's like applying a filter in post-production.
LUTs help achieve a specific aesthetic or mood, correct color imbalances, or ensure consistency across multiple clips. They are non-destructive, meaning the original data remains untouched, allowing for easy experimentation and the ability to revert to the original look if needed.
There are two main types of LUTs:
- Technical LUTs: Used for color space conversions and camera log profiles.
- Creative LUTs: Designed to add a particular style or mood to the footage.
Understanding these types and their purposes is essential for effectively using AI to create LUTs that align with your desired outcome.
AI-Powered LUT Generation: A Step-by-Step Guide Using ChatGPT
Harnessing ChatGPT for Custom LUT Creation
One of the most exciting developments in AI video editing is the ability to use conversational AI models like ChatGPT to generate custom LUTs. Here’s how you can do it:
Step 1: Define Your Desired Aesthetic
Before engaging with ChatGPT, clearly define the visual style you want to achieve. Consider the colors, tones, and overall mood. Are you aiming for a desaturated, gritty look reminiscent of the film 'Joker'? Or perhaps a vibrant, warm aesthetic like a tropical sunset? Having a clear vision is essential for guiding the AI.
Step 2: Gather Reference Images
Collect reference images or stills from films, photographs, or other videos that embody the visual style you're aiming for. The more references you provide, the better ChatGPT can understand your needs. These can be stills from a movie, photographs, or even conceptual art pieces that convey the color palette and mood. Ensure the images accurately represent the overall look you desire.
Step 3: Craft Your Prompt for ChatGPT
Now, communicate your vision to ChatGPT. Be as specific as possible in your prompt, providing details about the colors, tones, and style you want the LUT to emulate. For instance, you might say:
"I like the look of the movie Joker. Can you build me a LUT file in the .cube format that will give me the same colors on my footage when applied? I have uploaded a still from the film for an example of what I want. I need to be able to download the LUT file for use."
Step 4: Upload Your Reference Image
Most AI tools, including ChatGPT, allow you to upload reference images. This step is crucial as it provides the AI with a visual guide for understanding your aesthetic preferences. Upload the reference image directly to the AI interface along with your prompt.
Step 5: Generate the LUT
Once you've submitted your prompt and reference image, instruct ChatGPT to generate the LUT. The AI will analyze the image, identify its color characteristics, and create a .cube file that replicates those colors. This process usually takes a few moments, depending on the complexity of the request.
Step 6: Download the LUT File
After the LUT is generated, you should be able to download it directly from ChatGPT. Ensure that the file is in a compatible format (.cube is widely supported) before proceeding.
Step 7: Apply the LUT in Your NLE
Import the downloaded LUT file into your preferred Non-Linear Editing (NLE) software, such as Final Cut Pro, Premiere Pro, or DaVinci Resolve. Apply the LUT to your footage and fine-tune the settings as needed.
Step 8: Iterate and Refine
Don't be afraid to experiment and refine the LUT. AI-generated LUTs are a great starting point, but you may need to make adjustments to perfectly match your desired look. Try different reference images, modify your prompts, and iterate on the process until you achieve the perfect visual style for your video.
By following these steps, you can effectively use ChatGPT and other AI tools to create custom LUTs that transform your video editing workflow. This approach saves time and unlocks new creative possibilities, allowing you to achieve professional-grade color grading with ease.
Troubleshooting LUT Download Issues with ChatGPT
Sometimes, technical glitches can occur when trying to download the generated LUT from ChatGPT. Here's how to address some common issues:
- Link Issues: If the initial download link doesn't work, ask ChatGPT to provide a corrected or alternative link. AI systems can sometimes generate temporary links that expire.
- Format Compatibility: Double-check that the LUT file is in the .cube format, which is widely supported across different NLEs. If not, request ChatGPT to generate the LUT specifically in this format.
- Browser Compatibility: Try using a different web browser to download the LUT. Sometimes, browser-specific settings or extensions can interfere with the download process.
If you're still unable to download the LUT, consider trying a different AI tool or platform. There are several alternatives available, each with its own strengths and features. By being proactive and resourceful, you can overcome these technical challenges and successfully obtain your custom LUT.
Applying AI-Generated LUTs in Popular NLEs
How to Use the Generated LUTs in Final Cut Pro
- Import Your Footage: Launch Final Cut Pro and import the video clip you want to color grade into your project.
- Apply the Custom LUT:
- Navigate to the Effects browser on the right-hand side of the Final Cut Pro interface.
- Search for the “Custom LUT” effect, usually found under the Color category.
- Drag and drop the “Custom LUT” effect onto your video clip in the timeline.
- Load the LUT File:
- With the clip selected, go to the Inspector panel (usually located at the top right).
- In the Inspector, you’ll see the “Custom LUT” settings.
- Click on the “Choose Custom LUT” dropdown menu.
- Select “Choose Custom LUT” again to open a Finder window.
- Locate the .cube file that was downloaded and click “Open”.
- Adjust the Intensity: Once the LUT is applied, you can adjust the intensity using the “Mix” slider in the “Custom LUT” settings. This allows you to fine-tune the effect and prevent it from being too overpowering.
- Make Additional Adjustments: After applying the LUT, you may want to make additional color adjustments to perfect the look of your footage. Use the built-in color correction tools in Final Cut Pro to adjust the exposure, contrast, saturation, and more. Be mindful of preserving skin tones, and make sure that the adjustments complement the overall aesthetic of the LUT. Remember, LUTs are a great starting point, but they rarely provide the complete solution to color grading.
How to Use the Generated LUTs in Adobe Premiere Pro
- Import Your Footage: Launch Adobe Premiere Pro and import the video clip you intend to color grade into your project.
- Create an Adjustment Layer:
- Go to the “Project” panel (usually at the bottom left).
- Click the “New Item” icon (it looks like a page being turned). Select “Adjustment Layer”.
- Drag the adjustment layer from the Project panel onto the timeline, above your video clip. Adjust the duration of the adjustment layer to match the length of your video clip.
- Open the Lumetri Color Panel:
- Select the adjustment layer in the timeline.
- Navigate to the “Color” workspace at the top of Premiere Pro. The “Lumetri Color” panel will appear on the right-hand side of the interface.
- Apply the LUT:
- In the Lumetri Color panel, go to the “Creative” tab.
- Under “Look,” click the dropdown menu. Select “Browse…” to open a file explorer window.
- Locate the .cube file and click “Open” to apply the LUT to the adjustment layer.
- Adjust the Intensity: Use the “Intensity” slider under the “Look” dropdown menu to adjust how much the LUT affects your footage. A lower intensity will result in a more subtle effect, while a higher intensity will make the effect more pronounced.
- Additional Adjustments: As with Final Cut Pro, you can use the other tools in the Lumetri Color panel to further refine the color grade. Adjust the basic correction settings such as exposure, contrast, highlights, shadows, whites, and blacks to achieve the desired look. Pay attention to skin tones and ensure that the LUT enhances rather than detracts from the overall visual quality of your video.
Pricing and Accessibility of AI LUT Generation Tools
Cost Considerations for AI-Powered LUT Creation
The pricing for AI LUT generation tools varies significantly. Some platforms offer free tiers with limited features, while others operate on a subscription-based model or charge per LUT generated. ChatGPT, for example, requires a subscription for advanced features, including image analysis and file generation.
When evaluating pricing, consider the following factors:
- Monthly Subscription Fees: Some AI tools offer monthly subscriptions that provide access to a range of features, including LUT generation, image enhancement, and more.
- Pay-Per-Use Costs: Other platforms charge a fee for each LUT generated. This can be a cost-effective option for users who only need to create LUTs occasionally.
It's essential to research and compare pricing models to find the option that best aligns with your budget and usage needs. Free tiers can be a great way to experiment with AI LUT generation, but paid subscriptions often offer more advanced features and greater flexibility. Subscriptions can range from $20/month to upwards of $100/month.
Weighing the Benefits and Drawbacks of AI LUTs
Pros
- Increased Efficiency: AI can significantly speed up the color grading process by automatically generating LUTs based on reference images.
- Accessibility for All Skill Levels: AI-powered tools make professional-grade color grading accessible to video editors of all skill levels.
- Creative Experimentation: AI allows for quick and easy experimentation with different visual styles, unlocking new creative possibilities.
- Consistency Across Clips: AI-generated LUTs can ensure consistent color grading across multiple clips, even if they were shot under different lighting conditions.
- Cost-Effective Solution: AI LUT generation can be a cost-effective alternative to traditional color grading techniques, especially for independent creators and small businesses.
Cons
- Potential for Generic Looks: AI-generated LUTs can sometimes produce generic or uninspired looks, especially if the reference images are not carefully selected.
- Limited Customization: Some AI tools offer limited customization options, making it difficult to fine-tune the LUT to perfectly match your desired look.
- Dependency on Reference Images: The quality of the AI-generated LUT is highly dependent on the quality and relevance of the reference images.
- Subscription Costs: Many AI LUT generation tools operate on a subscription-based model, which can be expensive for users who only need to create LUTs occasionally.
- Ethical Considerations: The use of AI in video editing raises ethical concerns about the potential for manipulation and the displacement of human color graders.
Key Features of AI LUT Generation Tools
Core Functionalities of AI LUT Creation Platforms
AI LUT generation tools come equipped with a variety of features designed to simplify and enhance the color grading process. Here are some of the most important functionalities:
- Image Analysis: AI algorithms can analyze reference images and extract their color characteristics, identifying the dominant hues, tones, and saturation levels.
- LUT Generation: Based on the image analysis, the AI can generate a .cube file that replicates the colors of the reference image. This file can then be imported into your NLE and applied to your footage.
- Customization Options: Some AI tools offer customization options that allow you to fine-tune the generated LUT. You can adjust the intensity, contrast, and saturation to achieve the desired look.
- Format Compatibility: AI LUT generation tools typically support a range of file formats, including .cube, .3dl, and .look. This ensures compatibility with different NLEs and color grading software.
- Batch Processing: Some platforms offer batch processing capabilities that allow you to generate multiple LUTs at once. This can save time when working on large projects.
By leveraging these features, video editors can streamline their color grading workflow and achieve professional-grade results with ease.
Practical Applications of AI-Generated LUTs
Real-World Scenarios for Using AI LUTs
AI-generated LUTs can be used in a variety of real-world scenarios to enhance the visual appearance of video content. Here are some examples:
- Cinematic Look: Replicate the color grading style of your favorite films to give your footage a cinematic aesthetic.
- Consistency Across Clips: Ensure consistent color grading across multiple clips, even if they were shot under different lighting conditions.
- Brand Identity: Create a custom LUT that aligns with your brand's visual identity to ensure consistent branding across all video content.
- Mood Enhancement: Use LUTs to evoke a specific mood or emotion in your footage, such as warmth, nostalgia, or suspense.
- Quick Color Correction: Correct color imbalances and exposure issues quickly and efficiently, saving time in post-production.
By leveraging AI-generated LUTs, video editors can elevate the visual quality of their work and achieve professional-grade results with ease.
Frequently Asked Questions About AI LUT Generation
Is AI LUT generation suitable for professional video editing?
Yes, AI LUT generation can be a valuable tool for professional video editing. While it may not replace traditional color grading techniques entirely, it can significantly speed up the workflow and provide a great starting point for achieving the desired look. AI-generated LUTs can be particularly useful for quickly applying a consistent style across multiple clips or for experimenting with different looks. Professional video editors can leverage AI to enhance their efficiency and unlock new creative possibilities, but they should still rely on their expertise to fine-tune the results and ensure the highest quality.
Exploring Further Possibilities with AI and Video Editing
What other AI tools can enhance my video editing workflow?
AI's influence extends far beyond LUT generation, offering a plethora of tools to enhance various aspects of video editing. Here are some exciting applications:
- AI-Powered Noise Reduction: Eliminate unwanted noise from your footage with AI-driven noise reduction tools. These algorithms can intelligently identify and remove noise without sacrificing image quality.
- AI-Based Object Removal: Remove unwanted objects from your video with AI-powered object removal tools. These tools can seamlessly fill the area where the object was, creating a natural-looking result.
- AI-Driven Content-Aware Editing: Automate repetitive tasks and streamline your editing process with AI-driven content-aware editing tools. These tools can analyze your footage and make intelligent editing suggestions.
- AI-Enhanced Upscaling: Increase the resolution of your video footage with AI-enhanced upscaling tools. These algorithms can add detail and sharpness to low-resolution footage, making it suitable for larger displays.
By exploring these AI tools, video editors can unlock new levels of efficiency, creativity, and visual quality in their work.


 WordPress.com now allows AI agents to write and publish posts, plus more
WordPress.com, the popular web hosting and publishing platform, is now embracing AI agents—a move that could reshape the look and feel of the web. The company announced Friday that it will allow AI agents to draft, edit, and publish content on custom
WordPress.com now allows AI agents to write and publish posts, plus more
WordPress.com, the popular web hosting and publishing platform, is now embracing AI agents—a move that could reshape the look and feel of the web. The company announced Friday that it will allow AI agents to draft, edit, and publish content on custom
 Anthropic's experimental AI Claude completes negotiations and transactions in e-commerce test
As artificial intelligence advances rapidly, Anthropic quietly rolled out an internal experiment called "Project Deal" last Friday, showcasing AI's potential in e-commerce. The experiment had its AI model Claude autonomously handle buying, selling, a
Anthropic's experimental AI Claude completes negotiations and transactions in e-commerce test
As artificial intelligence advances rapidly, Anthropic quietly rolled out an internal experiment called "Project Deal" last Friday, showcasing AI's potential in e-commerce. The experiment had its AI model Claude autonomously handle buying, selling, a
 DeepSeek Code poised for launch
As AI technology accelerates, DeepSeek is at a thrilling juncture. The AI company recently revealed it has secured over 70 billion yuan in funding. Leadership has emphasized a commitment to groundbreaking AI research over immediate commercial gains.
DeepSeek Code poised for launch
As AI technology accelerates, DeepSeek is at a thrilling juncture. The AI company recently revealed it has secured over 70 billion yuan in funding. Leadership has emphasized a commitment to groundbreaking AI research over immediate commercial gains.

2026 Latest Best AI Expense Trackers: Top-rated tools to scan receipts & categorize corporate spend automatically. Discover powerful, game-changing solutions for effortless expense management, accurate financial tracking, and streamlined compliance. Our curated, weekly-updated comparison of free vs paid options helps you find the perfect fit. Unlock your AI edge with XIX.AI's expert picks.
10 tools
xix.ai

Discover the 2026 latest top-rated AI recruiting tools on XIX.AI. Our curated list features powerful, game-changing solutions for screening resumes and automating candidate interview scheduling. Compare free vs paid options with real-world tests and weekly updated rankings. Find your perfect hiring assistant and streamline your recruitment today!
10 tools
xix.ai
Discover the 2026 best AI personal wellness and focus coaches on XIX.AI. Our curated rankings feature top-rated, game-changing tools to manage burnout and boost mental energy. Compare free vs paid options with real-world insights. Unlock your path to peak productivity and well-being today.
10 tools
xix.ai
Discover the 2026 latest top-rated AI romantic chatbots for building genuine, long-term connections. Our curated list features powerful, consistent personalities, free vs paid comparisons, and real-world tests. Find your perfect companion and start building today at XIX.AI.
10 tools
xix.ai

Discover the 2026 best AI data science mentors to master SQL, Pandas & ML workflows. Explore our top-rated, curated selection at XIX.AI for powerful, game-changing guidance. Compare free vs paid options with real-world insights. Unlock your data science mastery today.
10 tools
xix.ai

Discover the 2026 best AI flirting and conversation trainers on XIX.AI. Our curated, top-rated selection helps you build social charisma and confidence in real-time. Explore must-try, game-changing tools with free vs paid comparisons and weekly updated rankings. Unlock your social edge today.
10 tools
xix.ai

Die Idee, KI für LUTs zu nutzen, ist echt clever! 🎬 Endlich muss man nicht mehr stundenlang manuell an den Farben feilen. Aber ich frage mich, ob das am Ende dazu führt, dass alle Videos gleich aussehen... Hoffentlich bleibt da noch Raum für individuelle Kreativität. Trotzdem, ein spannender Schritt für Hobby-Editoren wie mich!
Als Hobbyfilmer fand ich die manuelle Farbkorrektur immer super kompliziert 🎬. Dass KI jetzt individuelle LUTs erstellt, klingt nach einem Gamechanger! Aber macht uns das zu abhängig von Algorithmen? Die Beispiele im Artikel sehen schon krass professionell aus.
This AI LUT stuff sounds like a game-changer for video editing! I’m no pro, but making cinematic looks this easy? Count me in! 🎥
AI LUTs sound like a game-changer for video editing! Can't wait to try them out and see if they really make my footage pop like a Hollywood film. 🎥
This AI LUT stuff sounds like a game-changer for video editing! I’m stoked to try it out and see if it can make my vids look like a Hollywood blockbuster. Anyone else excited about this? 🎥
ビデオ編集でのAI LUTs?ぜひお願いします!色補正がずっと簡単になりました。ただ、結果が時々ずれることがあります。でも、大きな時間の節約になります!🎥✨


