


 Home
HomeTransform AI Images with DaVinci Resolve 3D Animation Tutorial
Bringing Static AI Images to Life with DaVinci Resolve
In the ever-expanding realm of digital creativity, artificial intelligence (AI) image generation has revolutionized how we approach art and design. Yet, even the most stunning AI-generated images can feel flat and two-dimensional. This is where things get interesting—by combining advanced tools like Midjourney and ZoeDepth with the power of DaVinci Resolve, you can transform a static image into a dynamic 3D scene. Let me walk you through this exciting process.
But first, let’s talk about why this matters. Static images, no matter how beautiful, lack the immersive quality of a 3D environment. By adding depth, motion, and interactivity, you can create something truly engaging—a piece of art that feels alive. Whether you're a professional artist or someone who simply enjoys tinkering with digital media, this technique opens up endless possibilities.
Getting Started: Creating Your AI Image
Before diving into 3D territory, you need a solid foundation—a great 2D image. If you've got a Midjourney subscription, you're already ahead of the game. Their AI models produce crisp, detailed images that serve as excellent starting points. But what if you're working on a tighter budget? No worries! There are plenty of free AI image generators out there. Just type in a prompt, tweak the settings, and voilà—you’ve got yourself an image.
For instance, I recently used Midjourney to craft a breathtaking mountain range scene bathed in golden sunlight. The result was so vivid that I couldn’t wait to bring it to life in 3D. Experimentation is key here. Spend some time tweaking your prompts until you land on something that sparks joy—and maybe even surprise.
Turning 2D into 3D with ZoeDepth
Now comes the magical part: converting your 2D masterpiece into a 3D object. Enter ZoeDepth, a tool specifically designed for this purpose. It takes your image and estimates depth information, turning it into a mesh that looks and feels three-dimensional.
Here’s how it works:
- Head over to the ZoeDepth website and select the “Image to 3D” tab.
- Drag your AI image into the designated area. Trust me, it’s easier than it sounds.
- Enable the “Keep occlusion edges” option to keep the details intact.
- Hit submit and watch as ZoeDepth transforms your image into a 3D mesh.
The output might look odd at first glance, but trust the process. Once you’ve downloaded the GLB file, you’re ready to move on to the next step.
GLB to FBX Conversion for DaVinci Resolve
DaVinci Resolve doesn’t play nicely with GLB files, unfortunately. That’s where a little conversion magic comes in handy. Using a tool like Aspose Products’ GLB to FBX converter, you can seamlessly transition from one format to another.
Steps:
- Upload your GLB file to the converter.
- Choose FBX as your output format.
- Click convert and download your newly minted FBX file.
With your FBX file in hand, you’re finally prepared to bring your creation to life in DaVinci Resolve.
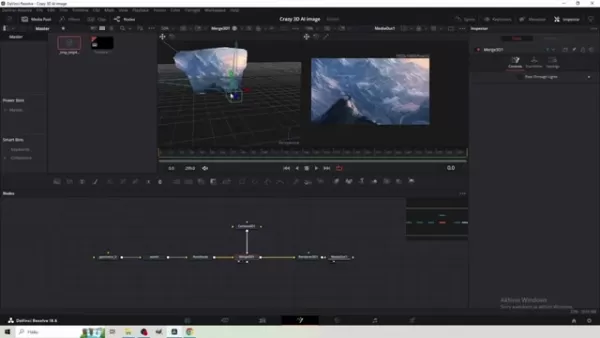
Building Your Dynamic Scene in DaVinci Resolve
Let’s dive straight into DaVinci Resolve’s Fusion tab. If you’re new to the software, don’t panic—it’s surprisingly intuitive once you get the hang of it.
- Open DaVinci Resolve and create a new project.
- Set your timeline to 60fps for smoother playback.
- Add a Fusion composition to your timeline.
- Import your FBX file via Fusion > Import > FBX Scene.
At this point, you should see your 3D mesh represented in the Fusion workspace. Three main nodes appear: Geometry (your 3D mesh), World (coordinate system), and RootNode (the master node). Since we’re dealing with 3D elements, we need to enable 3D rendering.
Rendering and Animating Your Scene
To render your 3D scene properly, you’ll need a Render 3D node. Here’s how:
- Press Shift + Spacebar and search for “Render 3D.”
- Connect the RootNode to the Render 3D node.
- Link the Render 3D node to MediaOut.
- Switch the Renderer Type to Hardware in the Inspector.
- Adjust the Y-axis rotation to 180 degrees in the RootNode settings.
Next up, we add camera movement using a Camera 3D node. This gives your scene life and dynamism. Follow these steps:
- Insert a Camera 3D node.
- Connect it to the Merge 3D node.
- Keyframe the camera’s position along the Z-axis to simulate zooming.
Adding Final Touches: Snow Overlay
To really sell the 3D effect, consider layering in atmospheric elements like snow. Adding an animated overlay not only enhances the scene but also adds texture and realism.
- Drop the snow overlay into your timeline.
- Under Composite Mode, switch to Screen to blend the overlay smoothly.
Cost Considerations and Tool Selection
When deciding between Midjourney and free AI generators, weigh your priorities. Midjourney delivers premium results but comes with a price tag. On the flip side, free tools offer affordability without sacrificing fun. Regardless of your choice, remember that experimentation is half the battle.
Pros and Cons of This Technique
Pros:
- Adds depth and interactivity to static images.
- Relatively straightforward workflow in DaVinci Resolve.
- Offers creative freedom in camera movement and scene design.
- Creates immersive content that captivates viewers.
Cons:
- Requires additional software and possibly a Midjourney subscription.
- 3D mesh reconstruction may introduce imperfections.
- Subtle camera movements are essential to maintain realism.
- Familiarity with DaVinci Resolve’s Fusion tab helps.
Frequently Asked Questions
Q: Do I absolutely need Midjourney for this?
A: No, Midjourney isn’t mandatory. Free alternatives exist, but they may differ in quality. Test multiple tools to find what fits your style.
Q: Why convert GLB to FBX?
A: DaVinci Resolve doesn’t support GLB files directly. FBX ensures compatibility.
Q: What if the 3D mesh has issues?
A: Play around with ZoeDepth’s settings or clean up the image beforehand.
Q: What’s Timeline Proxy Resolution?
A: Lower resolutions improve playback performance on less powerful systems.
Related Questions
Looking for alternatives to Midjourney? Try DALL-E 2, Stable Diffusion, NightCafe Creator, or RunwayML. Each tool brings something unique to the table, so explore and discover what resonates with you.


 Related article
 OpenAI Secretly Changes Charter to Make Removing Altman Harder
Following the 2023 coup-like incident, OpenAI has further solidified protections for CEO Sam Altman by updating its corporate bylaws. Recently released court documents reveal that Altman's position is now rock-solid, with substantially higher barrier
Meta AI now responds to buyer messages on Facebook Marketplace
Facebook Marketplace introduces new Meta AI features, including automated replies to buyer inquiries, the company announced Thursday. The platform also leverages AI to accelerate item listings, summarize seller profiles, and now lets sellers offer sh
OpenAI outlines AI economy with public wealth funds, robot taxes, and four-day week
As governments struggle to manage the economic impact of superintelligent machines, OpenAI has released a set of policy proposals outlining how wealth and work could be reshaped in an "intelligence age." The ideas blend traditional left-leaning mecha
Related Special Topic Recommendations
Productivity
OpenAI Secretly Changes Charter to Make Removing Altman Harder
Following the 2023 coup-like incident, OpenAI has further solidified protections for CEO Sam Altman by updating its corporate bylaws. Recently released court documents reveal that Altman's position is now rock-solid, with substantially higher barrier
Meta AI now responds to buyer messages on Facebook Marketplace
Facebook Marketplace introduces new Meta AI features, including automated replies to buyer inquiries, the company announced Thursday. The platform also leverages AI to accelerate item listings, summarize seller profiles, and now lets sellers offer sh
OpenAI outlines AI economy with public wealth funds, robot taxes, and four-day week
As governments struggle to manage the economic impact of superintelligent machines, OpenAI has released a set of policy proposals outlining how wealth and work could be reshaped in an "intelligence age." The ideas blend traditional left-leaning mecha
Related Special Topic Recommendations
Productivity
 AI Personal Wellness & Focus Coaches: Manage Burnout & Boost Mental Energy Levels
Discover the 2026 best AI personal wellness and focus coaches on XIX.AI. Our curated rankings feature top-rated, game-changing tools to manage burnout and boost mental energy. Compare free vs paid options with real-world insights. Unlock your path to peak productivity and well-being today.
 10 tools
 xix.ai
chatbot
Top-Rated AI Romantic Chatbots: Build Long-Term Relationships with Consistent Personalities
xix.ai
chatbot
Top-Rated AI Romantic Chatbots: Build Long-Term Relationships with Consistent Personalities
Discover the 2026 latest top-rated AI romantic chatbots for building genuine, long-term connections. Our curated list features powerful, consistent personalities, free vs paid comparisons, and real-world tests. Find your perfect companion and start building today at XIX.AI.
10 tools
xix.ai
Education and Learning
Best AI Data Science Mentors: Master SQL, Pandas & Machine Learning Workflows
Discover the 2026 best AI data science mentors to master SQL, Pandas & ML workflows. Explore our top-rated, curated selection at XIX.AI for powerful, game-changing guidance. Compare free vs paid options with real-world insights. Unlock your data science mastery today.
10 tools
xix.ai
chatbot
Best AI Flirting & Conversation Trainers: Improve Social Charisma and Confidence in Real-Time
Discover the 2026 best AI flirting and conversation trainers on XIX.AI. Our curated, top-rated selection helps you build social charisma and confidence in real-time. Explore must-try, game-changing tools with free vs paid comparisons and weekly updated rankings. Unlock your social edge today.
10 tools
xix.ai
code
Best AI Tools for Automated Unit Testing: Generate Jest, PyTest & JUnit Test Cases in One Click
Discover the 2026 latest top-rated AI tools for automated unit testing. Our curated selection features powerful, game-changing solutions to generate Jest, PyTest & JUnit test cases instantly. Compare free vs paid options with real-world tests and weekly updated rankings on XIX.AI. Unlock your AI edge and boost development productivity today.
10 tools
xix.ai
Data Analysis
Best AI Data Visualization Tools: Auto-Generate Interactive BI Dashboards from Raw Files
Discover the 2026 best AI data visualization tools at XIX.AI. Our curated, top-rated selection helps you auto-generate powerful, interactive BI dashboards from raw files instantly. Compare free vs paid options with real-world tests and weekly updated rankings. Unlock your data's potential today.
10 tools
xix.ai

 Comments (3)
0/500
Comments (3)
0/500
![GregoryClark]()
Никогда бы не подумал, что статические AI-изображения можно так оживить! DaVinci Resolve оказывается не только для цветокоррекции. Интересно, сколько времени потребуется на освоение этих техник? Может быть, попробую сделать анимированный портрет своего кота 😸
![JuanMartínez]()
This tutorial is a game-changer! Turning flat AI images into 3D animations with DaVinci Resolve sounds like magic. Can’t wait to try it and make my designs pop! 🖼️✨
![CarlPerez]()
Whoa, turning AI images into 3D animations with DaVinci Resolve sounds like a game-changer! I’m no pro, but this tutorial makes me wanna dive in and play with some trippy visuals. 😎 Anyone tried this yet? How’s the learning curve?
Bringing Static AI Images to Life with DaVinci Resolve
In the ever-expanding realm of digital creativity, artificial intelligence (AI) image generation has revolutionized how we approach art and design. Yet, even the most stunning AI-generated images can feel flat and two-dimensional. This is where things get interesting—by combining advanced tools like Midjourney and ZoeDepth with the power of DaVinci Resolve, you can transform a static image into a dynamic 3D scene. Let me walk you through this exciting process.
But first, let’s talk about why this matters. Static images, no matter how beautiful, lack the immersive quality of a 3D environment. By adding depth, motion, and interactivity, you can create something truly engaging—a piece of art that feels alive. Whether you're a professional artist or someone who simply enjoys tinkering with digital media, this technique opens up endless possibilities.
Getting Started: Creating Your AI Image
Before diving into 3D territory, you need a solid foundation—a great 2D image. If you've got a Midjourney subscription, you're already ahead of the game. Their AI models produce crisp, detailed images that serve as excellent starting points. But what if you're working on a tighter budget? No worries! There are plenty of free AI image generators out there. Just type in a prompt, tweak the settings, and voilà—you’ve got yourself an image.
For instance, I recently used Midjourney to craft a breathtaking mountain range scene bathed in golden sunlight. The result was so vivid that I couldn’t wait to bring it to life in 3D. Experimentation is key here. Spend some time tweaking your prompts until you land on something that sparks joy—and maybe even surprise.
Turning 2D into 3D with ZoeDepth
Now comes the magical part: converting your 2D masterpiece into a 3D object. Enter ZoeDepth, a tool specifically designed for this purpose. It takes your image and estimates depth information, turning it into a mesh that looks and feels three-dimensional.
Here’s how it works:
- Head over to the ZoeDepth website and select the “Image to 3D” tab.
- Drag your AI image into the designated area. Trust me, it’s easier than it sounds.
- Enable the “Keep occlusion edges” option to keep the details intact.
- Hit submit and watch as ZoeDepth transforms your image into a 3D mesh.
The output might look odd at first glance, but trust the process. Once you’ve downloaded the GLB file, you’re ready to move on to the next step.
GLB to FBX Conversion for DaVinci Resolve
DaVinci Resolve doesn’t play nicely with GLB files, unfortunately. That’s where a little conversion magic comes in handy. Using a tool like Aspose Products’ GLB to FBX converter, you can seamlessly transition from one format to another.
Steps:
- Upload your GLB file to the converter.
- Choose FBX as your output format.
- Click convert and download your newly minted FBX file.
With your FBX file in hand, you’re finally prepared to bring your creation to life in DaVinci Resolve.
Building Your Dynamic Scene in DaVinci Resolve
Let’s dive straight into DaVinci Resolve’s Fusion tab. If you’re new to the software, don’t panic—it’s surprisingly intuitive once you get the hang of it.
- Open DaVinci Resolve and create a new project.
- Set your timeline to 60fps for smoother playback.
- Add a Fusion composition to your timeline.
- Import your FBX file via Fusion > Import > FBX Scene.
At this point, you should see your 3D mesh represented in the Fusion workspace. Three main nodes appear: Geometry (your 3D mesh), World (coordinate system), and RootNode (the master node). Since we’re dealing with 3D elements, we need to enable 3D rendering.
Rendering and Animating Your Scene
To render your 3D scene properly, you’ll need a Render 3D node. Here’s how:
- Press Shift + Spacebar and search for “Render 3D.”
- Connect the RootNode to the Render 3D node.
- Link the Render 3D node to MediaOut.
- Switch the Renderer Type to Hardware in the Inspector.
- Adjust the Y-axis rotation to 180 degrees in the RootNode settings.
Next up, we add camera movement using a Camera 3D node. This gives your scene life and dynamism. Follow these steps:
- Insert a Camera 3D node.
- Connect it to the Merge 3D node.
- Keyframe the camera’s position along the Z-axis to simulate zooming.
Adding Final Touches: Snow Overlay
To really sell the 3D effect, consider layering in atmospheric elements like snow. Adding an animated overlay not only enhances the scene but also adds texture and realism.
- Drop the snow overlay into your timeline.
- Under Composite Mode, switch to Screen to blend the overlay smoothly.
Cost Considerations and Tool Selection
When deciding between Midjourney and free AI generators, weigh your priorities. Midjourney delivers premium results but comes with a price tag. On the flip side, free tools offer affordability without sacrificing fun. Regardless of your choice, remember that experimentation is half the battle.
Pros and Cons of This Technique
Pros:
- Adds depth and interactivity to static images.
- Relatively straightforward workflow in DaVinci Resolve.
- Offers creative freedom in camera movement and scene design.
- Creates immersive content that captivates viewers.
Cons:
- Requires additional software and possibly a Midjourney subscription.
- 3D mesh reconstruction may introduce imperfections.
- Subtle camera movements are essential to maintain realism.
- Familiarity with DaVinci Resolve’s Fusion tab helps.
Frequently Asked Questions
Q: Do I absolutely need Midjourney for this? A: No, Midjourney isn’t mandatory. Free alternatives exist, but they may differ in quality. Test multiple tools to find what fits your style.
Q: Why convert GLB to FBX? A: DaVinci Resolve doesn’t support GLB files directly. FBX ensures compatibility.
Q: What if the 3D mesh has issues? A: Play around with ZoeDepth’s settings or clean up the image beforehand.
Q: What’s Timeline Proxy Resolution? A: Lower resolutions improve playback performance on less powerful systems.
Related Questions
Looking for alternatives to Midjourney? Try DALL-E 2, Stable Diffusion, NightCafe Creator, or RunwayML. Each tool brings something unique to the table, so explore and discover what resonates with you.


 OpenAI Secretly Changes Charter to Make Removing Altman Harder
Following the 2023 coup-like incident, OpenAI has further solidified protections for CEO Sam Altman by updating its corporate bylaws. Recently released court documents reveal that Altman's position is now rock-solid, with substantially higher barrier
OpenAI Secretly Changes Charter to Make Removing Altman Harder
Following the 2023 coup-like incident, OpenAI has further solidified protections for CEO Sam Altman by updating its corporate bylaws. Recently released court documents reveal that Altman's position is now rock-solid, with substantially higher barrier
 Meta AI now responds to buyer messages on Facebook Marketplace
Facebook Marketplace introduces new Meta AI features, including automated replies to buyer inquiries, the company announced Thursday. The platform also leverages AI to accelerate item listings, summarize seller profiles, and now lets sellers offer sh
Meta AI now responds to buyer messages on Facebook Marketplace
Facebook Marketplace introduces new Meta AI features, including automated replies to buyer inquiries, the company announced Thursday. The platform also leverages AI to accelerate item listings, summarize seller profiles, and now lets sellers offer sh
 OpenAI outlines AI economy with public wealth funds, robot taxes, and four-day week
As governments struggle to manage the economic impact of superintelligent machines, OpenAI has released a set of policy proposals outlining how wealth and work could be reshaped in an "intelligence age." The ideas blend traditional left-leaning mecha
OpenAI outlines AI economy with public wealth funds, robot taxes, and four-day week
As governments struggle to manage the economic impact of superintelligent machines, OpenAI has released a set of policy proposals outlining how wealth and work could be reshaped in an "intelligence age." The ideas blend traditional left-leaning mecha
Discover the 2026 best AI personal wellness and focus coaches on XIX.AI. Our curated rankings feature top-rated, game-changing tools to manage burnout and boost mental energy. Compare free vs paid options with real-world insights. Unlock your path to peak productivity and well-being today.
10 tools
xix.ai
Discover the 2026 latest top-rated AI romantic chatbots for building genuine, long-term connections. Our curated list features powerful, consistent personalities, free vs paid comparisons, and real-world tests. Find your perfect companion and start building today at XIX.AI.
10 tools
xix.ai

Discover the 2026 best AI data science mentors to master SQL, Pandas & ML workflows. Explore our top-rated, curated selection at XIX.AI for powerful, game-changing guidance. Compare free vs paid options with real-world insights. Unlock your data science mastery today.
10 tools
xix.ai

Discover the 2026 best AI flirting and conversation trainers on XIX.AI. Our curated, top-rated selection helps you build social charisma and confidence in real-time. Explore must-try, game-changing tools with free vs paid comparisons and weekly updated rankings. Unlock your social edge today.
10 tools
xix.ai

Discover the 2026 latest top-rated AI tools for automated unit testing. Our curated selection features powerful, game-changing solutions to generate Jest, PyTest & JUnit test cases instantly. Compare free vs paid options with real-world tests and weekly updated rankings on XIX.AI. Unlock your AI edge and boost development productivity today.
10 tools
xix.ai
Discover the 2026 best AI data visualization tools at XIX.AI. Our curated, top-rated selection helps you auto-generate powerful, interactive BI dashboards from raw files instantly. Compare free vs paid options with real-world tests and weekly updated rankings. Unlock your data's potential today.
10 tools
xix.ai

Никогда бы не подумал, что статические AI-изображения можно так оживить! DaVinci Resolve оказывается не только для цветокоррекции. Интересно, сколько времени потребуется на освоение этих техник? Может быть, попробую сделать анимированный портрет своего кота 😸
This tutorial is a game-changer! Turning flat AI images into 3D animations with DaVinci Resolve sounds like magic. Can’t wait to try it and make my designs pop! 🖼️✨
Whoa, turning AI images into 3D animations with DaVinci Resolve sounds like a game-changer! I’m no pro, but this tutorial makes me wanna dive in and play with some trippy visuals. 😎 Anyone tried this yet? How’s the learning curve?


