


 Home
HomeMidjourney Inpainting: Your Ultimate Guide to AI-Powered Image Editing
If you're diving into the world of AI-generated art, you've likely heard about Midjourney's inpainting feature. It's a game-changer, allowing you to tweak existing images with pinpoint accuracy. Whether you're looking to refine the smallest detail or completely overhaul certain elements, inpainting gives you the reins over your creative journey. In this guide, we'll explore how you can harness Midjourney's inpainting capabilities to elevate your AI-generated masterpieces.
Key Points
- Inpainting lets you modify specific sections of an image you've already created.
- Access the inpainting tool by clicking the 'Vary (Region)' button.
- Use outlining tools to pinpoint the areas you want to change.
- Guide the AI with detailed text prompts to achieve your desired modifications.
- The AI generates multiple variations, giving you the chance to pick the perfect result.
- You can upscale the image to appreciate the finer details.
- This method is perfect for enhancing AI-generated art without starting from scratch.
Understanding Midjourney's Inpainting Feature
What is Inpainting?
In the realm of AI image editing, inpainting means tweaking specific parts of an existing image with the help of artificial intelligence. Midjourney's approach to inpainting is both intuitive and powerful, allowing you to alter details, switch up textures, or even introduce new elements without the need to start over. This targeted technique is a real time-saver and gives you the precision you need to perfect your artwork.
Instead of regenerating the entire image just to fix a tiny flaw or tweak a small detail, inpainting zeroes in on the problematic spot. This not only boosts efficiency but also hands you more control over the final product. By carefully selecting the area and crafting a specific text prompt, you steer the AI towards the changes you envision, resulting in a finely tuned piece of art. It's a game-changer, making it easier than ever to bring your vision to life.
Accessing the Inpainting Feature with Vary (Region)
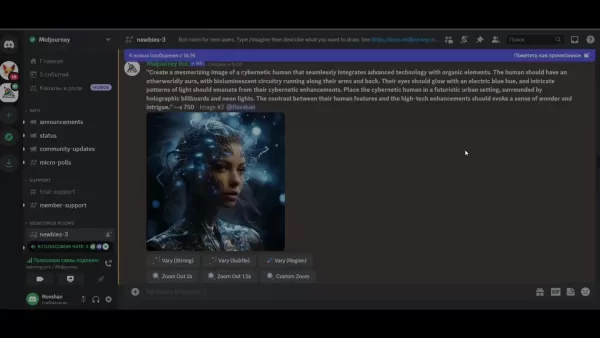
The 'Vary (Region)' button is your ticket to Midjourney's inpainting magic. Once you've created your initial set of images, this button pops up below the image grid. Clicking it opens up the inpainting interface, where you can then define the exact areas you want to tweak.
This feature adds a layer of flexibility to the AI image generation process, allowing you to refine and personalize your artwork step by step. Knowing how to navigate to this tool is essential if you want to make the most of Midjourney's AI image editing capabilities.
Even if you're new to AI image generation, this user-friendly approach makes inpainting accessible. The 'Vary (Region)' button is a testament to Midjourney's commitment to providing powerful yet easy-to-use creative tools. By integrating this function directly into the image generation workflow, Midjourney encourages users to experiment and refine their images with precision. The inpainting workflow is designed to be seamless, from the initial image creation to the final touches.
The Importance of Precise Outlining
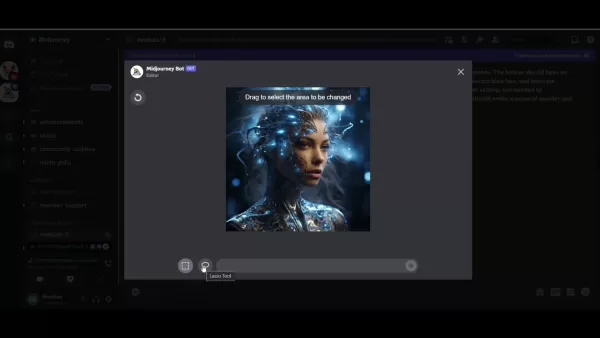
Getting the outlining right is crucial for effective inpainting. Midjourney offers both a rectangle tool and a lasso tool, letting you select areas ranging from simple shapes to complex, free-form regions.
The more precise your outline, the better the AI can understand and execute your desired changes. This balance between AI power and user control is what makes Midjourney's ecosystem so compelling.
Accurate outlining is key to ensuring the AI focuses on the right spots. Whether you're correcting a minor imperfection or reimagining a section of the image, precise outlining helps avoid unwanted changes to surrounding areas. This level of control is invaluable for achieving the perfect aesthetic and maintaining consistency throughout the image. Mastering the outlining tools is your ticket to unlocking the full potential of Midjourney's inpainting feature.
Guiding the AI with Text Prompts
Once you've outlined the area, it's time to guide the AI with a text prompt. The clarity and detail of your prompt directly affect the quality and relevance of the results. Be as specific and descriptive as possible, detailing the desired texture, color, style, or objects you want to add.
A well-crafted prompt ensures the AI understands your vision and can generate appropriate variations. This phase highlights the collaborative nature of AI image generation, where your creativity and the AI's processing power work hand in hand.
Writing effective text prompts is an art form. Experiment with different phrasing and keywords to see how they influence the AI's output. The more specific you are, the better the AI can align with your intent and deliver results that match your vision. This iterative process of prompting and refining is key to mastering Midjourney's inpainting feature, allowing you to achieve stunning and unique results.
Step-by-Step Guide to Using Midjourney Inpainting
Initiating Inpainting Process
Here's a straightforward guide on how to effectively use Midjourney's inpainting feature:
- Generate Initial Image: Begin by creating an image using a text prompt. This will serve as the base for your modifications.
- Select the Image: Choose the specific image variation you want to refine.
- Click 'Vary (Region)': Find and click the 'Vary (Region)' button below the image.
- Outline the Area: Use the rectangle or lasso tool to precisely outline the area you wish to modify.
- Enter Text Prompt: Provide a detailed text prompt describing the changes you want.
- Submit Change: Submit the job and wait for Midjourney to generate variations.
- Review Variations: Carefully review each variation to select the best outcome.
- Upscale (Optional): If desired, upscale the selected image to view intricate details.
This process showcases the intuitive workflow of Midjourney's AI image editing software, making it easy for users to navigate and utilize inpainting to enhance their artwork. The combination of precise outlining and targeted text prompts gives creators unprecedented control over their AI-generated creations.
Advanced Tips for Effective Inpainting
To maximize the potential of Midjourney's inpainting feature, consider these advanced tips:
- Be Specific: Vague prompts can lead to unpredictable results. Be as detailed as possible in describing the changes you want.
- Use Keywords: Incorporate relevant keywords related to texture, color, and style to guide the AI more effectively.
- Iterate: Don't hesitate to experiment with different prompts and selections. AI image generation is an iterative process.
- Reference Other Images: If possible, reference specific artworks or styles to guide the AI's output.
- Combine with Other Features: Use inpainting alongside other Midjourney features like upscaling and variations for even greater control.
By following these tips, you can significantly enhance the effectiveness of your inpainting efforts, allowing you to achieve truly remarkable results with Midjourney's advanced AI image editing technology. The key is to view the process as a collaboration between your creative vision and the AI's processing power, leveraging the strengths of both to create stunning and unique artwork.
A Step-by-Step Guide on How to Change Hair Color Using Midjourney Inpainting
Step 1: Select the Vary Region Tool
Start by finding the image you want to edit within Midjourney. Below the image grid, you'll see several options, including the 'Vary (Region)' button. Click on this button to kick off the inpainting process.
Step 2: Precisely Outline the Hair Section
After clicking 'Vary (Region)', the inpainting interface will appear. Here, you'll find tools for outlining the specific area you want to modify. Choose either the rectangle tool for more geometric selections or the lasso tool for intricate, free-form outlining. Carefully trace around the hair, making sure you've accurately defined the section you want to change.
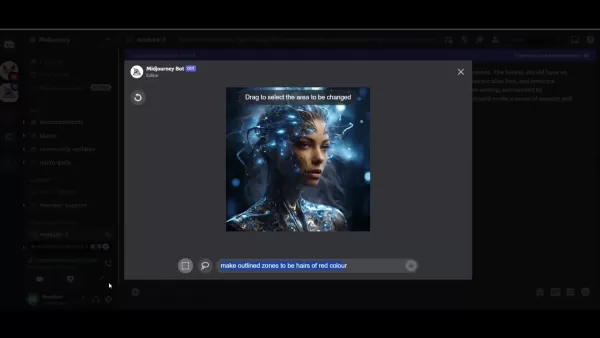
Step 3: Enter a Detailed Text Prompt
Once you've outlined the hair, you'll need to guide the AI with a text prompt. Be as descriptive as possible. For example, if you want to change the hair to red, type in: 'Make outlined zones to be in stylized and beautiful hairs of red color'. The clearer your instructions, the better the AI can understand your vision.
Step 4: Submit and Review the Changes
After submitting your prompt, Midjourney will generate multiple variations of the image with the hair color changed. Each variation may interpret your prompt slightly differently, so take your time to review each one.
Pay attention to details like color accuracy, how well the new color blends with the rest of the image, and whether any unwanted changes have occurred in surrounding areas. Select the variation that best aligns with your artistic vision.
Step 5: Upscale the Image (Optional)
Once you've chosen your preferred variation, you have the option to upscale the image for a more detailed view. Upscaling enhances the resolution, allowing you to examine intricate aspects of the image, such as the texture and individual strands of hair.
Midjourney Inpainting: Weighing the Pros and Cons
Pros
- Precise Control: Ability to modify specific areas with accuracy.
- Time-Saving: Reduces the need to regenerate entire images.
- Creative Freedom: Enhances creative possibilities through targeted edits.
- User-Friendly: Accessible interface with intuitive outlining tools.
Cons
- Prompt Dependency: Results heavily rely on the quality of the text prompt.
- Learning Curve: Requires practice to master the outlining tools.
- Ethical Considerations: Potential for misuse if not handled responsibly.
FAQ
What is Midjourney's Inpainting feature?
Midjourney's inpainting feature enables users to modify specific parts of an existing image using artificial intelligence. This allows for targeted edits without regenerating the entire image.
How do I access the inpainting feature?
You can access the inpainting feature by clicking the 'Vary (Region)' button located below the image grid after generating an initial set of images.
What tools can I use to outline the area for modification?
Midjourney provides both a rectangle tool and a lasso tool for outlining areas, catering to different shapes and levels of precision.
How important is the text prompt for inpainting?
The text prompt is crucial for guiding the AI. Be specific and descriptive to ensure the AI understands your desired changes and generates relevant variations.
Can I review multiple variations of the changes?
Yes, Midjourney generates multiple variations, allowing you to choose the one that best aligns with your vision before finalizing the changes.
Is it possible to upscale the image after inpainting?
Yes, you can upscale the selected image to view intricate details and ensure the changes are seamless and high-quality.
Related Questions
What other AI image editing tools are available?
Besides Midjourney, several other AI image editing tools offer various features and capabilities. Some popular alternatives include:
- DALL-E 2: Known for its ability to create highly detailed and imaginative images from text prompts.
- Stable Diffusion: An open-source model that offers a wide range of customization options and supports inpainting.
- Adobe Photoshop with AI: Integrates AI features like Neural Filters for tasks such as style transfer, skin smoothing, and more.
- RunwayML: A comprehensive AI platform with tools for image generation, video editing, and other creative tasks.
- Deep Image AI: Excellent for enhancing and upscaling images using AI algorithms.
These AI image tools each have their strengths, catering to different needs and preferences.
How does Midjourney compare to other AI image generators?
Midjourney stands out from other AI image generators in several ways:
- Artistic Style: Midjourney often produces images with a distinct artistic flair, making it popular among digital artists.
- Ease of Use: The platform is relatively easy to use, with simple text prompts guiding the AI.
- Community Focus: Midjourney has a strong community aspect, with users sharing prompts and creations.
- Inpainting: The inpainting feature offers precise control over image modifications.
However, other AI image generators may offer different strengths, such as greater realism, more customization options, or better integration with existing software. Ultimately, the best tool depends on your specific needs and creative goals. Evaluating the pros and cons of different AI image generation platforms is key to finding the right fit.
What are the ethical considerations when using AI image editing?
When using AI image editing tools like Midjourney, it's important to consider the ethical implications:
- Copyright: Be mindful of copyright issues when generating images based on existing artworks or styles.
- Authenticity: Clearly disclose when an image has been significantly altered by AI to maintain transparency.
- Bias: Be aware of potential biases in AI models that could perpetuate stereotypes or misrepresentations.
- Misinformation: Avoid using AI-generated images to spread false or misleading information.
Adhering to these ethical guidelines promotes responsible use of AI in digital art and helps maintain trust in the creative community. As AI technology advances, it's crucial to engage in ongoing discussions about ethical considerations and best practices.
Related article
 Suno Lead Investor: Deleting Posts Won't Plug Copyright Lawsuit Hole
The much-anticipated AI music generation platform Suno is facing a tough copyright battle, and a candid remark from its lead investor may have handed the opposing side exactly the evidence they were hoping for. C.C. Gong, a partner at Menlo Ventures
Claude Opus 4.7 Launches with Reliability Valued Over Intelligence
Anthropic has maintained an aggressive pace this year, rolling out new features almost every other day. The much-anticipated Claude Opus 4.7 has just been officially released, and interestingly, Anthropic was upfront in the announcement: "This is not
Haier Launches World's Lightest AI Sports Exoskeleton Robot, Weighing Just 1.75 kg
Haier Group has introduced the world's lightest AI-powered exoskeleton robot for sports — the Haier Exoskeleton Robot W3. This launch sets a new industry record for lightness, marking a major breakthrough in lightweight design and intelligent human m
Related Special Topic Recommendations
Comic Creation
Suno Lead Investor: Deleting Posts Won't Plug Copyright Lawsuit Hole
The much-anticipated AI music generation platform Suno is facing a tough copyright battle, and a candid remark from its lead investor may have handed the opposing side exactly the evidence they were hoping for. C.C. Gong, a partner at Menlo Ventures
Claude Opus 4.7 Launches with Reliability Valued Over Intelligence
Anthropic has maintained an aggressive pace this year, rolling out new features almost every other day. The much-anticipated Claude Opus 4.7 has just been officially released, and interestingly, Anthropic was upfront in the announcement: "This is not
Haier Launches World's Lightest AI Sports Exoskeleton Robot, Weighing Just 1.75 kg
Haier Group has introduced the world's lightest AI-powered exoskeleton robot for sports — the Haier Exoskeleton Robot W3. This launch sets a new industry record for lightness, marking a major breakthrough in lightweight design and intelligent human m
Related Special Topic Recommendations
Comic Creation
 Top AI Generators for Shonen Manga: Create High-Octane Action Sequences & Energy Effects
Discover the 2026 best AI generators for Shonen manga at XIX.AI. Our top-rated, curated list features powerful tools for creating high-octane action sequences and dynamic energy effects. Compare free vs paid options with real-world tests. Unlock your creative potential and start crafting epic manga today!
 15 tools
 xix.ai
Business
Best AI Expense Trackers: Scan Receipts & Categorize Corporate Spend Automatically
xix.ai
Business
Best AI Expense Trackers: Scan Receipts & Categorize Corporate Spend Automatically
2026 Latest Best AI Expense Trackers: Top-rated tools to scan receipts & categorize corporate spend automatically. Discover powerful, game-changing solutions for effortless expense management, accurate financial tracking, and streamlined compliance. Our curated, weekly-updated comparison of free vs paid options helps you find the perfect fit. Unlock your AI edge with XIX.AI's expert picks.
10 tools
xix.ai
Business
Best AI Recruiting Tools: Screen Resumes & Automate Candidate Interview Scheduling
Discover the 2026 latest top-rated AI recruiting tools on XIX.AI. Our curated list features powerful, game-changing solutions for screening resumes and automating candidate interview scheduling. Compare free vs paid options with real-world tests and weekly updated rankings. Find your perfect hiring assistant and streamline your recruitment today!
10 tools
xix.ai
Productivity
AI Personal Wellness & Focus Coaches: Manage Burnout & Boost Mental Energy Levels
Discover the 2026 best AI personal wellness and focus coaches on XIX.AI. Our curated rankings feature top-rated, game-changing tools to manage burnout and boost mental energy. Compare free vs paid options with real-world insights. Unlock your path to peak productivity and well-being today.
10 tools
xix.ai
chatbot
Top-Rated AI Romantic Chatbots: Build Long-Term Relationships with Consistent Personalities
Discover the 2026 latest top-rated AI romantic chatbots for building genuine, long-term connections. Our curated list features powerful, consistent personalities, free vs paid comparisons, and real-world tests. Find your perfect companion and start building today at XIX.AI.
10 tools
xix.ai
Education and Learning
Best AI Data Science Mentors: Master SQL, Pandas & Machine Learning Workflows
Discover the 2026 best AI data science mentors to master SQL, Pandas & ML workflows. Explore our top-rated, curated selection at XIX.AI for powerful, game-changing guidance. Compare free vs paid options with real-world insights. Unlock your data science mastery today.
10 tools
xix.ai

 Comments (4)
0/500
Comments (4)
0/500
![GaryBrown]()
Читаю про Midjourney и ах*ел 😂 Шутка ли — менять детали на картинке с такой точностью! Интересно, сколько дизайнеров уже сидят без работы из-за таких фич? Кстати, а есть ли ограничения по количеству правок в бесплатной версии? Кто знает — отпишитесь!
![JerryMoore]()
멋져요! 미드저니 인페인팅은 진짜 혁신적인 기능 같아요. 제 사진 보정할 때 시간을 많이 줄일 수 있을 거 같아요. 근데 무료 버전에도 적용되나요? 😅
![JuanThomas]()
This inpainting feature sounds like a dream for artists! I tried tweaking a photo and it’s wild how precise it gets. Anyone else obsessed with this tool? 🎨
![RyanSmith]()
Midjourney's inpainting sounds like a dream for artists! I tried tweaking a portrait, and the precision blew me away. Anyone else obsessed with this tool? 🎨
If you're diving into the world of AI-generated art, you've likely heard about Midjourney's inpainting feature. It's a game-changer, allowing you to tweak existing images with pinpoint accuracy. Whether you're looking to refine the smallest detail or completely overhaul certain elements, inpainting gives you the reins over your creative journey. In this guide, we'll explore how you can harness Midjourney's inpainting capabilities to elevate your AI-generated masterpieces.
Key Points
- Inpainting lets you modify specific sections of an image you've already created.
- Access the inpainting tool by clicking the 'Vary (Region)' button.
- Use outlining tools to pinpoint the areas you want to change.
- Guide the AI with detailed text prompts to achieve your desired modifications.
- The AI generates multiple variations, giving you the chance to pick the perfect result.
- You can upscale the image to appreciate the finer details.
- This method is perfect for enhancing AI-generated art without starting from scratch.
Understanding Midjourney's Inpainting Feature
What is Inpainting?
In the realm of AI image editing, inpainting means tweaking specific parts of an existing image with the help of artificial intelligence. Midjourney's approach to inpainting is both intuitive and powerful, allowing you to alter details, switch up textures, or even introduce new elements without the need to start over. This targeted technique is a real time-saver and gives you the precision you need to perfect your artwork.
Instead of regenerating the entire image just to fix a tiny flaw or tweak a small detail, inpainting zeroes in on the problematic spot. This not only boosts efficiency but also hands you more control over the final product. By carefully selecting the area and crafting a specific text prompt, you steer the AI towards the changes you envision, resulting in a finely tuned piece of art. It's a game-changer, making it easier than ever to bring your vision to life.
Accessing the Inpainting Feature with Vary (Region)
The 'Vary (Region)' button is your ticket to Midjourney's inpainting magic. Once you've created your initial set of images, this button pops up below the image grid. Clicking it opens up the inpainting interface, where you can then define the exact areas you want to tweak.
This feature adds a layer of flexibility to the AI image generation process, allowing you to refine and personalize your artwork step by step. Knowing how to navigate to this tool is essential if you want to make the most of Midjourney's AI image editing capabilities.
Even if you're new to AI image generation, this user-friendly approach makes inpainting accessible. The 'Vary (Region)' button is a testament to Midjourney's commitment to providing powerful yet easy-to-use creative tools. By integrating this function directly into the image generation workflow, Midjourney encourages users to experiment and refine their images with precision. The inpainting workflow is designed to be seamless, from the initial image creation to the final touches.
The Importance of Precise Outlining
Getting the outlining right is crucial for effective inpainting. Midjourney offers both a rectangle tool and a lasso tool, letting you select areas ranging from simple shapes to complex, free-form regions.
The more precise your outline, the better the AI can understand and execute your desired changes. This balance between AI power and user control is what makes Midjourney's ecosystem so compelling.
Accurate outlining is key to ensuring the AI focuses on the right spots. Whether you're correcting a minor imperfection or reimagining a section of the image, precise outlining helps avoid unwanted changes to surrounding areas. This level of control is invaluable for achieving the perfect aesthetic and maintaining consistency throughout the image. Mastering the outlining tools is your ticket to unlocking the full potential of Midjourney's inpainting feature.
Guiding the AI with Text Prompts
Once you've outlined the area, it's time to guide the AI with a text prompt. The clarity and detail of your prompt directly affect the quality and relevance of the results. Be as specific and descriptive as possible, detailing the desired texture, color, style, or objects you want to add.
A well-crafted prompt ensures the AI understands your vision and can generate appropriate variations. This phase highlights the collaborative nature of AI image generation, where your creativity and the AI's processing power work hand in hand.
Writing effective text prompts is an art form. Experiment with different phrasing and keywords to see how they influence the AI's output. The more specific you are, the better the AI can align with your intent and deliver results that match your vision. This iterative process of prompting and refining is key to mastering Midjourney's inpainting feature, allowing you to achieve stunning and unique results.
Step-by-Step Guide to Using Midjourney Inpainting
Initiating Inpainting Process
Here's a straightforward guide on how to effectively use Midjourney's inpainting feature:
- Generate Initial Image: Begin by creating an image using a text prompt. This will serve as the base for your modifications.
- Select the Image: Choose the specific image variation you want to refine.
- Click 'Vary (Region)': Find and click the 'Vary (Region)' button below the image.
- Outline the Area: Use the rectangle or lasso tool to precisely outline the area you wish to modify.
- Enter Text Prompt: Provide a detailed text prompt describing the changes you want.
- Submit Change: Submit the job and wait for Midjourney to generate variations.
- Review Variations: Carefully review each variation to select the best outcome.
- Upscale (Optional): If desired, upscale the selected image to view intricate details.
This process showcases the intuitive workflow of Midjourney's AI image editing software, making it easy for users to navigate and utilize inpainting to enhance their artwork. The combination of precise outlining and targeted text prompts gives creators unprecedented control over their AI-generated creations.
Advanced Tips for Effective Inpainting
To maximize the potential of Midjourney's inpainting feature, consider these advanced tips:
- Be Specific: Vague prompts can lead to unpredictable results. Be as detailed as possible in describing the changes you want.
- Use Keywords: Incorporate relevant keywords related to texture, color, and style to guide the AI more effectively.
- Iterate: Don't hesitate to experiment with different prompts and selections. AI image generation is an iterative process.
- Reference Other Images: If possible, reference specific artworks or styles to guide the AI's output.
- Combine with Other Features: Use inpainting alongside other Midjourney features like upscaling and variations for even greater control.
By following these tips, you can significantly enhance the effectiveness of your inpainting efforts, allowing you to achieve truly remarkable results with Midjourney's advanced AI image editing technology. The key is to view the process as a collaboration between your creative vision and the AI's processing power, leveraging the strengths of both to create stunning and unique artwork.
A Step-by-Step Guide on How to Change Hair Color Using Midjourney Inpainting
Step 1: Select the Vary Region Tool
Start by finding the image you want to edit within Midjourney. Below the image grid, you'll see several options, including the 'Vary (Region)' button. Click on this button to kick off the inpainting process.
Step 2: Precisely Outline the Hair Section
After clicking 'Vary (Region)', the inpainting interface will appear. Here, you'll find tools for outlining the specific area you want to modify. Choose either the rectangle tool for more geometric selections or the lasso tool for intricate, free-form outlining. Carefully trace around the hair, making sure you've accurately defined the section you want to change.
Step 3: Enter a Detailed Text Prompt
Once you've outlined the hair, you'll need to guide the AI with a text prompt. Be as descriptive as possible. For example, if you want to change the hair to red, type in: 'Make outlined zones to be in stylized and beautiful hairs of red color'. The clearer your instructions, the better the AI can understand your vision.
Step 4: Submit and Review the Changes
After submitting your prompt, Midjourney will generate multiple variations of the image with the hair color changed. Each variation may interpret your prompt slightly differently, so take your time to review each one.
Pay attention to details like color accuracy, how well the new color blends with the rest of the image, and whether any unwanted changes have occurred in surrounding areas. Select the variation that best aligns with your artistic vision.
Step 5: Upscale the Image (Optional)
Once you've chosen your preferred variation, you have the option to upscale the image for a more detailed view. Upscaling enhances the resolution, allowing you to examine intricate aspects of the image, such as the texture and individual strands of hair.
Midjourney Inpainting: Weighing the Pros and Cons
Pros
- Precise Control: Ability to modify specific areas with accuracy.
- Time-Saving: Reduces the need to regenerate entire images.
- Creative Freedom: Enhances creative possibilities through targeted edits.
- User-Friendly: Accessible interface with intuitive outlining tools.
Cons
- Prompt Dependency: Results heavily rely on the quality of the text prompt.
- Learning Curve: Requires practice to master the outlining tools.
- Ethical Considerations: Potential for misuse if not handled responsibly.
FAQ
What is Midjourney's Inpainting feature?
Midjourney's inpainting feature enables users to modify specific parts of an existing image using artificial intelligence. This allows for targeted edits without regenerating the entire image.
How do I access the inpainting feature?
You can access the inpainting feature by clicking the 'Vary (Region)' button located below the image grid after generating an initial set of images.
What tools can I use to outline the area for modification?
Midjourney provides both a rectangle tool and a lasso tool for outlining areas, catering to different shapes and levels of precision.
How important is the text prompt for inpainting?
The text prompt is crucial for guiding the AI. Be specific and descriptive to ensure the AI understands your desired changes and generates relevant variations.
Can I review multiple variations of the changes?
Yes, Midjourney generates multiple variations, allowing you to choose the one that best aligns with your vision before finalizing the changes.
Is it possible to upscale the image after inpainting?
Yes, you can upscale the selected image to view intricate details and ensure the changes are seamless and high-quality.
Related Questions
What other AI image editing tools are available?
Besides Midjourney, several other AI image editing tools offer various features and capabilities. Some popular alternatives include:
- DALL-E 2: Known for its ability to create highly detailed and imaginative images from text prompts.
- Stable Diffusion: An open-source model that offers a wide range of customization options and supports inpainting.
- Adobe Photoshop with AI: Integrates AI features like Neural Filters for tasks such as style transfer, skin smoothing, and more.
- RunwayML: A comprehensive AI platform with tools for image generation, video editing, and other creative tasks.
- Deep Image AI: Excellent for enhancing and upscaling images using AI algorithms.
These AI image tools each have their strengths, catering to different needs and preferences.
How does Midjourney compare to other AI image generators?
Midjourney stands out from other AI image generators in several ways:
- Artistic Style: Midjourney often produces images with a distinct artistic flair, making it popular among digital artists.
- Ease of Use: The platform is relatively easy to use, with simple text prompts guiding the AI.
- Community Focus: Midjourney has a strong community aspect, with users sharing prompts and creations.
- Inpainting: The inpainting feature offers precise control over image modifications.
However, other AI image generators may offer different strengths, such as greater realism, more customization options, or better integration with existing software. Ultimately, the best tool depends on your specific needs and creative goals. Evaluating the pros and cons of different AI image generation platforms is key to finding the right fit.
What are the ethical considerations when using AI image editing?
When using AI image editing tools like Midjourney, it's important to consider the ethical implications:
- Copyright: Be mindful of copyright issues when generating images based on existing artworks or styles.
- Authenticity: Clearly disclose when an image has been significantly altered by AI to maintain transparency.
- Bias: Be aware of potential biases in AI models that could perpetuate stereotypes or misrepresentations.
- Misinformation: Avoid using AI-generated images to spread false or misleading information.
Adhering to these ethical guidelines promotes responsible use of AI in digital art and helps maintain trust in the creative community. As AI technology advances, it's crucial to engage in ongoing discussions about ethical considerations and best practices.


 Suno Lead Investor: Deleting Posts Won't Plug Copyright Lawsuit Hole
The much-anticipated AI music generation platform Suno is facing a tough copyright battle, and a candid remark from its lead investor may have handed the opposing side exactly the evidence they were hoping for. C.C. Gong, a partner at Menlo Ventures
Suno Lead Investor: Deleting Posts Won't Plug Copyright Lawsuit Hole
The much-anticipated AI music generation platform Suno is facing a tough copyright battle, and a candid remark from its lead investor may have handed the opposing side exactly the evidence they were hoping for. C.C. Gong, a partner at Menlo Ventures
 Claude Opus 4.7 Launches with Reliability Valued Over Intelligence
Anthropic has maintained an aggressive pace this year, rolling out new features almost every other day. The much-anticipated Claude Opus 4.7 has just been officially released, and interestingly, Anthropic was upfront in the announcement: "This is not
Claude Opus 4.7 Launches with Reliability Valued Over Intelligence
Anthropic has maintained an aggressive pace this year, rolling out new features almost every other day. The much-anticipated Claude Opus 4.7 has just been officially released, and interestingly, Anthropic was upfront in the announcement: "This is not
 Haier Launches World's Lightest AI Sports Exoskeleton Robot, Weighing Just 1.75 kg
Haier Group has introduced the world's lightest AI-powered exoskeleton robot for sports — the Haier Exoskeleton Robot W3. This launch sets a new industry record for lightness, marking a major breakthrough in lightweight design and intelligent human m
Haier Launches World's Lightest AI Sports Exoskeleton Robot, Weighing Just 1.75 kg
Haier Group has introduced the world's lightest AI-powered exoskeleton robot for sports — the Haier Exoskeleton Robot W3. This launch sets a new industry record for lightness, marking a major breakthrough in lightweight design and intelligent human m
Discover the 2026 best AI generators for Shonen manga at XIX.AI. Our top-rated, curated list features powerful tools for creating high-octane action sequences and dynamic energy effects. Compare free vs paid options with real-world tests. Unlock your creative potential and start crafting epic manga today!
15 tools
xix.ai

2026 Latest Best AI Expense Trackers: Top-rated tools to scan receipts & categorize corporate spend automatically. Discover powerful, game-changing solutions for effortless expense management, accurate financial tracking, and streamlined compliance. Our curated, weekly-updated comparison of free vs paid options helps you find the perfect fit. Unlock your AI edge with XIX.AI's expert picks.
10 tools
xix.ai

Discover the 2026 latest top-rated AI recruiting tools on XIX.AI. Our curated list features powerful, game-changing solutions for screening resumes and automating candidate interview scheduling. Compare free vs paid options with real-world tests and weekly updated rankings. Find your perfect hiring assistant and streamline your recruitment today!
10 tools
xix.ai
Discover the 2026 best AI personal wellness and focus coaches on XIX.AI. Our curated rankings feature top-rated, game-changing tools to manage burnout and boost mental energy. Compare free vs paid options with real-world insights. Unlock your path to peak productivity and well-being today.
10 tools
xix.ai
Discover the 2026 latest top-rated AI romantic chatbots for building genuine, long-term connections. Our curated list features powerful, consistent personalities, free vs paid comparisons, and real-world tests. Find your perfect companion and start building today at XIX.AI.
10 tools
xix.ai

Discover the 2026 best AI data science mentors to master SQL, Pandas & ML workflows. Explore our top-rated, curated selection at XIX.AI for powerful, game-changing guidance. Compare free vs paid options with real-world insights. Unlock your data science mastery today.
10 tools
xix.ai

Читаю про Midjourney и ах*ел 😂 Шутка ли — менять детали на картинке с такой точностью! Интересно, сколько дизайнеров уже сидят без работы из-за таких фич? Кстати, а есть ли ограничения по количеству правок в бесплатной версии? Кто знает — отпишитесь!
멋져요! 미드저니 인페인팅은 진짜 혁신적인 기능 같아요. 제 사진 보정할 때 시간을 많이 줄일 수 있을 거 같아요. 근데 무료 버전에도 적용되나요? 😅
This inpainting feature sounds like a dream for artists! I tried tweaking a photo and it’s wild how precise it gets. Anyone else obsessed with this tool? 🎨
Midjourney's inpainting sounds like a dream for artists! I tried tweaking a portrait, and the precision blew me away. Anyone else obsessed with this tool? 🎨


