


Create Unique Stickers at Home Using AI and Silhouette
Creating Personalized Stickers with AI: A Step-by-Step Guide
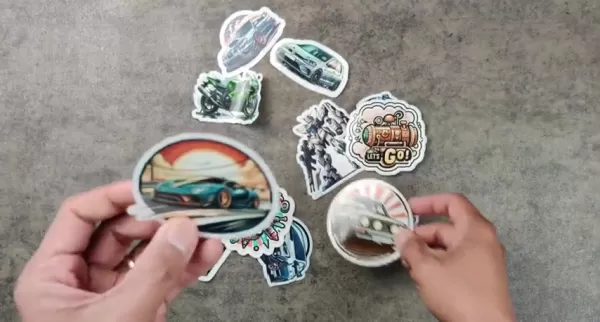
Have you ever dreamed of creating your own custom stickers but found yourself overwhelmed by the process? Well, thanks to advancements in AI technology and tools like the Silhouette Cameo and Silhouette Studio, designing unique, waterproof stickers has never been easier. Whether you’re looking to decorate your laptop, personalize gifts, or even launch a small business, this guide will walk you through every step of the process, from concept to creation.
Introducing Microsoft Copilot AI
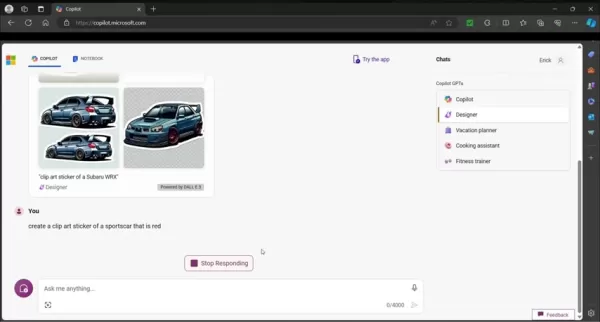
Let’s start with the brain behind your sticker design: Microsoft Copilot AI. Accessible through Microsoft Edge, this powerful tool allows you to generate unique sticker designs with nothing more than a few simple text prompts. No need for hours of manual graphic design—just tell Copilot what you want, and it’ll do the heavy lifting for you. Best of all, you don’t even need a premium subscription; a free Hotmail account works just fine.
Copilot’s versatility shines through its ability to produce various art styles based on your input. For example, if you’re aiming for a vintage look, you can specify that in your prompt. The AI integrates seamlessly with Microsoft Edge, ensuring a smooth workflow from start to finish. Whether you’re envisioning a sleek logo or a whimsical cartoon, Copilot can help you bring your ideas to life.
Crafting the Perfect Prompt
Creating clip art-style stickers starts with crafting the right prompt. Instead of vague requests, focus on specificity. Phrases like “create a clip art sticker of [subject]” tend to yield the best results. For instance, if you’re designing a sticker of a Subaru WRX, your prompt might read:
Create a clip art sticker of a Subaru WRX.
Adding descriptive keywords—such as "vintage," "modern," or "minimalist"—can further refine the output. Experimentation is key here. Copilot generates four variations per prompt, giving you multiple options to choose from. Once you’ve settled on your favorite design, download it to your computer and save it to a folder where Silhouette Studio can access it.
Setting Up Silhouette Studio
Before diving into cutting, it’s crucial to configure Silhouette Studio properly. Open the software and set the page size to match your sticker dimensions. Registration marks are another must—they act as guides for the cutting machine, ensuring precision. Next, import your AI-generated image into the software. This step is where things get exciting—you’re about to turn your digital design into something tangible!
Tracing and Cutting
With your image imported, it’s time to trace the outline. Silhouette Studio’s Trace panel is your best friend here. Select the portion of the image you want to cut, then activate the Trace tool. Adjust the settings until you achieve clean, defined lines. Once traced, you can adjust the cut lines as needed to ensure accuracy.
Printing and Enhancing Water Resistance
Printing is the next step. Load your waterproof sticker paper into the printer, making sure the settings match the paper type. Navigate to File > Print in Silhouette Studio and confirm everything is set up correctly. Hit Print, and watch your design come to life.
To enhance durability, laminate your printed stickers. This step adds an extra layer of protection against moisture, ensuring your stickers stay intact even after prolonged exposure to water. Once laminated, load the sheets onto a cutting mat and feed them into the Silhouette Cameo.
Final Touches: Cutting and Testing
With the Silhouette Cameo, precision is guaranteed. Align the cutting mat, adjust the blade depth, and send the job from Silhouette Studio. The machine will scan the registration marks and cut around your stickers with pinpoint accuracy. Once the cutting is complete, carefully peel off the stickers and test their waterproof capabilities by running them under water. Voilà—you now have your very own custom stickers!
The Cost Factor
Creating stickers at home is surprisingly budget-friendly. While the initial investment in a Silhouette Cameo may seem steep ($200–$400), it pays off in the long run. Sticker paper and laminate sheets are relatively inexpensive, with packs ranging from $15 to $30. Depending on how many stickers you can fit on a single sheet, the per-sticker cost remains manageable.
Potential Applications
From decorating personal items like laptops and water bottles to crafting promotional materials for small businesses, the possibilities are endless. You could even make educational tools for kids or quirky decals for parties. The only limit is your imagination!
Frequently Asked Questions
Q: Do I need special equipment?
A: Yes, a Silhouette Cameo is necessary for precise cuts, and access to Microsoft Copilot requires a Microsoft account.
Q: What are the most important steps?
A: Using clip art, saving AI designs to Silhouette Studio, and adjusting thresholds for clean cuts are critical.
Q: Are the stickers waterproof?
A: Absolutely! Waterproof paper and lamination ensure durability, though they’re not meant for prolonged immersion.
Conclusion
Combining AI creativity with craft technology opens up endless opportunities for personal expression. With tools like Microsoft Copilot and the Silhouette Cameo, you can transform simple ideas into stunning, personalized stickers. Happy crafting!
Related article
 Master Emerald Kaizo Nuzlocke: Ultimate Survival & Strategy Guide
Emerald Kaizo stands as one of the most formidable Pokémon ROM hacks ever conceived. While attempting a Nuzlocke run exponentially increases the challenge, victory remains achievable through meticulous planning and strategic execution. This definitiv
AI-Powered Cover Letters: Expert Guide for Journal Submissions
In today's competitive academic publishing environment, crafting an effective cover letter can make the crucial difference in your manuscript's acceptance. Discover how AI-powered tools like ChatGPT can streamline this essential task, helping you cre
US to Sanction Foreign Officials Over Social Media Regulations
US Takes Stand Against Global Digital Content Regulations
The State Department issued a sharp diplomatic rebuke this week targeting European digital governance policies, signaling escalating tensions over control of online platforms. Secretary Marco
Comments (1)
0/200
Master Emerald Kaizo Nuzlocke: Ultimate Survival & Strategy Guide
Emerald Kaizo stands as one of the most formidable Pokémon ROM hacks ever conceived. While attempting a Nuzlocke run exponentially increases the challenge, victory remains achievable through meticulous planning and strategic execution. This definitiv
AI-Powered Cover Letters: Expert Guide for Journal Submissions
In today's competitive academic publishing environment, crafting an effective cover letter can make the crucial difference in your manuscript's acceptance. Discover how AI-powered tools like ChatGPT can streamline this essential task, helping you cre
US to Sanction Foreign Officials Over Social Media Regulations
US Takes Stand Against Global Digital Content Regulations
The State Department issued a sharp diplomatic rebuke this week targeting European digital governance policies, signaling escalating tensions over control of online platforms. Secretary Marco
Comments (1)
0/200
![MarkJohnson]() MarkJohnson
MarkJohnson
 August 18, 2025 at 2:01:09 PM EDT
Wow, AI making stickers at home? That’s next-level cool! I’m totally trying this with my Silhouette. Any tips for picking the best AI design tools? 😎


 0
0
Creating Personalized Stickers with AI: A Step-by-Step Guide
Have you ever dreamed of creating your own custom stickers but found yourself overwhelmed by the process? Well, thanks to advancements in AI technology and tools like the Silhouette Cameo and Silhouette Studio, designing unique, waterproof stickers has never been easier. Whether you’re looking to decorate your laptop, personalize gifts, or even launch a small business, this guide will walk you through every step of the process, from concept to creation.
Introducing Microsoft Copilot AI
Let’s start with the brain behind your sticker design: Microsoft Copilot AI. Accessible through Microsoft Edge, this powerful tool allows you to generate unique sticker designs with nothing more than a few simple text prompts. No need for hours of manual graphic design—just tell Copilot what you want, and it’ll do the heavy lifting for you. Best of all, you don’t even need a premium subscription; a free Hotmail account works just fine.
Copilot’s versatility shines through its ability to produce various art styles based on your input. For example, if you’re aiming for a vintage look, you can specify that in your prompt. The AI integrates seamlessly with Microsoft Edge, ensuring a smooth workflow from start to finish. Whether you’re envisioning a sleek logo or a whimsical cartoon, Copilot can help you bring your ideas to life.
Crafting the Perfect Prompt
Creating clip art-style stickers starts with crafting the right prompt. Instead of vague requests, focus on specificity. Phrases like “create a clip art sticker of [subject]” tend to yield the best results. For instance, if you’re designing a sticker of a Subaru WRX, your prompt might read:
Create a clip art sticker of a Subaru WRX.
Adding descriptive keywords—such as "vintage," "modern," or "minimalist"—can further refine the output. Experimentation is key here. Copilot generates four variations per prompt, giving you multiple options to choose from. Once you’ve settled on your favorite design, download it to your computer and save it to a folder where Silhouette Studio can access it.
Setting Up Silhouette Studio
Before diving into cutting, it’s crucial to configure Silhouette Studio properly. Open the software and set the page size to match your sticker dimensions. Registration marks are another must—they act as guides for the cutting machine, ensuring precision. Next, import your AI-generated image into the software. This step is where things get exciting—you’re about to turn your digital design into something tangible!
Tracing and Cutting
With your image imported, it’s time to trace the outline. Silhouette Studio’s Trace panel is your best friend here. Select the portion of the image you want to cut, then activate the Trace tool. Adjust the settings until you achieve clean, defined lines. Once traced, you can adjust the cut lines as needed to ensure accuracy.
Printing and Enhancing Water Resistance
Printing is the next step. Load your waterproof sticker paper into the printer, making sure the settings match the paper type. Navigate to File > Print in Silhouette Studio and confirm everything is set up correctly. Hit Print, and watch your design come to life.
To enhance durability, laminate your printed stickers. This step adds an extra layer of protection against moisture, ensuring your stickers stay intact even after prolonged exposure to water. Once laminated, load the sheets onto a cutting mat and feed them into the Silhouette Cameo.
Final Touches: Cutting and Testing
With the Silhouette Cameo, precision is guaranteed. Align the cutting mat, adjust the blade depth, and send the job from Silhouette Studio. The machine will scan the registration marks and cut around your stickers with pinpoint accuracy. Once the cutting is complete, carefully peel off the stickers and test their waterproof capabilities by running them under water. Voilà—you now have your very own custom stickers!
The Cost Factor
Creating stickers at home is surprisingly budget-friendly. While the initial investment in a Silhouette Cameo may seem steep ($200–$400), it pays off in the long run. Sticker paper and laminate sheets are relatively inexpensive, with packs ranging from $15 to $30. Depending on how many stickers you can fit on a single sheet, the per-sticker cost remains manageable.
Potential Applications
From decorating personal items like laptops and water bottles to crafting promotional materials for small businesses, the possibilities are endless. You could even make educational tools for kids or quirky decals for parties. The only limit is your imagination!
Frequently Asked Questions
Q: Do I need special equipment?
A: Yes, a Silhouette Cameo is necessary for precise cuts, and access to Microsoft Copilot requires a Microsoft account.
Q: What are the most important steps?
A: Using clip art, saving AI designs to Silhouette Studio, and adjusting thresholds for clean cuts are critical.
Q: Are the stickers waterproof?
A: Absolutely! Waterproof paper and lamination ensure durability, though they’re not meant for prolonged immersion.
Conclusion
Combining AI creativity with craft technology opens up endless opportunities for personal expression. With tools like Microsoft Copilot and the Silhouette Cameo, you can transform simple ideas into stunning, personalized stickers. Happy crafting!


 Master Emerald Kaizo Nuzlocke: Ultimate Survival & Strategy Guide
Emerald Kaizo stands as one of the most formidable Pokémon ROM hacks ever conceived. While attempting a Nuzlocke run exponentially increases the challenge, victory remains achievable through meticulous planning and strategic execution. This definitiv
Master Emerald Kaizo Nuzlocke: Ultimate Survival & Strategy Guide
Emerald Kaizo stands as one of the most formidable Pokémon ROM hacks ever conceived. While attempting a Nuzlocke run exponentially increases the challenge, victory remains achievable through meticulous planning and strategic execution. This definitiv
 AI-Powered Cover Letters: Expert Guide for Journal Submissions
In today's competitive academic publishing environment, crafting an effective cover letter can make the crucial difference in your manuscript's acceptance. Discover how AI-powered tools like ChatGPT can streamline this essential task, helping you cre
AI-Powered Cover Letters: Expert Guide for Journal Submissions
In today's competitive academic publishing environment, crafting an effective cover letter can make the crucial difference in your manuscript's acceptance. Discover how AI-powered tools like ChatGPT can streamline this essential task, helping you cre
 US to Sanction Foreign Officials Over Social Media Regulations
US Takes Stand Against Global Digital Content Regulations
The State Department issued a sharp diplomatic rebuke this week targeting European digital governance policies, signaling escalating tensions over control of online platforms. Secretary Marco
August 18, 2025 at 2:01:09 PM EDT
US to Sanction Foreign Officials Over Social Media Regulations
US Takes Stand Against Global Digital Content Regulations
The State Department issued a sharp diplomatic rebuke this week targeting European digital governance policies, signaling escalating tensions over control of online platforms. Secretary Marco
August 18, 2025 at 2:01:09 PM EDT
Wow, AI making stickers at home? That’s next-level cool! I’m totally trying this with my Silhouette. Any tips for picking the best AI design tools? 😎
0


