


 Home
HomeCreate Stunning Textures with Polycam AI & Blender
In the dynamic world of 3D modeling, textures play a crucial role in bringing your creations to life, adding depth, realism, and visual appeal. Crafting these textures traditionally can be a time-consuming task, but that's where Polycam's AI Texture Generator steps in to streamline your workflow. This guide will walk you through the process of using Polycam's AI with Blender to quickly generate and apply unique, high-quality textures to your 3D models, such as a robot dog. Let's explore how this innovative tool can transform your 3D modeling experience.
Key Points
- Polycam AI Texture Generator simplifies texture creation for 3D models.
- Blender enables you to apply Polycam-generated textures to enhance your 3D models.
- The process involves downloading textures from Polycam and importing them into Blender with the help of Node Wrangler.
- UV unwrapping is essential for correct texture mapping onto 3D models.
- Node Wrangler automates the setup by connecting texture maps to the Principled BSDF shader.
- You can customize texture scale and metallic properties within Blender for the desired effect.
- Experimenting with prompts in Polycam opens up endless possibilities for unique textures.
- AI-generated textures significantly speed up 3D modeling workflows.
Introduction to AI Texture Generation with Polycam and Blender
Unlocking the Power of Polycam AI Texture Generator
Creating realistic textures is vital for any 3D modeling project. Traditionally, this involves intricate processes using tools like Photoshop or Substance Painter, which often require a significant time investment. The Polycam AI Texture Generator offers a streamlined approach, allowing users to generate textures from simple text prompts. This guide focuses on integrating Polycam with Blender, a powerful open-source 3D creation suite.
With Polycam, you can describe the texture you need—such as "scratched rusty sheet metal"—and the AI will generate several options for you to choose from. This eliminates the need for manual creation, drastically cutting down the time spent on texturing. The generated textures can then be downloaded and seamlessly integrated into Blender, where you can further customize and fine-tune the look to match your vision. The integration of AI in texture generation opens up endless possibilities, empowering creators to focus more on the artistic and design aspects of their projects.
Here's what you'll need:
- A computer with Blender installed.
- An internet connection to access the Polycam AI Texture Generator website.
- A free Polycam account for downloading textures.
- The Node Wrangler add-on enabled in Blender.
Setting Up Your 3D Model in Blender
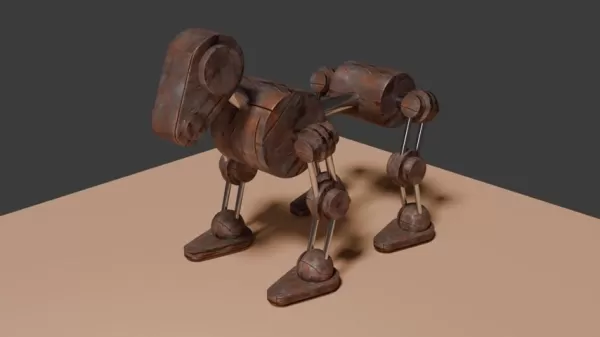
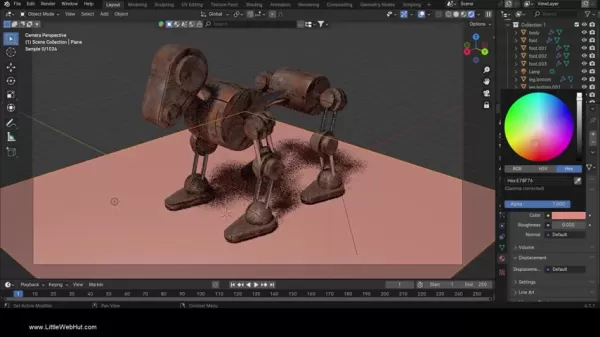
Before importing your AI-generated texture, make sure your 3D model is properly set up in Blender. This includes ensuring that the model has a suitable material applied and is ready for UV unwrapping. For this demonstration, we'll use a robot dog model.
If you want to create your own robot dog, there is a tutorial to follow. The Tutorial link is added in the video description.
Preparing Your Model:
- Open your 3D model in Blender.
- Go to the Shading workspace.
- Ensure you have the Principled BSDF shader applied to your model's material. This shader is versatile and works well with most textures.
- Select the Principled BSDF shader node. This is a critical step for applying the texture correctly.
Now that your model is ready, the next step is to generate the texture using Polycam's AI Texture Generator.
Step-by-Step Guide: Generating and Applying AI Textures in Blender
Generating Textures with Polycam AI
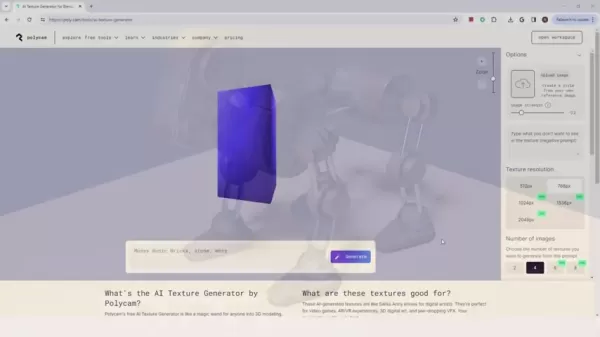
Start by navigating to the Polycam AI Texture Generator website. You can find the link in the video description.
This tool allows you to create custom textures simply by entering text prompts. You can set the texture resolution, with more options available on paid accounts. The free version offers ample resolution options for many projects.
Steps to Generate Your Texture:
- Go to the Polycam AI Texture Generator website.
- Set the texture resolution according to your needs. Keep in mind that higher resolutions will require more processing time.
- Choose the number of textures you want the AI to generate. The tool typically provides four samples.
- Enter a detailed description of the texture you desire. For example, "scratched rusty sheet metal." The more descriptive you are, the better the AI can generate accurate textures.
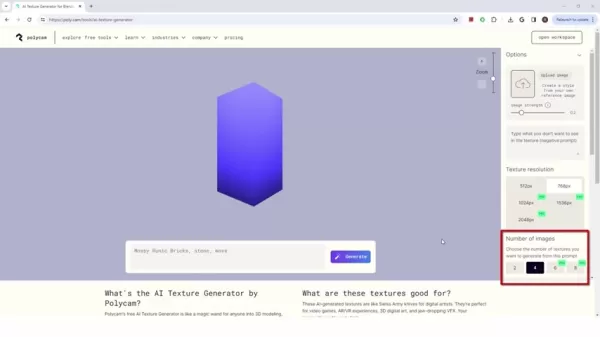
- Click the "Generate" button and wait for the AI to process your request. This usually takes a few seconds.
- Review the generated samples. You can click on each one to see how it looks on a rotating cube preview.
- Once you find a texture you like, click the download button. You'll need to be signed into your Polycam account to proceed. Creating an account is free.
Importing and Setting Up Textures in Blender with Node Wrangler
After downloading the texture from Polycam, you'll receive a ZIP file. Extract the contents of this file into a folder. The ZIP file typically contains an albedo image, a displacement map, a normal map, and a roughness map.

To streamline the texture setup process in Blender, use the Node Wrangler add-on. If you don't have it installed, follow these steps:
- Go to Edit > Preferences.
- Click on "Add-ons".
- In the search box, type "Node Wrangler".
- Enable the Node Wrangler add-on.
Now, you can import the textures into Blender easily.
Steps to Import Textures:
- In the Shading workspace, ensure the Principled BSDF shader node is selected.
- Press Ctrl+Shift+T. This shortcut is provided by Node Wrangler and allows you to quickly add texture maps.
- Navigate to the folder where you extracted the texture files. Select all four image files (albedo, displacement, normal, roughness).
- Click "Principled Texture Setup". Node Wrangler automatically loads the files and sets up the nodes, saving you a significant amount of time. If Node Wrangler has not been enabled, this process will not work.
Now that the textures are imported and connected, it's time to adjust the UV mapping to ensure the texture displays correctly on your model.
UV Unwrapping Your Model
UV unwrapping is essential to map the 2D texture onto your 3D model. If your model is not properly unwrapped, the texture might appear distorted or not display at all.
Steps to UV Unwrap:
- Select your model and press Tab to enter Edit Mode.
- Press A to select all the faces of your model.
- Press U to open the UV Mapping menu.
- Select Smart UV Project and accept the default settings.
UV unwrapping ensures that the texture is properly aligned with the model's surface.
Fine-Tuning the Texture
With the texture applied and the model unwrapped, you can fine-tune the texture's appearance to achieve the desired look.
Steps to Customize the Texture:
- In the Shading workspace, locate the Mapping node added by Node Wrangler.
- Adjust the X and Y Scale values to resize the texture. For example, set both values to 5 to make the texture smaller and more detailed.
- If your material is metal, set the Metallic value in the Principled BSDF shader to 0.5-1.
These adjustments allow you to tailor the texture to perfectly fit your 3D model.
To customize your results, this table provides an overview of typical texture types and what they control:
Texture Type Function Connection Albedo Base Color Base Color Input of the Principled BSDF Roughness Surface Roughness Roughness Input of the Principled BSDF Normal Surface Normals Normal Input of the Principled BSDF through a Normal Map node Displacement Changes Mesh Geometry Displacement Input of the Material Output
Understanding Polycam Pricing and Subscription
Polycam Subscription and Access Levels
While Polycam offers a range of free tools, including the AI Texture Generator, accessing higher resolutions and additional features often requires a subscription. Understanding the pricing tiers and what each offers is essential for making an informed decision.
Here is a basic overview of the Polycam subscription model:
- Free Tier: This tier typically provides access to basic features and lower-resolution texture generation. It's perfect for users who are just starting out or have simple texturing needs.
- Pro Tier: A paid subscription unlocks higher resolution texture generation, faster processing times, and additional customization options. This tier is suited for professionals who need high-quality textures for commercial projects.
- Enterprise Tier: For large organizations or teams, the enterprise tier offers custom solutions with dedicated support, collaboration features, and tailored pricing.
Keep an eye on any limited-time deals. You can keep an eye on their website https://poly.cam/.
Pros and Cons of Using Polycam AI Texture Generator with Blender
Pros
- Time-Saving: Generates textures from text prompts, eliminating manual creation.
- User-Friendly: Easy-to-use interface suitable for beginners and experienced users.
- Seamless Integration: Easily imports textures into Blender with Node Wrangler.
- Customizable: Allows for fine-tuning of texture scale and metallic properties within Blender.
- Versatile: Can be used in various 3D modeling projects, including game development, architectural visualization, and product design.
Cons
- Subscription Required: Accessing higher resolutions and additional features requires a paid subscription.
- Internet Dependency: Requires an internet connection to generate textures.
- Limited Customization: While customizable, the AI-generated textures may not always perfectly match your vision and may require additional tweaking.
- UV Unwrapping Necessary: UV unwrapping is essential for textures to display correctly, which can be time-consuming if not automated.
Exploring the Core Features of Polycam AI Texture Generator
Key Features and Capabilities
The Polycam AI Texture Generator is packed with features designed to make texture creation efficient and accessible. From generating textures with simple text prompts to integrating seamlessly with Blender, this tool offers a comprehensive solution for 3D model texturing. Here are some of its core features:
- Text-to-Texture Generation: The primary function of the tool is its ability to generate textures from text descriptions. This eliminates the need for manual creation and allows users to quickly iterate on different texture styles.
- Customizable Resolution: The tool offers various resolution options, allowing you to choose the level of detail that best suits your project. Higher resolutions provide more detailed textures but may require more processing power.
- Multiple Sample Generation: With each prompt, the AI generates multiple samples, providing you with a range of options to choose from. This ensures you can find the perfect texture for your 3D model.
- Seamless Blender Integration: The generated textures can be easily downloaded and imported into Blender, where you can further customize and fine-tune the look.
- User-Friendly Interface: The tool features an intuitive interface that makes it easy for both beginners and experienced users to create high-quality textures.
Unleashing Creativity: Use Cases for Polycam AI Texture Generator
How Can You Use This?
The Polycam AI Texture Generator can be used in numerous 3D modeling projects to enhance realism and visual appeal. Here are some of the most common use cases:
- Game Development: Create realistic textures for game environments and characters, saving time and resources on texture creation.
- Architectural Visualization: Generate textures for building materials, landscapes, and interior designs, allowing architects and designers to showcase their projects with stunning realism.
- Product Design: Add realistic textures to product models, enabling designers to create visually appealing presentations and prototypes.
- Film and Animation: Enhance the visual quality of film and animation projects by generating custom textures for props, sets, and characters.
- 3D Art: Create unique and visually striking 3D artworks by experimenting with different text prompts and texture styles.
Frequently Asked Questions About Polycam AI Texture Generator
Is Polycam AI Texture Generator free to use?
Polycam AI Texture Generator offers a free tier with basic features and lower-resolution texture generation. However, accessing higher resolutions and additional features requires a paid subscription. Creating an account is free so you can test it out yourself.
Do I need to have prior experience to use this?
No, the Polycam AI Texture Generator features a user-friendly interface that makes it easy for both beginners and experienced users to create high-quality textures. Some experience with Blender is helpful, but not required.
What type of file format does the AI create?
The AI creates a ZIP file that, when extracted, includes an albedo image, a displacement map, a normal map, and a roughness map.
Will this AI Model give me all the textures needed?
Yes, after you've downloaded the textures from the AI, you have everything needed to load the AI model into Blender.
Related Questions
What are some other AI tools that will help enhance my 3D models?
There are plenty of AI tools you can utilize:
- Meshy: Let's you generate 3D models from text or images, simplifying 3D content creation for various applications like games, e-commerce, and augmented reality.
- Luma AI: Allows you to create realistic 3D models from videos and images, making it easy to generate content for gaming, e-commerce, and more.
- Scenario: A platform that provides AI-generated game assets, helping game developers create unique content while still maintaining style consistency.
- Kaedim: Converts 2D images into 3D models, streamlining asset creation for game development and design projects with AI.
Related article
 Yaoke Media's First AIGC Drama 'The Mystery of the Bronze in Qinling' Launches Today with AI-Signed Leads
Today marks the official launch of Yaoke Media's AIGC fantasy mystery short drama, "The Secret Story of the Qinling Bronze." Starring the company's first two signed AI actors, Qin Lingyue and Lin Xiyanyan, the story unfolds in the enigmatic Qinling m
Satya Nadella ready to exploit new OpenAI deal
On Wednesday, a Wall Street analyst asked Microsoft CEO Satya Nadella directly how the revised OpenAI partnership would affect the company’s financials.Nadella described the new agreement as a win for everyone. “We feel good about our partnership wit
WordPress.com now allows AI agents to write and publish posts, plus more
WordPress.com, the popular web hosting and publishing platform, is now embracing AI agents—a move that could reshape the look and feel of the web. The company announced Friday that it will allow AI agents to draft, edit, and publish content on custom
Related Special Topic Recommendations
Business
Yaoke Media's First AIGC Drama 'The Mystery of the Bronze in Qinling' Launches Today with AI-Signed Leads
Today marks the official launch of Yaoke Media's AIGC fantasy mystery short drama, "The Secret Story of the Qinling Bronze." Starring the company's first two signed AI actors, Qin Lingyue and Lin Xiyanyan, the story unfolds in the enigmatic Qinling m
Satya Nadella ready to exploit new OpenAI deal
On Wednesday, a Wall Street analyst asked Microsoft CEO Satya Nadella directly how the revised OpenAI partnership would affect the company’s financials.Nadella described the new agreement as a win for everyone. “We feel good about our partnership wit
WordPress.com now allows AI agents to write and publish posts, plus more
WordPress.com, the popular web hosting and publishing platform, is now embracing AI agents—a move that could reshape the look and feel of the web. The company announced Friday that it will allow AI agents to draft, edit, and publish content on custom
Related Special Topic Recommendations
Business
 Best AI Expense Trackers: Scan Receipts & Categorize Corporate Spend Automatically
2026 Latest Best AI Expense Trackers: Top-rated tools to scan receipts & categorize corporate spend automatically. Discover powerful, game-changing solutions for effortless expense management, accurate financial tracking, and streamlined compliance. Our curated, weekly-updated comparison of free vs paid options helps you find the perfect fit. Unlock your AI edge with XIX.AI's expert picks.
 10 tools
 xix.ai
Business
Best AI Recruiting Tools: Screen Resumes & Automate Candidate Interview Scheduling
xix.ai
Business
Best AI Recruiting Tools: Screen Resumes & Automate Candidate Interview Scheduling
Discover the 2026 latest top-rated AI recruiting tools on XIX.AI. Our curated list features powerful, game-changing solutions for screening resumes and automating candidate interview scheduling. Compare free vs paid options with real-world tests and weekly updated rankings. Find your perfect hiring assistant and streamline your recruitment today!
10 tools
xix.ai
Productivity
AI Personal Wellness & Focus Coaches: Manage Burnout & Boost Mental Energy Levels
Discover the 2026 best AI personal wellness and focus coaches on XIX.AI. Our curated rankings feature top-rated, game-changing tools to manage burnout and boost mental energy. Compare free vs paid options with real-world insights. Unlock your path to peak productivity and well-being today.
10 tools
xix.ai
chatbot
Top-Rated AI Romantic Chatbots: Build Long-Term Relationships with Consistent Personalities
Discover the 2026 latest top-rated AI romantic chatbots for building genuine, long-term connections. Our curated list features powerful, consistent personalities, free vs paid comparisons, and real-world tests. Find your perfect companion and start building today at XIX.AI.
10 tools
xix.ai
Education and Learning
Best AI Data Science Mentors: Master SQL, Pandas & Machine Learning Workflows
Discover the 2026 best AI data science mentors to master SQL, Pandas & ML workflows. Explore our top-rated, curated selection at XIX.AI for powerful, game-changing guidance. Compare free vs paid options with real-world insights. Unlock your data science mastery today.
10 tools
xix.ai
chatbot
Best AI Flirting & Conversation Trainers: Improve Social Charisma and Confidence in Real-Time
Discover the 2026 best AI flirting and conversation trainers on XIX.AI. Our curated, top-rated selection helps you build social charisma and confidence in real-time. Explore must-try, game-changing tools with free vs paid comparisons and weekly updated rankings. Unlock your social edge today.
10 tools
xix.ai

 Comments (17)
0/500
Comments (17)
0/500
![LarryAdams]()
Wow, Polycam AI with Blender sounds like a game-changer for 3D artists! The idea of generating textures so quickly is wild—makes me wonder how it stacks up against traditional methods in quality. Anyone tried it yet? 😎
![RobertWhite]()
Wow, l'outil de textures de Polycam semble révolutionnaire ! Ça simplifie tellement le travail en 3D, mais je me demande si ça ne risque pas de rendre les créations trop uniformes. Vous avez essayé ? 😄
![HarryLewis]()
폴리캠 AI와 블렌더를 사용한 텍스처 제작은 정말 혁신적이에요! 사용하기 쉽고 결과물도 멋져요. 시간을 많이 절약할 수 있었지만, 가끔 텍스처가 너무 인공적으로 보일 때가 있어요. 그래도 3D 아티스트라면 꼭 가져야 할 도구예요! 😄
![CharlesRoberts]()
Polycam AI com Blender é uma revolução na criação de texturas! É super fácil de usar e os resultados são impressionantes. Economizou muito tempo para mim, mas às vezes as texturas parecem um pouco artificiais. Ainda assim, é essencial para qualquer artista 3D que quer acelerar seu fluxo de trabalho! 😊
![ChristopherHarris]()
Blender with AI textures is a game changer! Creating stunning textures is now easier than ever before. The results look professional and polished, but sometimes the process feels a bit slow. Still, highly recommended for anyone into 3D art.
![EricJohnson]()
Polycam AIとBlenderを使うようになってから、テクスチャの作成が本当に楽になりました。以前は面倒だったけど、今はとても速くて結果も素晴らしいです。ただ、AIが時々変なパターンを選ぶことがありますが、全体的に時間を大幅に節約してくれます。3Dアーティストには強くお勧めします!🎨
In the dynamic world of 3D modeling, textures play a crucial role in bringing your creations to life, adding depth, realism, and visual appeal. Crafting these textures traditionally can be a time-consuming task, but that's where Polycam's AI Texture Generator steps in to streamline your workflow. This guide will walk you through the process of using Polycam's AI with Blender to quickly generate and apply unique, high-quality textures to your 3D models, such as a robot dog. Let's explore how this innovative tool can transform your 3D modeling experience.
Key Points
- Polycam AI Texture Generator simplifies texture creation for 3D models.
- Blender enables you to apply Polycam-generated textures to enhance your 3D models.
- The process involves downloading textures from Polycam and importing them into Blender with the help of Node Wrangler.
- UV unwrapping is essential for correct texture mapping onto 3D models.
- Node Wrangler automates the setup by connecting texture maps to the Principled BSDF shader.
- You can customize texture scale and metallic properties within Blender for the desired effect.
- Experimenting with prompts in Polycam opens up endless possibilities for unique textures.
- AI-generated textures significantly speed up 3D modeling workflows.
Introduction to AI Texture Generation with Polycam and Blender
Unlocking the Power of Polycam AI Texture Generator
Creating realistic textures is vital for any 3D modeling project. Traditionally, this involves intricate processes using tools like Photoshop or Substance Painter, which often require a significant time investment. The Polycam AI Texture Generator offers a streamlined approach, allowing users to generate textures from simple text prompts. This guide focuses on integrating Polycam with Blender, a powerful open-source 3D creation suite.
With Polycam, you can describe the texture you need—such as "scratched rusty sheet metal"—and the AI will generate several options for you to choose from. This eliminates the need for manual creation, drastically cutting down the time spent on texturing. The generated textures can then be downloaded and seamlessly integrated into Blender, where you can further customize and fine-tune the look to match your vision. The integration of AI in texture generation opens up endless possibilities, empowering creators to focus more on the artistic and design aspects of their projects.
Here's what you'll need:
- A computer with Blender installed.
- An internet connection to access the Polycam AI Texture Generator website.
- A free Polycam account for downloading textures.
- The Node Wrangler add-on enabled in Blender.
Setting Up Your 3D Model in Blender
Before importing your AI-generated texture, make sure your 3D model is properly set up in Blender. This includes ensuring that the model has a suitable material applied and is ready for UV unwrapping. For this demonstration, we'll use a robot dog model.
If you want to create your own robot dog, there is a tutorial to follow. The Tutorial link is added in the video description.
Preparing Your Model:
- Open your 3D model in Blender.
- Go to the Shading workspace.
- Ensure you have the Principled BSDF shader applied to your model's material. This shader is versatile and works well with most textures.
- Select the Principled BSDF shader node. This is a critical step for applying the texture correctly.
Now that your model is ready, the next step is to generate the texture using Polycam's AI Texture Generator.
Step-by-Step Guide: Generating and Applying AI Textures in Blender
Generating Textures with Polycam AI
Start by navigating to the Polycam AI Texture Generator website. You can find the link in the video description.
This tool allows you to create custom textures simply by entering text prompts. You can set the texture resolution, with more options available on paid accounts. The free version offers ample resolution options for many projects.
Steps to Generate Your Texture:
- Go to the Polycam AI Texture Generator website.
- Set the texture resolution according to your needs. Keep in mind that higher resolutions will require more processing time.
- Choose the number of textures you want the AI to generate. The tool typically provides four samples.
- Enter a detailed description of the texture you desire. For example, "scratched rusty sheet metal." The more descriptive you are, the better the AI can generate accurate textures.
- Click the "Generate" button and wait for the AI to process your request. This usually takes a few seconds.
- Review the generated samples. You can click on each one to see how it looks on a rotating cube preview.
- Once you find a texture you like, click the download button. You'll need to be signed into your Polycam account to proceed. Creating an account is free.
Importing and Setting Up Textures in Blender with Node Wrangler
After downloading the texture from Polycam, you'll receive a ZIP file. Extract the contents of this file into a folder. The ZIP file typically contains an albedo image, a displacement map, a normal map, and a roughness map.
To streamline the texture setup process in Blender, use the Node Wrangler add-on. If you don't have it installed, follow these steps:
- Go to Edit > Preferences.
- Click on "Add-ons".
- In the search box, type "Node Wrangler".
- Enable the Node Wrangler add-on.
Now, you can import the textures into Blender easily.
Steps to Import Textures:
- In the Shading workspace, ensure the Principled BSDF shader node is selected.
- Press Ctrl+Shift+T. This shortcut is provided by Node Wrangler and allows you to quickly add texture maps.
- Navigate to the folder where you extracted the texture files. Select all four image files (albedo, displacement, normal, roughness).
- Click "Principled Texture Setup". Node Wrangler automatically loads the files and sets up the nodes, saving you a significant amount of time. If Node Wrangler has not been enabled, this process will not work.
Now that the textures are imported and connected, it's time to adjust the UV mapping to ensure the texture displays correctly on your model.
UV Unwrapping Your Model
UV unwrapping is essential to map the 2D texture onto your 3D model. If your model is not properly unwrapped, the texture might appear distorted or not display at all.
Steps to UV Unwrap:
- Select your model and press Tab to enter Edit Mode.
- Press A to select all the faces of your model.
- Press U to open the UV Mapping menu.
- Select Smart UV Project and accept the default settings.
UV unwrapping ensures that the texture is properly aligned with the model's surface.
Fine-Tuning the Texture
With the texture applied and the model unwrapped, you can fine-tune the texture's appearance to achieve the desired look.
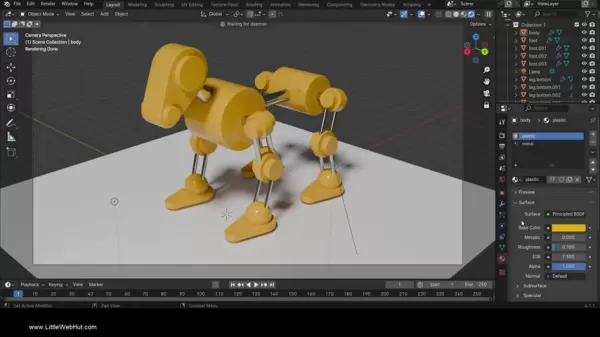
Steps to Customize the Texture:
- In the Shading workspace, locate the Mapping node added by Node Wrangler.
- Adjust the X and Y Scale values to resize the texture. For example, set both values to 5 to make the texture smaller and more detailed.
- If your material is metal, set the Metallic value in the Principled BSDF shader to 0.5-1.
These adjustments allow you to tailor the texture to perfectly fit your 3D model.
To customize your results, this table provides an overview of typical texture types and what they control:
| Texture Type | Function | Connection |
|---|---|---|
| Albedo | Base Color | Base Color Input of the Principled BSDF |
| Roughness | Surface Roughness | Roughness Input of the Principled BSDF |
| Normal | Surface Normals | Normal Input of the Principled BSDF through a Normal Map node |
| Displacement | Changes Mesh Geometry | Displacement Input of the Material Output |
Understanding Polycam Pricing and Subscription
Polycam Subscription and Access Levels
While Polycam offers a range of free tools, including the AI Texture Generator, accessing higher resolutions and additional features often requires a subscription. Understanding the pricing tiers and what each offers is essential for making an informed decision.
Here is a basic overview of the Polycam subscription model:
- Free Tier: This tier typically provides access to basic features and lower-resolution texture generation. It's perfect for users who are just starting out or have simple texturing needs.
- Pro Tier: A paid subscription unlocks higher resolution texture generation, faster processing times, and additional customization options. This tier is suited for professionals who need high-quality textures for commercial projects.
- Enterprise Tier: For large organizations or teams, the enterprise tier offers custom solutions with dedicated support, collaboration features, and tailored pricing.
Keep an eye on any limited-time deals. You can keep an eye on their website https://poly.cam/.
Pros and Cons of Using Polycam AI Texture Generator with Blender
Pros
- Time-Saving: Generates textures from text prompts, eliminating manual creation.
- User-Friendly: Easy-to-use interface suitable for beginners and experienced users.
- Seamless Integration: Easily imports textures into Blender with Node Wrangler.
- Customizable: Allows for fine-tuning of texture scale and metallic properties within Blender.
- Versatile: Can be used in various 3D modeling projects, including game development, architectural visualization, and product design.
Cons
- Subscription Required: Accessing higher resolutions and additional features requires a paid subscription.
- Internet Dependency: Requires an internet connection to generate textures.
- Limited Customization: While customizable, the AI-generated textures may not always perfectly match your vision and may require additional tweaking.
- UV Unwrapping Necessary: UV unwrapping is essential for textures to display correctly, which can be time-consuming if not automated.
Exploring the Core Features of Polycam AI Texture Generator
Key Features and Capabilities
The Polycam AI Texture Generator is packed with features designed to make texture creation efficient and accessible. From generating textures with simple text prompts to integrating seamlessly with Blender, this tool offers a comprehensive solution for 3D model texturing. Here are some of its core features:
- Text-to-Texture Generation: The primary function of the tool is its ability to generate textures from text descriptions. This eliminates the need for manual creation and allows users to quickly iterate on different texture styles.
- Customizable Resolution: The tool offers various resolution options, allowing you to choose the level of detail that best suits your project. Higher resolutions provide more detailed textures but may require more processing power.
- Multiple Sample Generation: With each prompt, the AI generates multiple samples, providing you with a range of options to choose from. This ensures you can find the perfect texture for your 3D model.
- Seamless Blender Integration: The generated textures can be easily downloaded and imported into Blender, where you can further customize and fine-tune the look.
- User-Friendly Interface: The tool features an intuitive interface that makes it easy for both beginners and experienced users to create high-quality textures.
Unleashing Creativity: Use Cases for Polycam AI Texture Generator
How Can You Use This?
The Polycam AI Texture Generator can be used in numerous 3D modeling projects to enhance realism and visual appeal. Here are some of the most common use cases:
- Game Development: Create realistic textures for game environments and characters, saving time and resources on texture creation.
- Architectural Visualization: Generate textures for building materials, landscapes, and interior designs, allowing architects and designers to showcase their projects with stunning realism.
- Product Design: Add realistic textures to product models, enabling designers to create visually appealing presentations and prototypes.
- Film and Animation: Enhance the visual quality of film and animation projects by generating custom textures for props, sets, and characters.
- 3D Art: Create unique and visually striking 3D artworks by experimenting with different text prompts and texture styles.
Frequently Asked Questions About Polycam AI Texture Generator
Is Polycam AI Texture Generator free to use?
Polycam AI Texture Generator offers a free tier with basic features and lower-resolution texture generation. However, accessing higher resolutions and additional features requires a paid subscription. Creating an account is free so you can test it out yourself.
Do I need to have prior experience to use this?
No, the Polycam AI Texture Generator features a user-friendly interface that makes it easy for both beginners and experienced users to create high-quality textures. Some experience with Blender is helpful, but not required.
What type of file format does the AI create?
The AI creates a ZIP file that, when extracted, includes an albedo image, a displacement map, a normal map, and a roughness map.
Will this AI Model give me all the textures needed?
Yes, after you've downloaded the textures from the AI, you have everything needed to load the AI model into Blender.
Related Questions
What are some other AI tools that will help enhance my 3D models?
There are plenty of AI tools you can utilize:
- Meshy: Let's you generate 3D models from text or images, simplifying 3D content creation for various applications like games, e-commerce, and augmented reality.
- Luma AI: Allows you to create realistic 3D models from videos and images, making it easy to generate content for gaming, e-commerce, and more.
- Scenario: A platform that provides AI-generated game assets, helping game developers create unique content while still maintaining style consistency.
- Kaedim: Converts 2D images into 3D models, streamlining asset creation for game development and design projects with AI.


 Yaoke Media's First AIGC Drama 'The Mystery of the Bronze in Qinling' Launches Today with AI-Signed Leads
Today marks the official launch of Yaoke Media's AIGC fantasy mystery short drama, "The Secret Story of the Qinling Bronze." Starring the company's first two signed AI actors, Qin Lingyue and Lin Xiyanyan, the story unfolds in the enigmatic Qinling m
Yaoke Media's First AIGC Drama 'The Mystery of the Bronze in Qinling' Launches Today with AI-Signed Leads
Today marks the official launch of Yaoke Media's AIGC fantasy mystery short drama, "The Secret Story of the Qinling Bronze." Starring the company's first two signed AI actors, Qin Lingyue and Lin Xiyanyan, the story unfolds in the enigmatic Qinling m
 Satya Nadella ready to exploit new OpenAI deal
On Wednesday, a Wall Street analyst asked Microsoft CEO Satya Nadella directly how the revised OpenAI partnership would affect the company’s financials.Nadella described the new agreement as a win for everyone. “We feel good about our partnership wit
Satya Nadella ready to exploit new OpenAI deal
On Wednesday, a Wall Street analyst asked Microsoft CEO Satya Nadella directly how the revised OpenAI partnership would affect the company’s financials.Nadella described the new agreement as a win for everyone. “We feel good about our partnership wit
 WordPress.com now allows AI agents to write and publish posts, plus more
WordPress.com, the popular web hosting and publishing platform, is now embracing AI agents—a move that could reshape the look and feel of the web. The company announced Friday that it will allow AI agents to draft, edit, and publish content on custom
WordPress.com now allows AI agents to write and publish posts, plus more
WordPress.com, the popular web hosting and publishing platform, is now embracing AI agents—a move that could reshape the look and feel of the web. The company announced Friday that it will allow AI agents to draft, edit, and publish content on custom

2026 Latest Best AI Expense Trackers: Top-rated tools to scan receipts & categorize corporate spend automatically. Discover powerful, game-changing solutions for effortless expense management, accurate financial tracking, and streamlined compliance. Our curated, weekly-updated comparison of free vs paid options helps you find the perfect fit. Unlock your AI edge with XIX.AI's expert picks.
10 tools
xix.ai

Discover the 2026 latest top-rated AI recruiting tools on XIX.AI. Our curated list features powerful, game-changing solutions for screening resumes and automating candidate interview scheduling. Compare free vs paid options with real-world tests and weekly updated rankings. Find your perfect hiring assistant and streamline your recruitment today!
10 tools
xix.ai
Discover the 2026 best AI personal wellness and focus coaches on XIX.AI. Our curated rankings feature top-rated, game-changing tools to manage burnout and boost mental energy. Compare free vs paid options with real-world insights. Unlock your path to peak productivity and well-being today.
10 tools
xix.ai

Discover the 2026 latest top-rated AI romantic chatbots for building genuine, long-term connections. Our curated list features powerful, consistent personalities, free vs paid comparisons, and real-world tests. Find your perfect companion and start building today at XIX.AI.
10 tools
xix.ai

Discover the 2026 best AI data science mentors to master SQL, Pandas & ML workflows. Explore our top-rated, curated selection at XIX.AI for powerful, game-changing guidance. Compare free vs paid options with real-world insights. Unlock your data science mastery today.
10 tools
xix.ai

Discover the 2026 best AI flirting and conversation trainers on XIX.AI. Our curated, top-rated selection helps you build social charisma and confidence in real-time. Explore must-try, game-changing tools with free vs paid comparisons and weekly updated rankings. Unlock your social edge today.
10 tools
xix.ai

Wow, Polycam AI with Blender sounds like a game-changer for 3D artists! The idea of generating textures so quickly is wild—makes me wonder how it stacks up against traditional methods in quality. Anyone tried it yet? 😎
Wow, l'outil de textures de Polycam semble révolutionnaire ! Ça simplifie tellement le travail en 3D, mais je me demande si ça ne risque pas de rendre les créations trop uniformes. Vous avez essayé ? 😄
폴리캠 AI와 블렌더를 사용한 텍스처 제작은 정말 혁신적이에요! 사용하기 쉽고 결과물도 멋져요. 시간을 많이 절약할 수 있었지만, 가끔 텍스처가 너무 인공적으로 보일 때가 있어요. 그래도 3D 아티스트라면 꼭 가져야 할 도구예요! 😄
Polycam AI com Blender é uma revolução na criação de texturas! É super fácil de usar e os resultados são impressionantes. Economizou muito tempo para mim, mas às vezes as texturas parecem um pouco artificiais. Ainda assim, é essencial para qualquer artista 3D que quer acelerar seu fluxo de trabalho! 😊
Blender with AI textures is a game changer! Creating stunning textures is now easier than ever before. The results look professional and polished, but sometimes the process feels a bit slow. Still, highly recommended for anyone into 3D art.
Polycam AIとBlenderを使うようになってから、テクスチャの作成が本当に楽になりました。以前は面倒だったけど、今はとても速くて結果も素晴らしいです。ただ、AIが時々変なパターンを選ぶことがありますが、全体的に時間を大幅に節約してくれます。3Dアーティストには強くお勧めします!🎨


