


 Home
HomeComprehensive Guide to Mastering AI Image Creation in Blender
Blender, an ever-evolving open-source 3D creation suite, is pushing the boundaries of creativity by integrating Artificial Intelligence (AI) into its workflow. This fusion opens up a world of possibilities for texture and image generation, transforming the way artists approach 3D projects. In this guide, we'll dive into how you can harness AI within Blender to elevate your creations, exploring a variety of techniques and tools that can bring your artistic visions to life.
Key Points
- Utilize AI for detailed texture painting on surfaces.
- Isolate AI effects by masking specific regions.
- Generate textures directly within Blender using AI.
- Create photorealistic images with Stable Diffusion models.
- Control photographic parameters through AI prompts.
- Blend existing images with AI for customized outputs.
- Master seamless texture generation with AI.
- Refine AI-generated outputs through iterations and custom settings.
Introduction to AI-Powered Texturing in Blender
Understanding the Basics of AI Texturing
AI texturing is revolutionizing the way we create textures in 3D modeling. By using machine learning models, AI can automatically generate detailed and realistic textures, significantly cutting down the time and effort needed for manual creation. These algorithms analyze existing data to produce textures that meet specific style requirements, allowing artists to achieve stunning results more efficiently. Grasping these fundamentals is key to seamlessly integrating AI into your Blender workflow.
Setting Up Blender for AI Texture Painting
Getting started with AI texture painting in Blender involves a few crucial steps. First, ensure you're using Blender version 3.6 or later, which is recommended for optimal AI integration. You'll need to enable specific add-ons and configure settings to enable communication between Blender and AI models. This setup includes installing necessary Python packages and ensuring your hardware is compatible. Proper setup is essential for smooth performance and effective AI-generated content creation.
Enhancing Realism with AI: Advanced Techniques
Seamless Texture Generation Using AI
Creating seamless textures is a game-changer in 3D modeling, ensuring that textures tile without visible seams or edges. AI excels in this area by analyzing patterns and structures to produce images that seamlessly connect at their edges. Techniques like pattern analysis, edge blending, and noise reduction are employed to achieve this seamless effect. In Blender, you can leverage these AI capabilities by selecting tools that support seamless generation and experimenting with settings to minimize tiling artifacts.
Working with Existing Textures
Sometimes, enhancing existing textures rather than starting from scratch can be more efficient. AI tools can seamlessly blend with these textures, adding details, refining colors, or creating variations while maintaining the original texture's essence. Methods like detail amplification, style transfer, and color correction can be used to enhance your textures. In Blender, you can import your base texture, apply AI enhancements, and blend the results to preserve key elements while introducing new details.
Step-by-Step Guide to AI Texture Painting
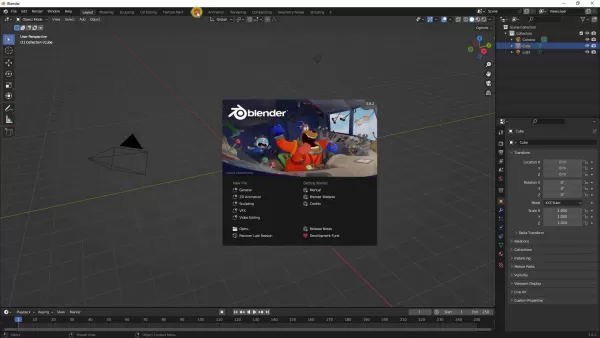
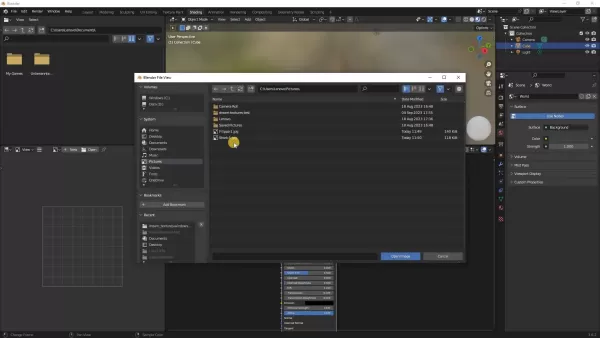
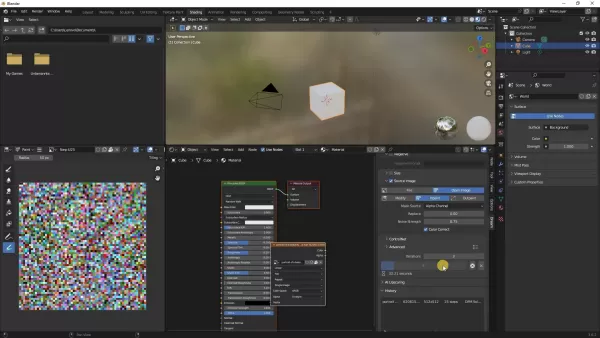
Step 1: Opening Blender and Setting Up the Scene
Begin by launching Blender and setting up a basic scene with a 3D object, like a cube, to serve as your canvas for AI texturing. Make sure the object has proper UV unwrapping for accurate texture mapping. Saving your initial setup is a good practice to avoid losing data during experimentation.
Step 2: Accessing Texture Paint Mode
Switch to 'Texture Paint' mode in Blender, which allows you to paint textures directly onto your 3D model. Access this mode through the top menu and familiarize yourself with the available brushes and settings. Experimenting with different brush settings can lead to unique texturing effects.

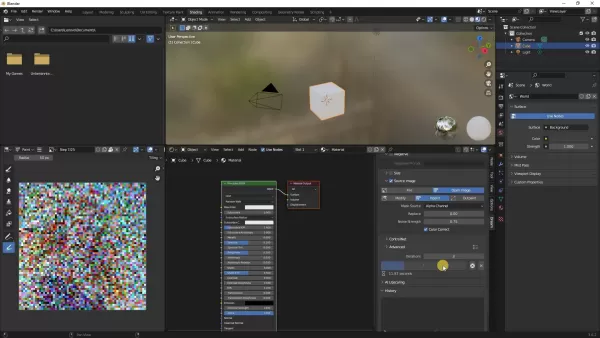
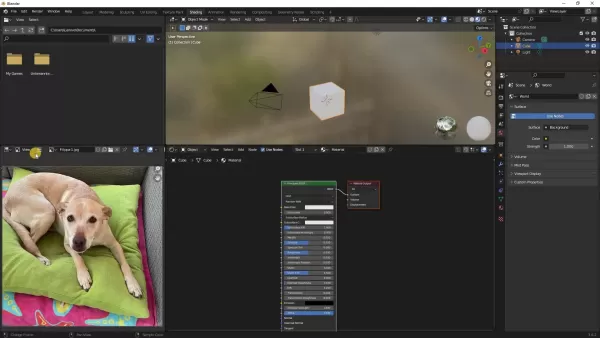
Step 3: Importing and Preparing Your Image for AI Painting
Import the image you want to use as a base for AI texture painting. Use Blender’s image editor to load and prepare your image, adjusting its resolution and format if necessary. Tweaking the image's color and contrast can improve its integration with the AI texturing process.
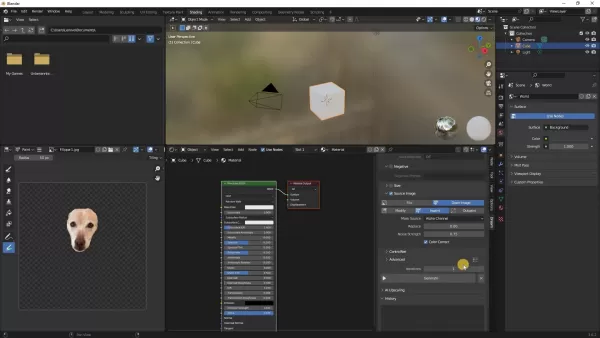
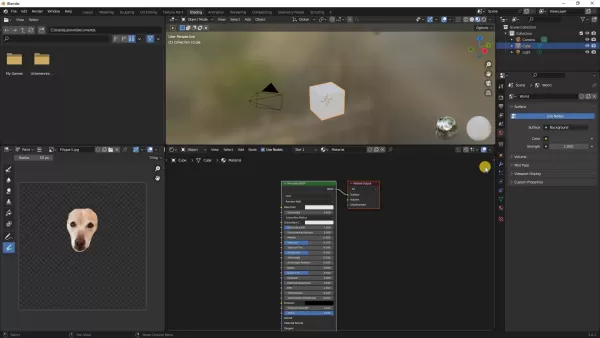
Step 4: Selecting a Dog Face and Masking the Texture
After loading your image, select a specific area of interest, like a dog's face, and create a mask to isolate this region. Use Blender’s masking tools to define the area where the AI will apply the new texture precisely. This ensures that only the intended part of the image is modified, keeping the rest intact. For instance, you might want to remove the dog's body and focus solely on the face.
Step 5: Integrating AI with Dream Texture and Setting Photography Parameters
To integrate AI capabilities, use add-ons like Dream Texture. Configure photographic parameters such as framing, camera position, film type, and lighting to guide the AI in generating textures that align with your vision. These settings can be adjusted to achieve different results, allowing you to tailor the AI's output to your project's needs.
Step 6: Writing the AI Prompt
Crafting a detailed prompt is crucial for guiding the AI's image generation. Specify the subject, style, and any specific attributes you want included. A prompt like "portrait of a beautiful woman with long blond hair" can direct the AI to create a face that complements the dog's head. The more specific your prompt, the better the AI's output will align with your creative vision.
Step 7: Configuring Source Image and Finalizing AI Texture Settings
Adjust the source image settings to ensure the AI incorporates the original data correctly. Fine-tune noise strength, color correction, and the number of iterations to refine the AI's output. More iterations often lead to better results but require more processing time. Experiment with these settings to find the perfect balance for your project.
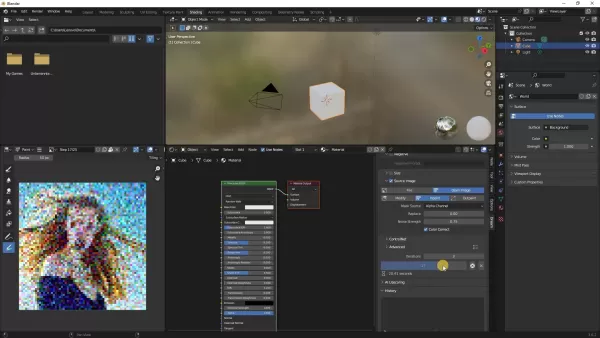
Step 8: Generating the AI Texture
Start the AI texture generation process by clicking the 'Generate' button. Monitor the progress as the AI completes the specified iterations. Once finished, the generated texture will appear in the image editor, ready for further refinement and integration into your 3D model. This is where the AI truly brings your prompts and settings to life.

Step 9: Iterating and Refining the AI Output
After generating the texture, review and iterate as needed. Use Blender's AI tools to modify the prompt, adjust settings, or increase iterations to refine the output. This iterative process allows you to progressively enhance the AI's output until it perfectly matches your creative vision.
Step 10: Saving and Applying the Final Texture
Once you're satisfied with the texture, save it and apply it to your 3D model in Blender. Adjust the material settings to ensure the texture maps correctly onto the model's surface. This final step integrates the AI-generated texture into your project, enhancing its visual quality and detail. You can easily switch to another image by selecting a different one.
Pricing and Availability of AI Tools
Overview of Costs
The cost of AI-powered tools in Blender varies. Some tools developed by the open-source community are free, while others may require a subscription or a one-time purchase. Pricing depends on the complexity of the AI model, processing power, and support level. It's important to review the pricing structure to choose tools that fit your budget.

Advantages and Disadvantages of AI Texture Generation
Pros
- Speed: Quickly generates complex textures.
- Automation: Reduces the need for manual labor.
- Accessibility: Lowers the skill barrier for creating high-quality textures.
- Exploration: Facilitates experimentation with various styles and effects.
Cons
- Originality: May lack unique artistic expression.
- Quality Control: Results can vary based on the AI model and input data.
- Dependence: Over-reliance can limit skill development.
- Licensing: Commercial use may be subject to licensing restrictions.
Core Features of AI Texture Generation in Blender
Key Capabilities and Functionalities
AI texture generation in Blender offers several core features that enhance the creative process:
- Automated Texture Creation: Quickly generate detailed textures from simple prompts or base images.
- Customizable Parameters: Adjust settings to control the texture's style, resolution, and appearance.
- Seamless Integration: Easily integrate AI-generated textures into Blender’s material and rendering systems.
- Iterative Refinement: Refine textures through multiple iterations for precise control over the final result.
- Masking and Isolation: Apply textures to specific regions using masking tools.
Diverse Use Cases for AI Texture Generation
Applications in Various 3D Projects
AI texture generation can be applied across numerous 3D projects, including:
- Game Development: Create realistic environments and character textures to enhance game visuals.
- Architectural Visualization: Generate detailed building materials and landscapes for architectural renderings.
- Product Design: Develop textures for product prototypes, allowing for quick iterations and realistic representations.
- Animation: Enhance character and environment textures for animated films and series.
- Visual Effects: Create complex textures for visual effects in movies and commercials.
FAQ
What Blender version is recommended for AI texturing?
Blender 3.6 or later is recommended for optimal compatibility and feature support when using AI texturing tools.
Do I need special hardware to use AI in Blender?
While not always required, a powerful GPU can significantly speed up the AI texture generation process. Check the specific hardware requirements for your chosen AI add-ons.
How can I improve the quality of AI-generated textures?
Experiment with different prompts, adjust AI settings, increase iteration counts, and use high-quality source images to improve texture quality.
Are AI-generated textures commercially viable?
Yes, AI-generated textures can be used commercially, but always check the licensing terms of the AI tools and models you use to ensure compliance.
Can AI create seamless textures?
Yes, many AI tools are designed to create seamless textures. Look for tools that offer features like pattern analysis and edge blending for best results.
Related Questions
How does AI texture painting compare to traditional methods?
AI texture painting offers a faster and more automated approach compared to traditional methods, which often require manual detailing and extensive artistic skill. AI can quickly generate complex textures, allowing artists to focus on higher-level creative decisions. However, traditional methods may offer more precise control over every aspect of the texture.
What are the limitations of using AI for texture generation?
Limitations include potential issues with creativity, quality control, and dependency on training data. AI-generated textures might sometimes lack originality or exhibit artifacts. Quality can vary based on the AI model and input data used. Additionally, relying heavily on AI can limit the development of traditional artistic skills.
How can I customize the AI texture to match my specific style?
Customize AI textures by adjusting parameters such as style, color, resolution, and detail level. Use detailed prompts to guide the AI toward your desired aesthetic. Iterative refinement allows you to progressively align the AI’s output with your artistic vision, even if it differs from your initial concept.
Related article
 WordPress.com now allows AI agents to write and publish posts, plus more
WordPress.com, the popular web hosting and publishing platform, is now embracing AI agents—a move that could reshape the look and feel of the web. The company announced Friday that it will allow AI agents to draft, edit, and publish content on custom
Anthropic's experimental AI Claude completes negotiations and transactions in e-commerce test
As artificial intelligence advances rapidly, Anthropic quietly rolled out an internal experiment called "Project Deal" last Friday, showcasing AI's potential in e-commerce. The experiment had its AI model Claude autonomously handle buying, selling, a
DeepSeek Code poised for launch
As AI technology accelerates, DeepSeek is at a thrilling juncture. The AI company recently revealed it has secured over 70 billion yuan in funding. Leadership has emphasized a commitment to groundbreaking AI research over immediate commercial gains.
Related Special Topic Recommendations
Business
WordPress.com now allows AI agents to write and publish posts, plus more
WordPress.com, the popular web hosting and publishing platform, is now embracing AI agents—a move that could reshape the look and feel of the web. The company announced Friday that it will allow AI agents to draft, edit, and publish content on custom
Anthropic's experimental AI Claude completes negotiations and transactions in e-commerce test
As artificial intelligence advances rapidly, Anthropic quietly rolled out an internal experiment called "Project Deal" last Friday, showcasing AI's potential in e-commerce. The experiment had its AI model Claude autonomously handle buying, selling, a
DeepSeek Code poised for launch
As AI technology accelerates, DeepSeek is at a thrilling juncture. The AI company recently revealed it has secured over 70 billion yuan in funding. Leadership has emphasized a commitment to groundbreaking AI research over immediate commercial gains.
Related Special Topic Recommendations
Business
 Best AI Expense Trackers: Scan Receipts & Categorize Corporate Spend Automatically
2026 Latest Best AI Expense Trackers: Top-rated tools to scan receipts & categorize corporate spend automatically. Discover powerful, game-changing solutions for effortless expense management, accurate financial tracking, and streamlined compliance. Our curated, weekly-updated comparison of free vs paid options helps you find the perfect fit. Unlock your AI edge with XIX.AI's expert picks.
 10 tools
 xix.ai
Business
Best AI Recruiting Tools: Screen Resumes & Automate Candidate Interview Scheduling
xix.ai
Business
Best AI Recruiting Tools: Screen Resumes & Automate Candidate Interview Scheduling
Discover the 2026 latest top-rated AI recruiting tools on XIX.AI. Our curated list features powerful, game-changing solutions for screening resumes and automating candidate interview scheduling. Compare free vs paid options with real-world tests and weekly updated rankings. Find your perfect hiring assistant and streamline your recruitment today!
10 tools
xix.ai
Productivity
AI Personal Wellness & Focus Coaches: Manage Burnout & Boost Mental Energy Levels
Discover the 2026 best AI personal wellness and focus coaches on XIX.AI. Our curated rankings feature top-rated, game-changing tools to manage burnout and boost mental energy. Compare free vs paid options with real-world insights. Unlock your path to peak productivity and well-being today.
10 tools
xix.ai
chatbot
Top-Rated AI Romantic Chatbots: Build Long-Term Relationships with Consistent Personalities
Discover the 2026 latest top-rated AI romantic chatbots for building genuine, long-term connections. Our curated list features powerful, consistent personalities, free vs paid comparisons, and real-world tests. Find your perfect companion and start building today at XIX.AI.
10 tools
xix.ai
Education and Learning
Best AI Data Science Mentors: Master SQL, Pandas & Machine Learning Workflows
Discover the 2026 best AI data science mentors to master SQL, Pandas & ML workflows. Explore our top-rated, curated selection at XIX.AI for powerful, game-changing guidance. Compare free vs paid options with real-world insights. Unlock your data science mastery today.
10 tools
xix.ai
chatbot
Best AI Flirting & Conversation Trainers: Improve Social Charisma and Confidence in Real-Time
Discover the 2026 best AI flirting and conversation trainers on XIX.AI. Our curated, top-rated selection helps you build social charisma and confidence in real-time. Explore must-try, game-changing tools with free vs paid comparisons and weekly updated rankings. Unlock your social edge today.
10 tools
xix.ai

 Comments (2)
0/500
Comments (2)
0/500
![DavidRodriguez]()
Klingt super, aber wie gut funktioniert das wirklich mit dem Texturing? Hab früher viel mit Blender gearbeitet und das Material-Painting war immer recht mühsam. Wenn KI das wirklich vereinfacht, wäre das ein Game-Changer für Indie-Entwickler. Hoffe nur, das führt nicht dazu, dass grundlegende Skills verloren gehen. Werde es auf jeden Fall mal testen müssen! 😅
![FredCarter]()
This guide is a game-changer! Blender's AI integration for textures sounds wild—can't wait to try it and see how it spices up my 3D models! 🎨
Blender, an ever-evolving open-source 3D creation suite, is pushing the boundaries of creativity by integrating Artificial Intelligence (AI) into its workflow. This fusion opens up a world of possibilities for texture and image generation, transforming the way artists approach 3D projects. In this guide, we'll dive into how you can harness AI within Blender to elevate your creations, exploring a variety of techniques and tools that can bring your artistic visions to life.
Key Points
- Utilize AI for detailed texture painting on surfaces.
- Isolate AI effects by masking specific regions.
- Generate textures directly within Blender using AI.
- Create photorealistic images with Stable Diffusion models.
- Control photographic parameters through AI prompts.
- Blend existing images with AI for customized outputs.
- Master seamless texture generation with AI.
- Refine AI-generated outputs through iterations and custom settings.
Introduction to AI-Powered Texturing in Blender
Understanding the Basics of AI Texturing
AI texturing is revolutionizing the way we create textures in 3D modeling. By using machine learning models, AI can automatically generate detailed and realistic textures, significantly cutting down the time and effort needed for manual creation. These algorithms analyze existing data to produce textures that meet specific style requirements, allowing artists to achieve stunning results more efficiently. Grasping these fundamentals is key to seamlessly integrating AI into your Blender workflow.
Setting Up Blender for AI Texture Painting
Getting started with AI texture painting in Blender involves a few crucial steps. First, ensure you're using Blender version 3.6 or later, which is recommended for optimal AI integration. You'll need to enable specific add-ons and configure settings to enable communication between Blender and AI models. This setup includes installing necessary Python packages and ensuring your hardware is compatible. Proper setup is essential for smooth performance and effective AI-generated content creation.
Enhancing Realism with AI: Advanced Techniques
Seamless Texture Generation Using AI
Creating seamless textures is a game-changer in 3D modeling, ensuring that textures tile without visible seams or edges. AI excels in this area by analyzing patterns and structures to produce images that seamlessly connect at their edges. Techniques like pattern analysis, edge blending, and noise reduction are employed to achieve this seamless effect. In Blender, you can leverage these AI capabilities by selecting tools that support seamless generation and experimenting with settings to minimize tiling artifacts.
Working with Existing Textures
Sometimes, enhancing existing textures rather than starting from scratch can be more efficient. AI tools can seamlessly blend with these textures, adding details, refining colors, or creating variations while maintaining the original texture's essence. Methods like detail amplification, style transfer, and color correction can be used to enhance your textures. In Blender, you can import your base texture, apply AI enhancements, and blend the results to preserve key elements while introducing new details.
Step-by-Step Guide to AI Texture Painting
Step 1: Opening Blender and Setting Up the Scene
Begin by launching Blender and setting up a basic scene with a 3D object, like a cube, to serve as your canvas for AI texturing. Make sure the object has proper UV unwrapping for accurate texture mapping. Saving your initial setup is a good practice to avoid losing data during experimentation.
Step 2: Accessing Texture Paint Mode
Switch to 'Texture Paint' mode in Blender, which allows you to paint textures directly onto your 3D model. Access this mode through the top menu and familiarize yourself with the available brushes and settings. Experimenting with different brush settings can lead to unique texturing effects.
Step 3: Importing and Preparing Your Image for AI Painting
Import the image you want to use as a base for AI texture painting. Use Blender’s image editor to load and prepare your image, adjusting its resolution and format if necessary. Tweaking the image's color and contrast can improve its integration with the AI texturing process.
Step 4: Selecting a Dog Face and Masking the Texture
After loading your image, select a specific area of interest, like a dog's face, and create a mask to isolate this region. Use Blender’s masking tools to define the area where the AI will apply the new texture precisely. This ensures that only the intended part of the image is modified, keeping the rest intact. For instance, you might want to remove the dog's body and focus solely on the face.
Step 5: Integrating AI with Dream Texture and Setting Photography Parameters
To integrate AI capabilities, use add-ons like Dream Texture. Configure photographic parameters such as framing, camera position, film type, and lighting to guide the AI in generating textures that align with your vision. These settings can be adjusted to achieve different results, allowing you to tailor the AI's output to your project's needs.
Step 6: Writing the AI Prompt
Crafting a detailed prompt is crucial for guiding the AI's image generation. Specify the subject, style, and any specific attributes you want included. A prompt like "portrait of a beautiful woman with long blond hair" can direct the AI to create a face that complements the dog's head. The more specific your prompt, the better the AI's output will align with your creative vision.
Step 7: Configuring Source Image and Finalizing AI Texture Settings
Adjust the source image settings to ensure the AI incorporates the original data correctly. Fine-tune noise strength, color correction, and the number of iterations to refine the AI's output. More iterations often lead to better results but require more processing time. Experiment with these settings to find the perfect balance for your project.
Step 8: Generating the AI Texture
Start the AI texture generation process by clicking the 'Generate' button. Monitor the progress as the AI completes the specified iterations. Once finished, the generated texture will appear in the image editor, ready for further refinement and integration into your 3D model. This is where the AI truly brings your prompts and settings to life.
Step 9: Iterating and Refining the AI Output
After generating the texture, review and iterate as needed. Use Blender's AI tools to modify the prompt, adjust settings, or increase iterations to refine the output. This iterative process allows you to progressively enhance the AI's output until it perfectly matches your creative vision.
Step 10: Saving and Applying the Final Texture
Once you're satisfied with the texture, save it and apply it to your 3D model in Blender. Adjust the material settings to ensure the texture maps correctly onto the model's surface. This final step integrates the AI-generated texture into your project, enhancing its visual quality and detail. You can easily switch to another image by selecting a different one.
Pricing and Availability of AI Tools
Overview of Costs
The cost of AI-powered tools in Blender varies. Some tools developed by the open-source community are free, while others may require a subscription or a one-time purchase. Pricing depends on the complexity of the AI model, processing power, and support level. It's important to review the pricing structure to choose tools that fit your budget.
Advantages and Disadvantages of AI Texture Generation
Pros
- Speed: Quickly generates complex textures.
- Automation: Reduces the need for manual labor.
- Accessibility: Lowers the skill barrier for creating high-quality textures.
- Exploration: Facilitates experimentation with various styles and effects.
Cons
- Originality: May lack unique artistic expression.
- Quality Control: Results can vary based on the AI model and input data.
- Dependence: Over-reliance can limit skill development.
- Licensing: Commercial use may be subject to licensing restrictions.
Core Features of AI Texture Generation in Blender
Key Capabilities and Functionalities
AI texture generation in Blender offers several core features that enhance the creative process:
- Automated Texture Creation: Quickly generate detailed textures from simple prompts or base images.
- Customizable Parameters: Adjust settings to control the texture's style, resolution, and appearance.
- Seamless Integration: Easily integrate AI-generated textures into Blender’s material and rendering systems.
- Iterative Refinement: Refine textures through multiple iterations for precise control over the final result.
- Masking and Isolation: Apply textures to specific regions using masking tools.
Diverse Use Cases for AI Texture Generation
Applications in Various 3D Projects
AI texture generation can be applied across numerous 3D projects, including:
- Game Development: Create realistic environments and character textures to enhance game visuals.
- Architectural Visualization: Generate detailed building materials and landscapes for architectural renderings.
- Product Design: Develop textures for product prototypes, allowing for quick iterations and realistic representations.
- Animation: Enhance character and environment textures for animated films and series.
- Visual Effects: Create complex textures for visual effects in movies and commercials.
FAQ
What Blender version is recommended for AI texturing?
Blender 3.6 or later is recommended for optimal compatibility and feature support when using AI texturing tools.
Do I need special hardware to use AI in Blender?
While not always required, a powerful GPU can significantly speed up the AI texture generation process. Check the specific hardware requirements for your chosen AI add-ons.
How can I improve the quality of AI-generated textures?
Experiment with different prompts, adjust AI settings, increase iteration counts, and use high-quality source images to improve texture quality.
Are AI-generated textures commercially viable?
Yes, AI-generated textures can be used commercially, but always check the licensing terms of the AI tools and models you use to ensure compliance.
Can AI create seamless textures?
Yes, many AI tools are designed to create seamless textures. Look for tools that offer features like pattern analysis and edge blending for best results.
Related Questions
How does AI texture painting compare to traditional methods?
AI texture painting offers a faster and more automated approach compared to traditional methods, which often require manual detailing and extensive artistic skill. AI can quickly generate complex textures, allowing artists to focus on higher-level creative decisions. However, traditional methods may offer more precise control over every aspect of the texture.
What are the limitations of using AI for texture generation?
Limitations include potential issues with creativity, quality control, and dependency on training data. AI-generated textures might sometimes lack originality or exhibit artifacts. Quality can vary based on the AI model and input data used. Additionally, relying heavily on AI can limit the development of traditional artistic skills.
How can I customize the AI texture to match my specific style?
Customize AI textures by adjusting parameters such as style, color, resolution, and detail level. Use detailed prompts to guide the AI toward your desired aesthetic. Iterative refinement allows you to progressively align the AI’s output with your artistic vision, even if it differs from your initial concept.


 WordPress.com now allows AI agents to write and publish posts, plus more
WordPress.com, the popular web hosting and publishing platform, is now embracing AI agents—a move that could reshape the look and feel of the web. The company announced Friday that it will allow AI agents to draft, edit, and publish content on custom
WordPress.com now allows AI agents to write and publish posts, plus more
WordPress.com, the popular web hosting and publishing platform, is now embracing AI agents—a move that could reshape the look and feel of the web. The company announced Friday that it will allow AI agents to draft, edit, and publish content on custom
 Anthropic's experimental AI Claude completes negotiations and transactions in e-commerce test
As artificial intelligence advances rapidly, Anthropic quietly rolled out an internal experiment called "Project Deal" last Friday, showcasing AI's potential in e-commerce. The experiment had its AI model Claude autonomously handle buying, selling, a
Anthropic's experimental AI Claude completes negotiations and transactions in e-commerce test
As artificial intelligence advances rapidly, Anthropic quietly rolled out an internal experiment called "Project Deal" last Friday, showcasing AI's potential in e-commerce. The experiment had its AI model Claude autonomously handle buying, selling, a
 DeepSeek Code poised for launch
As AI technology accelerates, DeepSeek is at a thrilling juncture. The AI company recently revealed it has secured over 70 billion yuan in funding. Leadership has emphasized a commitment to groundbreaking AI research over immediate commercial gains.
DeepSeek Code poised for launch
As AI technology accelerates, DeepSeek is at a thrilling juncture. The AI company recently revealed it has secured over 70 billion yuan in funding. Leadership has emphasized a commitment to groundbreaking AI research over immediate commercial gains.

2026 Latest Best AI Expense Trackers: Top-rated tools to scan receipts & categorize corporate spend automatically. Discover powerful, game-changing solutions for effortless expense management, accurate financial tracking, and streamlined compliance. Our curated, weekly-updated comparison of free vs paid options helps you find the perfect fit. Unlock your AI edge with XIX.AI's expert picks.
10 tools
xix.ai

Discover the 2026 latest top-rated AI recruiting tools on XIX.AI. Our curated list features powerful, game-changing solutions for screening resumes and automating candidate interview scheduling. Compare free vs paid options with real-world tests and weekly updated rankings. Find your perfect hiring assistant and streamline your recruitment today!
10 tools
xix.ai
Discover the 2026 best AI personal wellness and focus coaches on XIX.AI. Our curated rankings feature top-rated, game-changing tools to manage burnout and boost mental energy. Compare free vs paid options with real-world insights. Unlock your path to peak productivity and well-being today.
10 tools
xix.ai
Discover the 2026 latest top-rated AI romantic chatbots for building genuine, long-term connections. Our curated list features powerful, consistent personalities, free vs paid comparisons, and real-world tests. Find your perfect companion and start building today at XIX.AI.
10 tools
xix.ai

Discover the 2026 best AI data science mentors to master SQL, Pandas & ML workflows. Explore our top-rated, curated selection at XIX.AI for powerful, game-changing guidance. Compare free vs paid options with real-world insights. Unlock your data science mastery today.
10 tools
xix.ai

Discover the 2026 best AI flirting and conversation trainers on XIX.AI. Our curated, top-rated selection helps you build social charisma and confidence in real-time. Explore must-try, game-changing tools with free vs paid comparisons and weekly updated rankings. Unlock your social edge today.
10 tools
xix.ai

Klingt super, aber wie gut funktioniert das wirklich mit dem Texturing? Hab früher viel mit Blender gearbeitet und das Material-Painting war immer recht mühsam. Wenn KI das wirklich vereinfacht, wäre das ein Game-Changer für Indie-Entwickler. Hoffe nur, das führt nicht dazu, dass grundlegende Skills verloren gehen. Werde es auf jeden Fall mal testen müssen! 😅
This guide is a game-changer! Blender's AI integration for textures sounds wild—can't wait to try it and see how it spices up my 3D models! 🎨


