


AI-Powered App Design: Step-by-Step Guide Using Free Tools
Starting out in mobile app design can feel overwhelming, especially if you're not a seasoned designer. But here's the good news: artificial intelligence (AI) is here to help, offering user-friendly tools that can simplify the design journey. This guide is your roadmap to using AI to craft a functional and eye-catching mobile app, all while sticking to free (though limited) resources. Get ready to turn your app ideas into reality, complete with interactive prototypes, without spending a fortune.
Key Points
- Use Claude to gather requirements and brainstorm, ensuring your app meets user needs.
- Create diagrams and wireframes with UX Pilot and FigJam to map out your app's structure.
- Utilize Visily for UI design and prototyping to bring your app's interface to life.
- Plan your design carefully to maximize the use of free AI tools.
- Focus on essential features and user flows to develop an effective Minimum Viable Product (MVP).
- Develop a shareable prototype to showcase your app idea.
From Idea to Interactive Prototype: An AI-Assisted App Design Process
Step 1: Requirement Gathering and Ideation with Claude
The foundation of any successful app design project is understanding what's needed. This means pinpointing your target audience, core features, design preferences, and technical considerations. AI can make this process much quicker. For instance, you can use Claude to simulate client interactions and gather project requirements.
 Claude can act as a virtual client, providing valuable insights and feedback to shape your app's functionality and design.
Here's an example prompt you might use with Claude:
"I'm a UX designer, and you're the client. Give me requirements for a new project."
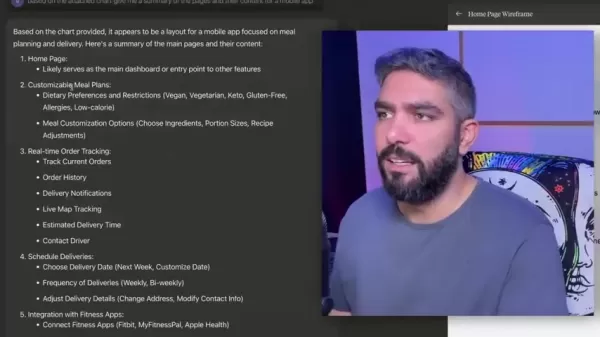
After getting those requirements from Claude, start with a simple approach to build your MVP. For example, when I asked Claude about a meal delivery app, it provided these key requirements:
- Target Audience: Busy professionals aged 25-45 in urban areas.
- Core Features: Customizable meal plans based on dietary preferences and restrictions, real-time order tracking, integration with popular fitness apps to sync nutritional data.
- Design Preferences: Clean, modern aesthetic, emphasis on high-quality food photography, intuitive navigation, minimizing the number of taps to place an order.
- Technical Requirements: iOS and Android versions, secure payment integration, push notifications for order updates and promotions.
- Key User Flows: New user onboarding, meal selection and customization, checkout process, delivery tracking.
- Unique Selling Points: Sourcing from local, organic farms, option for eco-friendly packaging, ability to rate and review meals.
- Budget: $100,000 for initial design and development timeline; four months to launch MVP.
Step 2: Diagramming and Wireframing with UX Pilot and FigJam
With a clear understanding of your app's requirements, it's time to visualize its structure and user flows. This involves creating diagrams and wireframes to outline the app's screens and interactions. Start by organizing your design features in FigJam, and enhance this process with the UX Pilot plugin.
UX Pilot, when used as a plugin in FigJam, leverages AI to automatically generate sitemaps and flowcharts based on your requirements.
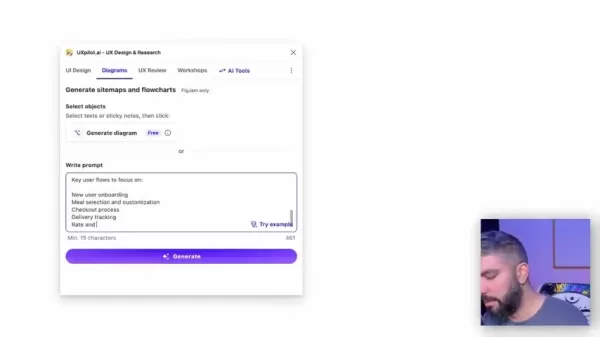 Feed the information you received from Claude into UX Pilot, and it will automatically provide you with the architecture for your app. For instance, using the requirements from the first step, UX Pilot can create categories for your app.
Here’s how to use UX Pilot with the information generated from Claude:
- Open FigJam and create a free account if you're new to the platform.
- Once in FigJam, launch the UX Pilot plugin to start the diagramming process.
- Copy in the requirements generated from Claude. UX Pilot will use this information to develop the architecture for your app.
By keeping your request vague with Claude, UX Pilot can generate a general site map that's suitable for development. With the architecture now set by UX Pilot, you can move on to building the UI design with Visily.
Step 3: UI Design and Prototyping with Visily
With your requirements outlined and wireframes visualized, it's time to create the user interface (UI) and prototype using Visily. Visily's AI can transform your wireframes and sketches into sleek, interactive prototypes, bringing your app's design to life. Here's how it works:
- Export your work from UX Pilot in Figma as a PDF to use in Visily.
- Use Visily's AI tool, Screenshot to Design, to convert your PDF into a website screenshot, which you'll use to develop the UI.
- Visily will create a UI that aligns with the core features and requirements from your PDF.
Now, refine your UI. Be meticulous and ensure everything meets your design standards. Adjust colors, photos, and other elements as needed. Once your screens are designed, add interactive features to create a prototype.
For interactive prototyping, you can share your final designs and prototypes with stakeholders and users to gather feedback and refine your designs.
Tips for Staying Within Free Tier Usage Limits
Plan Your Work
The AI tools mentioned in this guide have free usage tiers, but they come with limitations. You might be restricted by the number of projects, time, or designs you can create.
 For Claude and UX Pilot, it's crucial to keep these limits in mind. If you plan your project thoroughly, you should be able to stay within the free usage tiers, which also helps in honing your skills in planning UI design, development, and architecture.
Tips on How to Further UI Designs
Implement Brand Elements
Once you've refined your app designs, consider adding UI brand elements. These can include:
- Adding brand colors and typography to your UI designs.
- Incorporating brand-specific imagery or icons into your app designs.
- Using your brand's logo throughout the UI.
Improve Prototyping
Enhance the UI/UX experience by creating an interactive prototype with links between various pages of your app. High-quality animations and a user-friendly UI can significantly improve the overall experience and customer satisfaction.
AI-Assisted App Design: Weighing the Pros and Cons
Pros
- Accelerated Design Process: AI automates many tasks, speeding up the design process.
- Cost-Effectiveness: Using free AI tools keeps design costs low.
- Accessibility: AI enables those without extensive design knowledge to create functional prototypes.
- Increased Efficiency: Focus on core tasks like ideation and user experience, while AI handles routine design elements.
Cons
- Usage Limits: Free AI tools often have usage limits, requiring strategic planning.
- Design Flexibility: AI-generated designs might lack the unique touch and creativity of human designers.
- Learning Curve: Some AI tools may have a learning curve to master their features.
- Internet Dependence: All these tools require a stable internet connection.
- Requires Meticulous Adjustments: UX will need fine-tuning to be fully complete.
FAQ
Can I really design an app for free using AI?
Yes, with the tools outlined in this guide, you can create a functional prototype for free. However, you need to be mindful of the usage limits on the free tiers.
What if I exceed the usage limits?
Consider upgrading to a paid plan for unlimited access or plan your usage strategically to stay within the free tier limits.
Do I need coding skills for this process?
No coding skills are required. These AI tools focus on design and prototyping, allowing you to visualize and demonstrate your app idea.
Related Questions
What are the essential elements of a good mobile app design?
A good mobile app design focuses on user experience, prioritizing intuitive navigation, clear visual hierarchy, and accessibility. The design should align with the app's purpose and target audience, ensuring a seamless and engaging experience. Key components include:
- Intuitive Navigation: Make the app easy to explore with clear menus, search functions, and consistent labeling.
- Visually Appealing Interface: Create a modern and attractive UI that's pleasant to use.
- Clear Hierarchy of Information: Present information in a logical order, making it easy for users to find what they need.
- Accessibility: Ensure the app is usable by people with disabilities by following accessibility guidelines.
- Performance Optimization: Optimize the app for speed and responsiveness to provide a smooth user experience.
Related article
 AI-Powered Cover Letters: Expert Guide for Journal Submissions
In today's competitive academic publishing environment, crafting an effective cover letter can make the crucial difference in your manuscript's acceptance. Discover how AI-powered tools like ChatGPT can streamline this essential task, helping you cre
US to Sanction Foreign Officials Over Social Media Regulations
US Takes Stand Against Global Digital Content Regulations
The State Department issued a sharp diplomatic rebuke this week targeting European digital governance policies, signaling escalating tensions over control of online platforms. Secretary Marco
Ultimate Guide to AI-Powered YouTube Video Summarizers
In our information-rich digital landscape, AI-powered YouTube video summarizers have become indispensable for efficient content consumption. This in-depth guide explores how to build a sophisticated summarization tool using cutting-edge NLP technolog
Comments (28)
0/200
AI-Powered Cover Letters: Expert Guide for Journal Submissions
In today's competitive academic publishing environment, crafting an effective cover letter can make the crucial difference in your manuscript's acceptance. Discover how AI-powered tools like ChatGPT can streamline this essential task, helping you cre
US to Sanction Foreign Officials Over Social Media Regulations
US Takes Stand Against Global Digital Content Regulations
The State Department issued a sharp diplomatic rebuke this week targeting European digital governance policies, signaling escalating tensions over control of online platforms. Secretary Marco
Ultimate Guide to AI-Powered YouTube Video Summarizers
In our information-rich digital landscape, AI-powered YouTube video summarizers have become indispensable for efficient content consumption. This in-depth guide explores how to build a sophisticated summarization tool using cutting-edge NLP technolog
Comments (28)
0/200
![AnthonyHernández]() AnthonyHernández
AnthonyHernández
 August 25, 2025 at 5:01:22 PM EDT
This AI design guide is a game-changer! I’m no pro, but these free tools make app design feel like a breeze. Excited to try them out and see what I can create. 😎 Anyone else using AI for apps yet?


 0
0
![BenGarcía]() BenGarcía
August 9, 2025 at 9:00:59 AM EDT
BenGarcía
August 9, 2025 at 9:00:59 AM EDT
This guide is super helpful for newbies like me! AI tools sound like a game-changer for app design. Can they really make pro-level designs without coding? 😎
0
![DonaldLee]() DonaldLee
July 27, 2025 at 9:20:21 PM EDT
DonaldLee
July 27, 2025 at 9:20:21 PM EDT
This guide is super handy for beginners! AI tools make app design less intimidating, but I wonder how much creativity gets lost when machines do the heavy lifting. 🤔 Still, I’m excited to try these free tools!
0
![WillieHernández]() WillieHernández
April 22, 2025 at 11:25:52 AM EDT
WillieHernández
April 22, 2025 at 11:25:52 AM EDT
初心者の私にとってこのガイドは救世主です!無料のAIツールを使ったステップバイステップのアプローチで、初めてのアプリデザインがとても簡単になりました。プロセスを分かりやすく説明してくれるのが好きですが、部分的に少し急いでいる感じがしました。全体的に見て、素晴らしいスタートポイントです!👍💻
0
![RonaldMartinez]() RonaldMartinez
April 22, 2025 at 1:24:00 AM EDT
RonaldMartinez
April 22, 2025 at 1:24:00 AM EDT
This guide is a lifesaver for beginners like me! The step-by-step approach using free AI tools made designing my first app so much easier. I love how it breaks down the process, but some parts felt a bit rushed. Overall, it's a great starting point! 👍💻
0
![CharlesRoberts]() CharlesRoberts
April 21, 2025 at 10:53:08 PM EDT
CharlesRoberts
April 21, 2025 at 10:53:08 PM EDT
Este guia é um salva-vidas para iniciantes como eu! A abordagem passo a passo usando ferramentas de IA gratuitas tornou o design do meu primeiro app muito mais fácil. Adoro como ele desmonta o processo, mas algumas partes pareceram um pouco apressadas. No geral, é um ótimo ponto de partida! 👍💻
0
Starting out in mobile app design can feel overwhelming, especially if you're not a seasoned designer. But here's the good news: artificial intelligence (AI) is here to help, offering user-friendly tools that can simplify the design journey. This guide is your roadmap to using AI to craft a functional and eye-catching mobile app, all while sticking to free (though limited) resources. Get ready to turn your app ideas into reality, complete with interactive prototypes, without spending a fortune.
Key Points
- Use Claude to gather requirements and brainstorm, ensuring your app meets user needs.
- Create diagrams and wireframes with UX Pilot and FigJam to map out your app's structure.
- Utilize Visily for UI design and prototyping to bring your app's interface to life.
- Plan your design carefully to maximize the use of free AI tools.
- Focus on essential features and user flows to develop an effective Minimum Viable Product (MVP).
- Develop a shareable prototype to showcase your app idea.
From Idea to Interactive Prototype: An AI-Assisted App Design Process
Step 1: Requirement Gathering and Ideation with Claude
The foundation of any successful app design project is understanding what's needed. This means pinpointing your target audience, core features, design preferences, and technical considerations. AI can make this process much quicker. For instance, you can use Claude to simulate client interactions and gather project requirements.
Claude can act as a virtual client, providing valuable insights and feedback to shape your app's functionality and design.
Here's an example prompt you might use with Claude:
"I'm a UX designer, and you're the client. Give me requirements for a new project."
After getting those requirements from Claude, start with a simple approach to build your MVP. For example, when I asked Claude about a meal delivery app, it provided these key requirements:
- Target Audience: Busy professionals aged 25-45 in urban areas.
- Core Features: Customizable meal plans based on dietary preferences and restrictions, real-time order tracking, integration with popular fitness apps to sync nutritional data.
- Design Preferences: Clean, modern aesthetic, emphasis on high-quality food photography, intuitive navigation, minimizing the number of taps to place an order.
- Technical Requirements: iOS and Android versions, secure payment integration, push notifications for order updates and promotions.
- Key User Flows: New user onboarding, meal selection and customization, checkout process, delivery tracking.
- Unique Selling Points: Sourcing from local, organic farms, option for eco-friendly packaging, ability to rate and review meals.
- Budget: $100,000 for initial design and development timeline; four months to launch MVP.
Step 2: Diagramming and Wireframing with UX Pilot and FigJam
With a clear understanding of your app's requirements, it's time to visualize its structure and user flows. This involves creating diagrams and wireframes to outline the app's screens and interactions. Start by organizing your design features in FigJam, and enhance this process with the UX Pilot plugin.
UX Pilot, when used as a plugin in FigJam, leverages AI to automatically generate sitemaps and flowcharts based on your requirements.
Feed the information you received from Claude into UX Pilot, and it will automatically provide you with the architecture for your app. For instance, using the requirements from the first step, UX Pilot can create categories for your app.
Here’s how to use UX Pilot with the information generated from Claude:
- Open FigJam and create a free account if you're new to the platform.
- Once in FigJam, launch the UX Pilot plugin to start the diagramming process.
- Copy in the requirements generated from Claude. UX Pilot will use this information to develop the architecture for your app.
By keeping your request vague with Claude, UX Pilot can generate a general site map that's suitable for development. With the architecture now set by UX Pilot, you can move on to building the UI design with Visily.
Step 3: UI Design and Prototyping with Visily
With your requirements outlined and wireframes visualized, it's time to create the user interface (UI) and prototype using Visily. Visily's AI can transform your wireframes and sketches into sleek, interactive prototypes, bringing your app's design to life. Here's how it works:
- Export your work from UX Pilot in Figma as a PDF to use in Visily.
- Use Visily's AI tool, Screenshot to Design, to convert your PDF into a website screenshot, which you'll use to develop the UI.
- Visily will create a UI that aligns with the core features and requirements from your PDF.
Now, refine your UI. Be meticulous and ensure everything meets your design standards. Adjust colors, photos, and other elements as needed. Once your screens are designed, add interactive features to create a prototype.
For interactive prototyping, you can share your final designs and prototypes with stakeholders and users to gather feedback and refine your designs.
Tips for Staying Within Free Tier Usage Limits
Plan Your Work
The AI tools mentioned in this guide have free usage tiers, but they come with limitations. You might be restricted by the number of projects, time, or designs you can create.
For Claude and UX Pilot, it's crucial to keep these limits in mind. If you plan your project thoroughly, you should be able to stay within the free usage tiers, which also helps in honing your skills in planning UI design, development, and architecture.
Tips on How to Further UI Designs
Implement Brand Elements
Once you've refined your app designs, consider adding UI brand elements. These can include:
- Adding brand colors and typography to your UI designs.
- Incorporating brand-specific imagery or icons into your app designs.
- Using your brand's logo throughout the UI.
Improve Prototyping
Enhance the UI/UX experience by creating an interactive prototype with links between various pages of your app. High-quality animations and a user-friendly UI can significantly improve the overall experience and customer satisfaction.
AI-Assisted App Design: Weighing the Pros and Cons
Pros
- Accelerated Design Process: AI automates many tasks, speeding up the design process.
- Cost-Effectiveness: Using free AI tools keeps design costs low.
- Accessibility: AI enables those without extensive design knowledge to create functional prototypes.
- Increased Efficiency: Focus on core tasks like ideation and user experience, while AI handles routine design elements.
Cons
- Usage Limits: Free AI tools often have usage limits, requiring strategic planning.
- Design Flexibility: AI-generated designs might lack the unique touch and creativity of human designers.
- Learning Curve: Some AI tools may have a learning curve to master their features.
- Internet Dependence: All these tools require a stable internet connection.
- Requires Meticulous Adjustments: UX will need fine-tuning to be fully complete.
FAQ
Can I really design an app for free using AI?
Yes, with the tools outlined in this guide, you can create a functional prototype for free. However, you need to be mindful of the usage limits on the free tiers.
What if I exceed the usage limits?
Consider upgrading to a paid plan for unlimited access or plan your usage strategically to stay within the free tier limits.
Do I need coding skills for this process?
No coding skills are required. These AI tools focus on design and prototyping, allowing you to visualize and demonstrate your app idea.
Related Questions
What are the essential elements of a good mobile app design?
A good mobile app design focuses on user experience, prioritizing intuitive navigation, clear visual hierarchy, and accessibility. The design should align with the app's purpose and target audience, ensuring a seamless and engaging experience. Key components include:
- Intuitive Navigation: Make the app easy to explore with clear menus, search functions, and consistent labeling.
- Visually Appealing Interface: Create a modern and attractive UI that's pleasant to use.
- Clear Hierarchy of Information: Present information in a logical order, making it easy for users to find what they need.
- Accessibility: Ensure the app is usable by people with disabilities by following accessibility guidelines.
- Performance Optimization: Optimize the app for speed and responsiveness to provide a smooth user experience.


 AI-Powered Cover Letters: Expert Guide for Journal Submissions
In today's competitive academic publishing environment, crafting an effective cover letter can make the crucial difference in your manuscript's acceptance. Discover how AI-powered tools like ChatGPT can streamline this essential task, helping you cre
AI-Powered Cover Letters: Expert Guide for Journal Submissions
In today's competitive academic publishing environment, crafting an effective cover letter can make the crucial difference in your manuscript's acceptance. Discover how AI-powered tools like ChatGPT can streamline this essential task, helping you cre
 US to Sanction Foreign Officials Over Social Media Regulations
US Takes Stand Against Global Digital Content Regulations
The State Department issued a sharp diplomatic rebuke this week targeting European digital governance policies, signaling escalating tensions over control of online platforms. Secretary Marco
US to Sanction Foreign Officials Over Social Media Regulations
US Takes Stand Against Global Digital Content Regulations
The State Department issued a sharp diplomatic rebuke this week targeting European digital governance policies, signaling escalating tensions over control of online platforms. Secretary Marco
 Ultimate Guide to AI-Powered YouTube Video Summarizers
In our information-rich digital landscape, AI-powered YouTube video summarizers have become indispensable for efficient content consumption. This in-depth guide explores how to build a sophisticated summarization tool using cutting-edge NLP technolog
August 25, 2025 at 5:01:22 PM EDT
Ultimate Guide to AI-Powered YouTube Video Summarizers
In our information-rich digital landscape, AI-powered YouTube video summarizers have become indispensable for efficient content consumption. This in-depth guide explores how to build a sophisticated summarization tool using cutting-edge NLP technolog
August 25, 2025 at 5:01:22 PM EDT
This AI design guide is a game-changer! I’m no pro, but these free tools make app design feel like a breeze. Excited to try them out and see what I can create. 😎 Anyone else using AI for apps yet?
0
August 9, 2025 at 9:00:59 AM EDT
This guide is super helpful for newbies like me! AI tools sound like a game-changer for app design. Can they really make pro-level designs without coding? 😎
0
July 27, 2025 at 9:20:21 PM EDT
This guide is super handy for beginners! AI tools make app design less intimidating, but I wonder how much creativity gets lost when machines do the heavy lifting. 🤔 Still, I’m excited to try these free tools!
0
April 22, 2025 at 11:25:52 AM EDT
初心者の私にとってこのガイドは救世主です!無料のAIツールを使ったステップバイステップのアプローチで、初めてのアプリデザインがとても簡単になりました。プロセスを分かりやすく説明してくれるのが好きですが、部分的に少し急いでいる感じがしました。全体的に見て、素晴らしいスタートポイントです!👍💻
0
April 22, 2025 at 1:24:00 AM EDT
This guide is a lifesaver for beginners like me! The step-by-step approach using free AI tools made designing my first app so much easier. I love how it breaks down the process, but some parts felt a bit rushed. Overall, it's a great starting point! 👍💻
0
April 21, 2025 at 10:53:08 PM EDT
Este guia é um salva-vidas para iniciantes como eu! A abordagem passo a passo usando ferramentas de IA gratuitas tornou o design do meu primeiro app muito mais fácil. Adoro como ele desmonta o processo, mas algumas partes pareceram um pouco apressadas. No geral, é um ótimo ponto de partida! 👍💻
0


