Home
HomeTransform Text to Speech with Uberduck AI: A Comprehensive Guide
In today's digital age, turning text into lifelike speech has become a game-changer for countless applications. Whether you're producing content, building accessibility tools, or simply dabbling in AI experiments, having a dependable text-to-speech (TTS) solution is non-negotiable. Among the multitude of platforms out there, Uberduck AI shines brightly thanks to its impressive array of voices and features. This guide will walk you through mastering Uberduck AI, from signing up to generating polished audio outputs. By the time you finish, you'll be equipped to harness its power for all your creative endeavors.
Understanding Uberduck AI
Uberduck AI is a go-to platform for generating AI vocals and converting text to speech. It's tailored for creatives, musicians, and developers alike, offering everything from synthetic singing and rapping voices to straightforward conversational tones. With Uberduck, you can turn written words into spoken ones, complete with a wide variety of voice options to suit every mood and purpose. The AI behind Uberduck ensures top-notch audio quality, making it ideal for everything from content creation to accessibility tools.
The platform's user-friendly interface caters to both novices and seasoned users. You can tweak and customize the generated speech to perfection, choosing from a rich collection of voices, adjusting tones, and even adding special effects for a truly unique sound. Its continuous updates and active development ensure Uberduck stays ahead of the curve in the AI-driven audio generation world. The team behind it listens closely to user feedback, making it a solid choice for anyone seeking reliable TTS solutions.
Here’s a quick visual overview:

Getting Started: Sign Up Process
Let’s dive into the nitty-gritty of getting started with Uberduck AI. First things first—head over to the Uberduck AI website and sign up. It’s a breeze. Simply type the URL into your browser and look for the 'Sign Up' button, usually nestled at the top-right corner of the homepage.
Once you click that button, you’ll land on the registration page. Here, you’ll be asked to provide your email address and create a secure password. Fill in your details, and Uberduck will send a verification link to your inbox. Click that link to activate your account. Voilà—you’re now ready to explore the platform’s features!
Keep in mind that while some basic features are free, premium voices and functionalities often require a subscription. Familiarize yourself with the pricing plans to pick the best option for your needs. Pro tip: Take advantage of the free trial to get a feel for what Uberduck can do before committing to a paid plan.
Step-by-Step Guide: Turning Text into Speech
Ready to put Uberduck AI to work? Let’s break it down step by step.
Navigating the Dashboard
Log in to your account and you’ll arrive at the Uberduck AI dashboard. Think of it as your command center for all things TTS. Here, you’ll find sections like ‘Text to Voice,’ ‘Voice to Voice,’ and ‘AI Generated Rap.’ For this guide, we’ll focus on ‘Text to Voice.’
Spend a moment getting acquainted with the layout. You’ll notice areas for selecting voices, inputting text, and adjusting output settings. Everything is thoughtfully organized to give you full control over the process. Pay attention to any helpful tips or tooltips that pop up—they’re packed with useful insights.
Selecting the Perfect Voice
Picking the right voice is key to achieving your desired result. Uberduck AI boasts an expansive library of voices to choose from.
Browse through categories based on age, gender, accent, and style. Need a quirky character voice or something more professional? Uberduck has you covered. Preview each voice by clicking the play button next to it. This lets you hear samples and decide if it fits your project. Filters can help narrow down your search—say goodbye to sifting through endless options. Take your time to experiment and find the voice that resonates with your content.
Here’s a glimpse of some of the unique voices available:
- Aiden Botha
- Angus (Pleading)
- Bertie
- Big G
- B.L.A.B
- Damon Edwards
- Davo
- Fat Tony
- Jake Turner
With multiple pages of voices, you’ll have plenty to choose from. Experiment until you land on the perfect match.
Inputting Your Text
Now that you’ve chosen a voice, it’s time to feed it some text. You’ll find a text input area labeled ‘Your Text.’ Type or paste your content here. Before generating the speech, double-check for typos or grammar issues—these can mess with the audio quality. Also, keep in mind that Uberduck AI has character limits per conversion, so break up lengthy texts if needed.
Formatting your text properly is crucial. Use punctuation to indicate pauses and intonation shifts. Break up long sentences for better clarity. Add phonetic spellings in brackets to guide the AI on tricky pronunciations. Proper formatting ensures Uberduck delivers your message clearly and naturally.
Generating the Speech
With your voice selected and text ready, it’s time to hit the ‘Generate Speech’ button. Located beneath the text input area, this button kicks off the conversion process. The time it takes depends on the text length and voice complexity. Once processed, your speech will appear in the ‘Your Generations’ section.
Listen to the audio preview to confirm it meets your expectations. If not, tweak the text or voice and regenerate until you’re satisfied. This iterative approach ensures the final output aligns perfectly with your vision.
Downloading the Audio File
When you’re happy with the generated speech, it’s time to download the audio file. In the ‘Your Generations’ section, click the download button next to the audio preview. You’ll be prompted to save the file to your device. Choose a location and filename, and the download begins. Uberduck typically offers WAV files, which are widely compatible with most editing software and players. Save a copy of your work for future reference. Congratulations—you’ve successfully transformed text into speech with Uberduck AI!
Uberduck AI Pricing Insights
Understanding Uberduck AI’s subscription plans is essential for making the most of the platform. Here’s a breakdown of what to expect:
Subscription Plans Explained
Uberduck AI offers tiered plans to suit different user needs. Whether you’re an individual creator or part of a larger enterprise, there’s a plan for you.
The **Free Plan** serves as a great starting point, giving you access to a limited set of voices and capped monthly character conversions. It’s ideal for testing the waters but may fall short for frequent users.
**Paid Plans**, on the other hand, unlock the full potential of Uberduck AI. These plans provide access to the entire voice library, increased character limits, and additional perks like commercial usage rights and priority support. Pricing varies depending on usage levels, but it generally scales with the number of characters you convert per month. Some plans even offer unlimited usage for select features.
For **Enterprise Users**, Uberduck AI tailors bespoke solutions to meet specific business needs. These plans come with dedicated support, flexible pricing, and customizable features. Reach out directly if you’re part of an enterprise team looking to integrate Uberduck AI into your workflows.
Factors Influencing Pricing
Several elements affect the cost of using Uberduck AI. The primary factor is the volume of text you convert each month—the higher the usage, the pricier the subscription. Additional features like premium voices or commercial licenses may incur extra costs. Uberduck also offers add-ons, such as extra character credits or enhanced support, to further customize your plan.
When comparing plans, weigh long-term value against upfront costs. A cheaper plan might seem appealing initially, but it could lack the features you need. Opting for a balanced plan that meets your budget and usage patterns can save you both time and money in the long run.
Pros and Cons of Uberduck AI
Like any tool, Uberduck AI has its strengths and limitations. Here’s a quick rundown:
Pros
- Extensive voice library with diverse options
- User-friendly interface
- Highly customizable outputs
- Support for multiple languages
Cons
- Pricing can add up for heavy users
- Voice quality may not rival human recordings
Related article
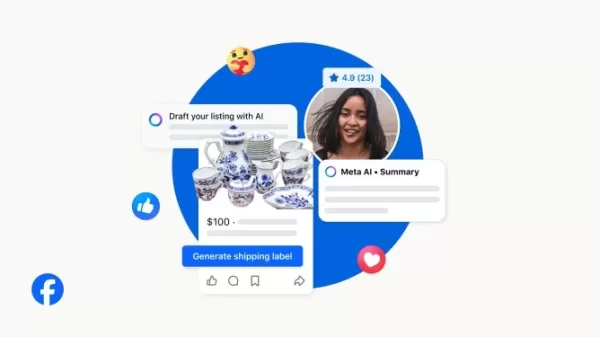
 Meta AI now responds to buyer messages on Facebook Marketplace
Facebook Marketplace introduces new Meta AI features, including automated replies to buyer inquiries, the company announced Thursday. The platform also leverages AI to accelerate item listings, summarize seller profiles, and now lets sellers offer sh
OpenAI outlines AI economy with public wealth funds, robot taxes, and four-day week
As governments struggle to manage the economic impact of superintelligent machines, OpenAI has released a set of policy proposals outlining how wealth and work could be reshaped in an "intelligence age." The ideas blend traditional left-leaning mecha
Google Unveils Gemini Notebooks, Merging NotebookLM with Personal Knowledge Base
Google recently launched a "Notebooks" feature for Gemini, designed to help users manage complex projects by creating a personalized knowledge base. This update bridges the data gap between Gemini and the AI research assistant NotebookLM, marking a k
Related Special Topic Recommendations
Productivity
Meta AI now responds to buyer messages on Facebook Marketplace
Facebook Marketplace introduces new Meta AI features, including automated replies to buyer inquiries, the company announced Thursday. The platform also leverages AI to accelerate item listings, summarize seller profiles, and now lets sellers offer sh
OpenAI outlines AI economy with public wealth funds, robot taxes, and four-day week
As governments struggle to manage the economic impact of superintelligent machines, OpenAI has released a set of policy proposals outlining how wealth and work could be reshaped in an "intelligence age." The ideas blend traditional left-leaning mecha
Google Unveils Gemini Notebooks, Merging NotebookLM with Personal Knowledge Base
Google recently launched a "Notebooks" feature for Gemini, designed to help users manage complex projects by creating a personalized knowledge base. This update bridges the data gap between Gemini and the AI research assistant NotebookLM, marking a k
Related Special Topic Recommendations
Productivity
 AI Personal Wellness & Focus Coaches: Manage Burnout & Boost Mental Energy Levels
Discover the 2026 best AI personal wellness and focus coaches on XIX.AI. Our curated rankings feature top-rated, game-changing tools to manage burnout and boost mental energy. Compare free vs paid options with real-world insights. Unlock your path to peak productivity and well-being today.
 10 tools
 xix.ai
chatbot
Top-Rated AI Romantic Chatbots: Build Long-Term Relationships with Consistent Personalities
xix.ai
chatbot
Top-Rated AI Romantic Chatbots: Build Long-Term Relationships with Consistent Personalities
Discover the 2026 latest top-rated AI romantic chatbots for building genuine, long-term connections. Our curated list features powerful, consistent personalities, free vs paid comparisons, and real-world tests. Find your perfect companion and start building today at XIX.AI.
10 tools
xix.ai
Education and Learning
Best AI Data Science Mentors: Master SQL, Pandas & Machine Learning Workflows
Discover the 2026 best AI data science mentors to master SQL, Pandas & ML workflows. Explore our top-rated, curated selection at XIX.AI for powerful, game-changing guidance. Compare free vs paid options with real-world insights. Unlock your data science mastery today.
10 tools
xix.ai
chatbot
Best AI Flirting & Conversation Trainers: Improve Social Charisma and Confidence in Real-Time
Discover the 2026 best AI flirting and conversation trainers on XIX.AI. Our curated, top-rated selection helps you build social charisma and confidence in real-time. Explore must-try, game-changing tools with free vs paid comparisons and weekly updated rankings. Unlock your social edge today.
10 tools
xix.ai
code
Best AI Tools for Automated Unit Testing: Generate Jest, PyTest & JUnit Test Cases in One Click
Discover the 2026 latest top-rated AI tools for automated unit testing. Our curated selection features powerful, game-changing solutions to generate Jest, PyTest & JUnit test cases instantly. Compare free vs paid options with real-world tests and weekly updated rankings on XIX.AI. Unlock your AI edge and boost development productivity today.
10 tools
xix.ai
Data Analysis
Best AI Data Visualization Tools: Auto-Generate Interactive BI Dashboards from Raw Files
Discover the 2026 best AI data visualization tools at XIX.AI. Our curated, top-rated selection helps you auto-generate powerful, interactive BI dashboards from raw files instantly. Compare free vs paid options with real-world tests and weekly updated rankings. Unlock your data's potential today.
10 tools
xix.ai

 Comments (9)
0/500
Comments (9)
0/500
![DavidRodriguez]()
Uberduck AI klingt echt vielversprechend für Podcast-Produktionen! Aber ich frage mich, wie gut es mit deutschen Dialekten klarkommt. Die meisten TTS-Tools scheitern ja schon an bayrischem Akzent 😅 Kann mir jemand Erfahrungsberichte geben?
![WillieCarter]()
Uberduck AI semble intéressant, mais j'espère qu'il ne sonnera pas comme un robot des années 90 ! 😅 Blague à part, c'est vrai que la synthèse vocale a fait des progrès fous ces dernières années. Reste à voir si c'est vraiment utile pour mon petit projet de podcast...
![ChristopherDavis]()
J'ai testé Uberduck pour un projet perso et la voix française est assez convaincante ! Dommage qu'elle ait parfois ce petit côté robotique qu'on entend encore dans les TTS. Pour de la vraie voix naturelle, faudra peut-être attendre encore 2-3 ans. 😅
![BillyYoung]()
This Uberduck AI guide is super cool! 😎 Text-to-speech is changing the game for content creators like me. Can't wait to try it for my next video project!
![CharlesRoberts]()
Uberduck AI, c’est impressionnant ! Les voix sont hyper réalistes, parfait pour mes projets de doublage. 😊 Mais est-ce que ça va remplacer les acteurs vocaux ?
![DanielWalker]()
Uberduck的文本转语音技术真牛!感觉以后视频配音都不用真人了,省时又省力!😎 不过担心会不会被滥用啊?
Top News
AI Builder and Power Automate Revolutionize Document Summarization
AI Hosts of NotebookLM Podcast Now Available for Interviews
China unveils national humanoid robot and embodied intelligence standards
Corporate AI Adoption Plateaus, Ramp Data Reveals
Bing Image Creator Tutorial: AI Art Generation Guide
Learn to Create AI Music Using Your Voice: A Step-by-Step Suno Tutorial
iMyFone MagicMic: In-Depth Review and Tutorial on Real-Time AI Voice Changer
Top AI Video Generators in 2025: Pika Labs Compared to Alternatives
DeepSeek V4 Emerges as Multimodal AI Game-Changer
Embodied Intelligence Unveils First Industry Standard to Curb Unregulated Growth
More
Featured
Claude
Meet Claude: Your AI Assistant for Smart
Cici AI
Ever wondered what Cici AI is all about?
Gemini
Ever wondered what the buzz about Gemini
DeepSeek
Ever wondered what DeepSeek is all about
Grok
Ever heard of Grok? It's this nifty AI a
ChatGPT
Ever wondered what ChatGPT is all about?
OpenAI
Ever wondered what the buzz around OpenA
Tencent Hunyuan
Tencent Hunyuan-Large, huh? It's like th
Qwen AI
Ever wondered what Qwen AI is all about?
Runway
Ever wondered how to turn your regular v
More
In today's digital age, turning text into lifelike speech has become a game-changer for countless applications. Whether you're producing content, building accessibility tools, or simply dabbling in AI experiments, having a dependable text-to-speech (TTS) solution is non-negotiable. Among the multitude of platforms out there, Uberduck AI shines brightly thanks to its impressive array of voices and features. This guide will walk you through mastering Uberduck AI, from signing up to generating polished audio outputs. By the time you finish, you'll be equipped to harness its power for all your creative endeavors.
Understanding Uberduck AI
Uberduck AI is a go-to platform for generating AI vocals and converting text to speech. It's tailored for creatives, musicians, and developers alike, offering everything from synthetic singing and rapping voices to straightforward conversational tones. With Uberduck, you can turn written words into spoken ones, complete with a wide variety of voice options to suit every mood and purpose. The AI behind Uberduck ensures top-notch audio quality, making it ideal for everything from content creation to accessibility tools.
The platform's user-friendly interface caters to both novices and seasoned users. You can tweak and customize the generated speech to perfection, choosing from a rich collection of voices, adjusting tones, and even adding special effects for a truly unique sound. Its continuous updates and active development ensure Uberduck stays ahead of the curve in the AI-driven audio generation world. The team behind it listens closely to user feedback, making it a solid choice for anyone seeking reliable TTS solutions.
Here’s a quick visual overview:
Getting Started: Sign Up Process
Let’s dive into the nitty-gritty of getting started with Uberduck AI. First things first—head over to the Uberduck AI website and sign up. It’s a breeze. Simply type the URL into your browser and look for the 'Sign Up' button, usually nestled at the top-right corner of the homepage.
Once you click that button, you’ll land on the registration page. Here, you’ll be asked to provide your email address and create a secure password. Fill in your details, and Uberduck will send a verification link to your inbox. Click that link to activate your account. Voilà—you’re now ready to explore the platform’s features!
Keep in mind that while some basic features are free, premium voices and functionalities often require a subscription. Familiarize yourself with the pricing plans to pick the best option for your needs. Pro tip: Take advantage of the free trial to get a feel for what Uberduck can do before committing to a paid plan.
Step-by-Step Guide: Turning Text into Speech
Ready to put Uberduck AI to work? Let’s break it down step by step.
Navigating the Dashboard
Log in to your account and you’ll arrive at the Uberduck AI dashboard. Think of it as your command center for all things TTS. Here, you’ll find sections like ‘Text to Voice,’ ‘Voice to Voice,’ and ‘AI Generated Rap.’ For this guide, we’ll focus on ‘Text to Voice.’
Spend a moment getting acquainted with the layout. You’ll notice areas for selecting voices, inputting text, and adjusting output settings. Everything is thoughtfully organized to give you full control over the process. Pay attention to any helpful tips or tooltips that pop up—they’re packed with useful insights.
Selecting the Perfect Voice
Picking the right voice is key to achieving your desired result. Uberduck AI boasts an expansive library of voices to choose from.
Browse through categories based on age, gender, accent, and style. Need a quirky character voice or something more professional? Uberduck has you covered. Preview each voice by clicking the play button next to it. This lets you hear samples and decide if it fits your project. Filters can help narrow down your search—say goodbye to sifting through endless options. Take your time to experiment and find the voice that resonates with your content.
Here’s a glimpse of some of the unique voices available:
- Aiden Botha
- Angus (Pleading)
- Bertie
- Big G
- B.L.A.B
- Damon Edwards
- Davo
- Fat Tony
- Jake Turner
With multiple pages of voices, you’ll have plenty to choose from. Experiment until you land on the perfect match.
Inputting Your Text
Now that you’ve chosen a voice, it’s time to feed it some text. You’ll find a text input area labeled ‘Your Text.’ Type or paste your content here. Before generating the speech, double-check for typos or grammar issues—these can mess with the audio quality. Also, keep in mind that Uberduck AI has character limits per conversion, so break up lengthy texts if needed.
Formatting your text properly is crucial. Use punctuation to indicate pauses and intonation shifts. Break up long sentences for better clarity. Add phonetic spellings in brackets to guide the AI on tricky pronunciations. Proper formatting ensures Uberduck delivers your message clearly and naturally.
Generating the Speech
With your voice selected and text ready, it’s time to hit the ‘Generate Speech’ button. Located beneath the text input area, this button kicks off the conversion process. The time it takes depends on the text length and voice complexity. Once processed, your speech will appear in the ‘Your Generations’ section.
Listen to the audio preview to confirm it meets your expectations. If not, tweak the text or voice and regenerate until you’re satisfied. This iterative approach ensures the final output aligns perfectly with your vision.
Downloading the Audio File
When you’re happy with the generated speech, it’s time to download the audio file. In the ‘Your Generations’ section, click the download button next to the audio preview. You’ll be prompted to save the file to your device. Choose a location and filename, and the download begins. Uberduck typically offers WAV files, which are widely compatible with most editing software and players. Save a copy of your work for future reference. Congratulations—you’ve successfully transformed text into speech with Uberduck AI!
Uberduck AI Pricing Insights
Understanding Uberduck AI’s subscription plans is essential for making the most of the platform. Here’s a breakdown of what to expect:
Subscription Plans Explained
Uberduck AI offers tiered plans to suit different user needs. Whether you’re an individual creator or part of a larger enterprise, there’s a plan for you.
The **Free Plan** serves as a great starting point, giving you access to a limited set of voices and capped monthly character conversions. It’s ideal for testing the waters but may fall short for frequent users.
**Paid Plans**, on the other hand, unlock the full potential of Uberduck AI. These plans provide access to the entire voice library, increased character limits, and additional perks like commercial usage rights and priority support. Pricing varies depending on usage levels, but it generally scales with the number of characters you convert per month. Some plans even offer unlimited usage for select features.
For **Enterprise Users**, Uberduck AI tailors bespoke solutions to meet specific business needs. These plans come with dedicated support, flexible pricing, and customizable features. Reach out directly if you’re part of an enterprise team looking to integrate Uberduck AI into your workflows.
Factors Influencing Pricing
Several elements affect the cost of using Uberduck AI. The primary factor is the volume of text you convert each month—the higher the usage, the pricier the subscription. Additional features like premium voices or commercial licenses may incur extra costs. Uberduck also offers add-ons, such as extra character credits or enhanced support, to further customize your plan.
When comparing plans, weigh long-term value against upfront costs. A cheaper plan might seem appealing initially, but it could lack the features you need. Opting for a balanced plan that meets your budget and usage patterns can save you both time and money in the long run.
Pros and Cons of Uberduck AI
Like any tool, Uberduck AI has its strengths and limitations. Here’s a quick rundown:
Pros
- Extensive voice library with diverse options
- User-friendly interface
- Highly customizable outputs
- Support for multiple languages
Cons
- Pricing can add up for heavy users
- Voice quality may not rival human recordings
Related article
Meta AI now responds to buyer messages on Facebook Marketplace
Facebook Marketplace introduces new Meta AI features, including automated replies to buyer inquiries, the company announced Thursday. The platform also leverages AI to accelerate item listings, summarize seller profiles, and now lets sellers offer sh
OpenAI outlines AI economy with public wealth funds, robot taxes, and four-day week
As governments struggle to manage the economic impact of superintelligent machines, OpenAI has released a set of policy proposals outlining how wealth and work could be reshaped in an "intelligence age." The ideas blend traditional left-leaning mecha
Google Unveils Gemini Notebooks, Merging NotebookLM with Personal Knowledge Base
Google recently launched a "Notebooks" feature for Gemini, designed to help users manage complex projects by creating a personalized knowledge base. This update bridges the data gap between Gemini and the AI research assistant NotebookLM, marking a k
Related Special Topic RecommendationsProductivity
AI Personal Wellness & Focus Coaches: Manage Burnout & Boost Mental Energy Levels
Discover the 2026 best AI personal wellness and focus coaches on XIX.AI. Our curated rankings feature top-rated, game-changing tools to manage burnout and boost mental energy. Compare free vs paid options with real-world insights. Unlock your path to peak productivity and well-being today.
10 tools
xix.ai
chatbot
Top-Rated AI Romantic Chatbots: Build Long-Term Relationships with Consistent PersonalitiesDiscover the 2026 latest top-rated AI romantic chatbots for building genuine, long-term connections. Our curated list features powerful, consistent personalities, free vs paid comparisons, and real-world tests. Find your perfect companion and start building today at XIX.AI.
10 tools
xix.ai
Education and Learning
Best AI Data Science Mentors: Master SQL, Pandas & Machine Learning WorkflowsDiscover the 2026 best AI data science mentors to master SQL, Pandas & ML workflows. Explore our top-rated, curated selection at XIX.AI for powerful, game-changing guidance. Compare free vs paid options with real-world insights. Unlock your data science mastery today.
10 tools
xix.ai
chatbot
Best AI Flirting & Conversation Trainers: Improve Social Charisma and Confidence in Real-TimeDiscover the 2026 best AI flirting and conversation trainers on XIX.AI. Our curated, top-rated selection helps you build social charisma and confidence in real-time. Explore must-try, game-changing tools with free vs paid comparisons and weekly updated rankings. Unlock your social edge today.
10 tools
xix.ai
code
Best AI Tools for Automated Unit Testing: Generate Jest, PyTest & JUnit Test Cases in One ClickDiscover the 2026 latest top-rated AI tools for automated unit testing. Our curated selection features powerful, game-changing solutions to generate Jest, PyTest & JUnit test cases instantly. Compare free vs paid options with real-world tests and weekly updated rankings on XIX.AI. Unlock your AI edge and boost development productivity today.
10 tools
xix.ai
Data Analysis
Best AI Data Visualization Tools: Auto-Generate Interactive BI Dashboards from Raw FilesDiscover the 2026 best AI data visualization tools at XIX.AI. Our curated, top-rated selection helps you auto-generate powerful, interactive BI dashboards from raw files instantly. Compare free vs paid options with real-world tests and weekly updated rankings. Unlock your data's potential today.
10 tools
xix.ai
Comments (9)0/500Uberduck AI klingt echt vielversprechend für Podcast-Produktionen! Aber ich frage mich, wie gut es mit deutschen Dialekten klarkommt. Die meisten TTS-Tools scheitern ja schon an bayrischem Akzent 😅 Kann mir jemand Erfahrungsberichte geben?
Uberduck AI semble intéressant, mais j'espère qu'il ne sonnera pas comme un robot des années 90 ! 😅 Blague à part, c'est vrai que la synthèse vocale a fait des progrès fous ces dernières années. Reste à voir si c'est vraiment utile pour mon petit projet de podcast...
J'ai testé Uberduck pour un projet perso et la voix française est assez convaincante ! Dommage qu'elle ait parfois ce petit côté robotique qu'on entend encore dans les TTS. Pour de la vraie voix naturelle, faudra peut-être attendre encore 2-3 ans. 😅
This Uberduck AI guide is super cool! 😎 Text-to-speech is changing the game for content creators like me. Can't wait to try it for my next video project!
Uberduck AI, c’est impressionnant ! Les voix sont hyper réalistes, parfait pour mes projets de doublage. 😊 Mais est-ce que ça va remplacer les acteurs vocaux ?
Uberduck的文本转语音技术真牛!感觉以后视频配音都不用真人了,省时又省力!😎 不过担心会不会被滥用啊?