


 Home
HomeFlux AI Inpainting: The Ultimate Guide to AI-Powered Image Editing
Mastering AI Inpainting with Flux AI: A Complete Guide
AI-powered image editing has revolutionized how we retouch photos, and inpainting stands out as one of its most impressive capabilities. Whether you're removing unwanted objects, restoring old photos, or creatively altering images, Flux AI—combined with ComfyUI and Facebook’s Segment Anything (SAM)—provides a powerful yet accessible solution.
This guide will walk you through everything you need to know, from basic setup to advanced techniques, ensuring you get flawless results every time.
Understanding Flux AI Inpainting
What Is AI Inpainting?
AI inpainting is the process of intelligently filling in missing or unwanted parts of an image. Unlike traditional Photoshop tools that rely on manual cloning, AI analyzes surrounding pixels and generates content that blends seamlessly.
Flux AI takes this a step further by offering:
✔ Precision masking (manual or AI-assisted)
✔ Text-guided generation (describe what you want to fill)
✔ Seamless blending (adjustable opacity & blurring)
Key Components for Success
To get the best results, you’ll need:
- Flux AI Model – The core AI that generates new content.
- ComfyUI – A node-based workflow system for fine-tuning the process.
- Segment Anything (SAM) – Facebook’s AI tool for automatic object selection.
- Effective Prompts – Guiding the AI with clear instructions.

Segment Anything (SAM) makes masking effortless.
Enhancing Your Inpainting Results
1. Optimizing Prompts for Better Outputs
The AI relies on your prompts to understand what to generate. Here’s how to craft effective ones:
- Be specific – Instead of "fix the background," try "replace the background with a misty forest."
- Use style keywords – "Photorealistic," "cinematic lighting," or "oil painting style" help guide the AI.
- Experiment – Sometimes, slight tweaks lead to drastically better results.
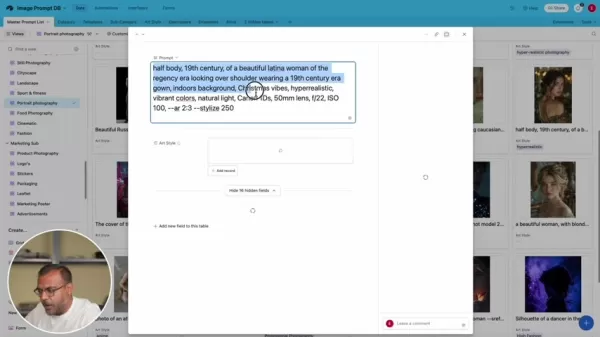
📌 Pro Tip: Check the Midjourney Prompt Database for inspiration on hyperrealistic prompts.
2. Mastering Mask Opacity & Blurring
The mask defines what gets replaced, but its edges matter:
- Full opacity = AI ignores what’s underneath.
- Partial opacity = AI blends with existing pixels.
- Blurred edges = Smoother transitions.
Adjusting mask opacity affects how the AI interprets the area.
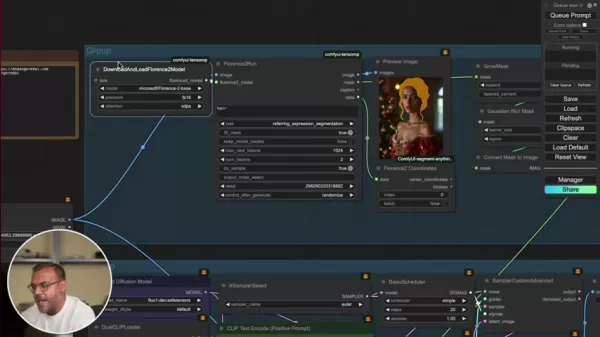
3. Leveraging Florence2 for Segmentation
Florence2 (by Microsoft) powers Segment Anything, making object selection lightning-fast.
Florence2 integration in ComfyUI for precise masking.
Step-by-Step Flux AI Inpainting Guide
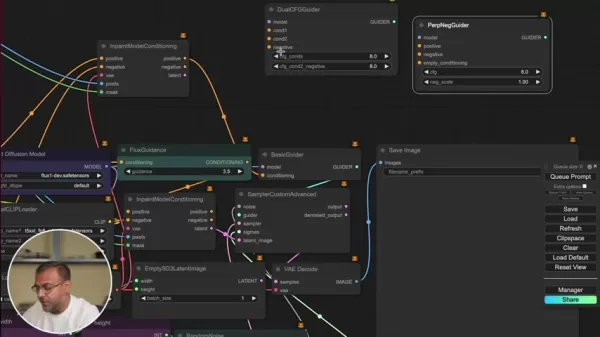
1. Setting Up ComfyUI Workflow
ComfyUI lets you customize the entire inpainting process. Here’s a basic setup:
- Load Image Node – Your input image.
- CLIP Text Encode – Positive & negative prompts (e.g., "a modern city skyline").
- Load Diffusion Model – The Flux AI model for generation.
- DualCLIPLoader – Enhances text understanding.
- Inpaint Model Conditioning – Links prompts, mask, and image.
- Sampler Custom Advanced – Generates the final output.
Example ComfyUI workflow for inpainting.
2. Masking the Target Area
- Manual masking – Paint directly in ComfyUI’s editor.
- Segment Anything (SAM) – Auto-select objects with AI.
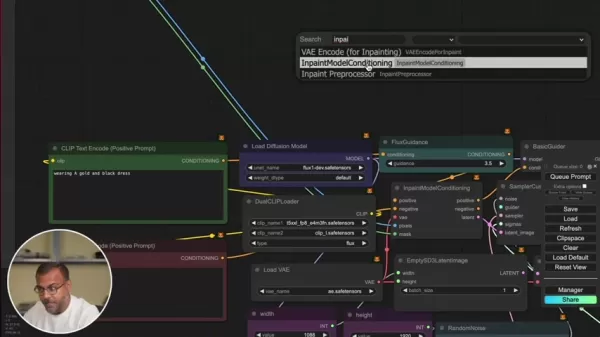
SAM makes masking complex objects a breeze.
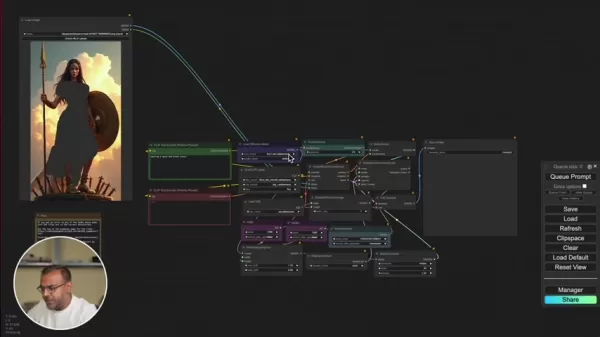
3. Running & Refining Results
After generating, tweak:
- Mask expansion (10-30 pixels for better blending).
- Prompt adjustments (if the AI misinterprets).
- Gaussian blur masking (for smoother edges).
Final inpainted result after refinements.
Flux AI Pricing & Hardware
Cost Considerations
- Free tier available (limited features).
- Patreon tiers (Endangered AI offers advanced workflows).
- Cloud options – RunPod or vast.ai for affordable GPU rentals.
Hardware Requirements
✔ High-end GPU (NVIDIA recommended) – Faster processing.
✔ 8GB+ VRAM – For smooth performance.
Pros & Cons of Flux AI Inpainting
✅ Pros
✔ Seamless edits – Hard to detect AI intervention.
✔ ComfyUI flexibility – Full workflow control.
✔ SAM integration – Speeds up masking.
✔ Prompt-driven creativity – Endless possibilities.
❌ Cons
✖ Steep learning curve – Node-based workflows take time.
✖ GPU-dependent – Slower on low-end hardware.
✖ Prompt sensitivity – Bad prompts = bad results.
Use Cases for Flux AI Inpainting
Where Can You Use It?
- Photo restoration – Fix old/damaged photos.
- Object removal – Delete photobombers.
- Creative edits – Swap skies, add elements.
- Product photography – Clean up imperfections.
Before & after inpainting for creative edits.
FAQ & Troubleshooting
Q: What GPU is best for Flux AI?
A: NVIDIA RTX 3060+ (8GB VRAM minimum).
Q: Can I use Flux AI commercially?
A: Yes, but check licensing terms.
Q: Where to find pre-made workflows?
A: Endangered AI’s Patreon offers downloadable setups.
Final Thoughts
Flux AI inpainting is a game-changer for digital artists, photographers, and designers. With ComfyUI’s flexibility and Segment Anything’s precision, you can achieve professional edits without years of Photoshop experience.
🚀 Ready to dive in? Start experimenting and see how AI can transform your images!
Related article
 Bain forecasts US$100 billion SaaS market in agentic AI automation
Bain & Company has estimated a $100 billion market in the U.S. for SaaS companies leveraging agentic AI. The firm said this market stems from automating coordination tasks within enterprise systems.This estimate comes from the second installment in B
AI Search Mandatory Policy Fuels Exodus, DuckDuckGo Sees User Surge
Following Google's 2026 I/O conference announcement of a full AI overhaul of its search engine, many users started looking for more controllable alternatives because there was no simple "one-click disable" for AI features. The privacy-focused search
Xiaohongshu Restructures: Conan Named President, Creates AI Primary Department Dots and Overseas Division Rednote
On April 30, Xiaohongshu sent an internal memo to all employees announcing the launch of a new organizational restructuring. The core of this change involves fully integrating three business lines—community, e-commerce, and commercialization—along wi
Related Special Topic Recommendations
Text-to-speech
Bain forecasts US$100 billion SaaS market in agentic AI automation
Bain & Company has estimated a $100 billion market in the U.S. for SaaS companies leveraging agentic AI. The firm said this market stems from automating coordination tasks within enterprise systems.This estimate comes from the second installment in B
AI Search Mandatory Policy Fuels Exodus, DuckDuckGo Sees User Surge
Following Google's 2026 I/O conference announcement of a full AI overhaul of its search engine, many users started looking for more controllable alternatives because there was no simple "one-click disable" for AI features. The privacy-focused search
Xiaohongshu Restructures: Conan Named President, Creates AI Primary Department Dots and Overseas Division Rednote
On April 30, Xiaohongshu sent an internal memo to all employees announcing the launch of a new organizational restructuring. The core of this change involves fully integrating three business lines—community, e-commerce, and commercialization—along wi
Related Special Topic Recommendations
Text-to-speech
 Top AI TTS Apps for Dyslexia: Support Learning and Reading Efficiency for Students
Discover the 2026 latest top-rated AI TTS apps curated for dyslexia support. Our expert rankings compare free vs paid tools, highlighting powerful features for enhanced reading efficiency and learning. Explore must-try, game-changing solutions to unlock student potential. Start your journey at XIX.AI.
 10 tools
 xix.ai
Comic Creation
Top AI Generators for Shonen Manga: Create High-Octane Action Sequences & Energy Effects
xix.ai
Comic Creation
Top AI Generators for Shonen Manga: Create High-Octane Action Sequences & Energy Effects
Discover the 2026 best AI generators for Shonen manga at XIX.AI. Our top-rated, curated list features powerful tools for creating high-octane action sequences and dynamic energy effects. Compare free vs paid options with real-world tests. Unlock your creative potential and start crafting epic manga today!
15 tools
xix.ai
Business
Best AI Expense Trackers: Scan Receipts & Categorize Corporate Spend Automatically
2026 Latest Best AI Expense Trackers: Top-rated tools to scan receipts & categorize corporate spend automatically. Discover powerful, game-changing solutions for effortless expense management, accurate financial tracking, and streamlined compliance. Our curated, weekly-updated comparison of free vs paid options helps you find the perfect fit. Unlock your AI edge with XIX.AI's expert picks.
10 tools
xix.ai
Business
Best AI Recruiting Tools: Screen Resumes & Automate Candidate Interview Scheduling
Discover the 2026 latest top-rated AI recruiting tools on XIX.AI. Our curated list features powerful, game-changing solutions for screening resumes and automating candidate interview scheduling. Compare free vs paid options with real-world tests and weekly updated rankings. Find your perfect hiring assistant and streamline your recruitment today!
10 tools
xix.ai
Productivity
AI Personal Wellness & Focus Coaches: Manage Burnout & Boost Mental Energy Levels
Discover the 2026 best AI personal wellness and focus coaches on XIX.AI. Our curated rankings feature top-rated, game-changing tools to manage burnout and boost mental energy. Compare free vs paid options with real-world insights. Unlock your path to peak productivity and well-being today.
10 tools
xix.ai
chatbot
Top-Rated AI Romantic Chatbots: Build Long-Term Relationships with Consistent Personalities
Discover the 2026 latest top-rated AI romantic chatbots for building genuine, long-term connections. Our curated list features powerful, consistent personalities, free vs paid comparisons, and real-world tests. Find your perfect companion and start building today at XIX.AI.
10 tools
xix.ai

 Comments (6)
0/500
Comments (6)
0/500
![PaulTaylor]()
La función de inpainting de Flux parece realmente útil para restaurar fotos antiguas. Tengo unas cuantas imágenes familiares dañadas que quizá pueda intentar arreglar con esto. Si es tan fácil como lo describen, podría ser un salvavidas para los recuerdos 😅. ¿Alguien ya lo probó para ese uso? Me pregunto qué tan bien maneja rasguños severos o partes faltantes grandes.
![KevinMartínez]()
Also das klingt ja richtig krass! 🚀 Kann mir vorstellen, wie praktisch das für alte Familienfotos wäre - mein Opa hätte sich sicher gefreut, wenn seine kaputten Kriegsfotos repariert werden könnten. Aber ich frage mich, ob diese KI am Ende vielleicht zu gut wird... Was, wenn jemand damit historische Fotos manipulieren will? Irgendwie gruselig, oder?
![BenHernández]()
Flux AIのインペインティング機能、実際に使ってみたけどすごく自然な仕上がりで感動した!古い家族写真の傷もきれいに消せて、技術の進歩には驚くばかりです✨ でもAI編集が当たり前になるにつれ、偽画像問題がさらに深刻化するんじゃないかとちょっと不安…
![KevinScott]()
Flux AI's inpainting is mind-blowing! I tried removing a random pole from a photo, and it was like it never existed. Super easy to use, but I wonder how it handles super complex backgrounds? 🤔
![KeithMoore]()
Flux AI inpainting sounds like magic! 🪄 Removing objects from photos effortlessly is a game-changer for my editing projects.
![BenRoberts]()
Flux AI's inpainting sounds like a game-changer for photo editing! I’m amazed at how it can seamlessly remove objects or restore old pics. Can’t wait to try it out on some family photos 📸. Anyone else blown away by this tech?
Mastering AI Inpainting with Flux AI: A Complete Guide
AI-powered image editing has revolutionized how we retouch photos, and inpainting stands out as one of its most impressive capabilities. Whether you're removing unwanted objects, restoring old photos, or creatively altering images, Flux AI—combined with ComfyUI and Facebook’s Segment Anything (SAM)—provides a powerful yet accessible solution.
This guide will walk you through everything you need to know, from basic setup to advanced techniques, ensuring you get flawless results every time.
Understanding Flux AI Inpainting
What Is AI Inpainting?
AI inpainting is the process of intelligently filling in missing or unwanted parts of an image. Unlike traditional Photoshop tools that rely on manual cloning, AI analyzes surrounding pixels and generates content that blends seamlessly.
Flux AI takes this a step further by offering:
✔ Precision masking (manual or AI-assisted)
✔ Text-guided generation (describe what you want to fill)
✔ Seamless blending (adjustable opacity & blurring)
Key Components for Success
To get the best results, you’ll need:
- Flux AI Model – The core AI that generates new content.
- ComfyUI – A node-based workflow system for fine-tuning the process.
- Segment Anything (SAM) – Facebook’s AI tool for automatic object selection.
- Effective Prompts – Guiding the AI with clear instructions.
Segment Anything (SAM) makes masking effortless.
Enhancing Your Inpainting Results
1. Optimizing Prompts for Better Outputs
The AI relies on your prompts to understand what to generate. Here’s how to craft effective ones:
- Be specific – Instead of "fix the background," try "replace the background with a misty forest."
- Use style keywords – "Photorealistic," "cinematic lighting," or "oil painting style" help guide the AI.
- Experiment – Sometimes, slight tweaks lead to drastically better results.
📌 Pro Tip: Check the Midjourney Prompt Database for inspiration on hyperrealistic prompts.
2. Mastering Mask Opacity & Blurring
The mask defines what gets replaced, but its edges matter:
- Full opacity = AI ignores what’s underneath.
- Partial opacity = AI blends with existing pixels.
- Blurred edges = Smoother transitions.
Adjusting mask opacity affects how the AI interprets the area.
3. Leveraging Florence2 for Segmentation
Florence2 (by Microsoft) powers Segment Anything, making object selection lightning-fast.
Florence2 integration in ComfyUI for precise masking.
Step-by-Step Flux AI Inpainting Guide
1. Setting Up ComfyUI Workflow
ComfyUI lets you customize the entire inpainting process. Here’s a basic setup:
- Load Image Node – Your input image.
- CLIP Text Encode – Positive & negative prompts (e.g., "a modern city skyline").
- Load Diffusion Model – The Flux AI model for generation.
- DualCLIPLoader – Enhances text understanding.
- Inpaint Model Conditioning – Links prompts, mask, and image.
- Sampler Custom Advanced – Generates the final output.
Example ComfyUI workflow for inpainting.
2. Masking the Target Area
- Manual masking – Paint directly in ComfyUI’s editor.
- Segment Anything (SAM) – Auto-select objects with AI.
SAM makes masking complex objects a breeze.
3. Running & Refining Results
After generating, tweak:
- Mask expansion (10-30 pixels for better blending).
- Prompt adjustments (if the AI misinterprets).
- Gaussian blur masking (for smoother edges).
Final inpainted result after refinements.
Flux AI Pricing & Hardware
Cost Considerations
- Free tier available (limited features).
- Patreon tiers (Endangered AI offers advanced workflows).
- Cloud options – RunPod or vast.ai for affordable GPU rentals.
Hardware Requirements
✔ High-end GPU (NVIDIA recommended) – Faster processing.
✔ 8GB+ VRAM – For smooth performance.
Pros & Cons of Flux AI Inpainting
✅ Pros
✔ Seamless edits – Hard to detect AI intervention.
✔ ComfyUI flexibility – Full workflow control.
✔ SAM integration – Speeds up masking.
✔ Prompt-driven creativity – Endless possibilities.
❌ Cons
✖ Steep learning curve – Node-based workflows take time.
✖ GPU-dependent – Slower on low-end hardware.
✖ Prompt sensitivity – Bad prompts = bad results.
Use Cases for Flux AI Inpainting
Where Can You Use It?
- Photo restoration – Fix old/damaged photos.
- Object removal – Delete photobombers.
- Creative edits – Swap skies, add elements.
- Product photography – Clean up imperfections.
Before & after inpainting for creative edits.
FAQ & Troubleshooting
Q: What GPU is best for Flux AI?
A: NVIDIA RTX 3060+ (8GB VRAM minimum).
Q: Can I use Flux AI commercially?
A: Yes, but check licensing terms.
Q: Where to find pre-made workflows?
A: Endangered AI’s Patreon offers downloadable setups.
Final Thoughts
Flux AI inpainting is a game-changer for digital artists, photographers, and designers. With ComfyUI’s flexibility and Segment Anything’s precision, you can achieve professional edits without years of Photoshop experience.
🚀 Ready to dive in? Start experimenting and see how AI can transform your images!


 Bain forecasts US$100 billion SaaS market in agentic AI automation
Bain & Company has estimated a $100 billion market in the U.S. for SaaS companies leveraging agentic AI. The firm said this market stems from automating coordination tasks within enterprise systems.This estimate comes from the second installment in B
Bain forecasts US$100 billion SaaS market in agentic AI automation
Bain & Company has estimated a $100 billion market in the U.S. for SaaS companies leveraging agentic AI. The firm said this market stems from automating coordination tasks within enterprise systems.This estimate comes from the second installment in B
 AI Search Mandatory Policy Fuels Exodus, DuckDuckGo Sees User Surge
Following Google's 2026 I/O conference announcement of a full AI overhaul of its search engine, many users started looking for more controllable alternatives because there was no simple "one-click disable" for AI features. The privacy-focused search
AI Search Mandatory Policy Fuels Exodus, DuckDuckGo Sees User Surge
Following Google's 2026 I/O conference announcement of a full AI overhaul of its search engine, many users started looking for more controllable alternatives because there was no simple "one-click disable" for AI features. The privacy-focused search
 Xiaohongshu Restructures: Conan Named President, Creates AI Primary Department Dots and Overseas Division Rednote
On April 30, Xiaohongshu sent an internal memo to all employees announcing the launch of a new organizational restructuring. The core of this change involves fully integrating three business lines—community, e-commerce, and commercialization—along wi
Xiaohongshu Restructures: Conan Named President, Creates AI Primary Department Dots and Overseas Division Rednote
On April 30, Xiaohongshu sent an internal memo to all employees announcing the launch of a new organizational restructuring. The core of this change involves fully integrating three business lines—community, e-commerce, and commercialization—along wi

Discover the 2026 latest top-rated AI TTS apps curated for dyslexia support. Our expert rankings compare free vs paid tools, highlighting powerful features for enhanced reading efficiency and learning. Explore must-try, game-changing solutions to unlock student potential. Start your journey at XIX.AI.
10 tools
xix.ai
Discover the 2026 best AI generators for Shonen manga at XIX.AI. Our top-rated, curated list features powerful tools for creating high-octane action sequences and dynamic energy effects. Compare free vs paid options with real-world tests. Unlock your creative potential and start crafting epic manga today!
15 tools
xix.ai

2026 Latest Best AI Expense Trackers: Top-rated tools to scan receipts & categorize corporate spend automatically. Discover powerful, game-changing solutions for effortless expense management, accurate financial tracking, and streamlined compliance. Our curated, weekly-updated comparison of free vs paid options helps you find the perfect fit. Unlock your AI edge with XIX.AI's expert picks.
10 tools
xix.ai

Discover the 2026 latest top-rated AI recruiting tools on XIX.AI. Our curated list features powerful, game-changing solutions for screening resumes and automating candidate interview scheduling. Compare free vs paid options with real-world tests and weekly updated rankings. Find your perfect hiring assistant and streamline your recruitment today!
10 tools
xix.ai
Discover the 2026 best AI personal wellness and focus coaches on XIX.AI. Our curated rankings feature top-rated, game-changing tools to manage burnout and boost mental energy. Compare free vs paid options with real-world insights. Unlock your path to peak productivity and well-being today.
10 tools
xix.ai

Discover the 2026 latest top-rated AI romantic chatbots for building genuine, long-term connections. Our curated list features powerful, consistent personalities, free vs paid comparisons, and real-world tests. Find your perfect companion and start building today at XIX.AI.
10 tools
xix.ai

La función de inpainting de Flux parece realmente útil para restaurar fotos antiguas. Tengo unas cuantas imágenes familiares dañadas que quizá pueda intentar arreglar con esto. Si es tan fácil como lo describen, podría ser un salvavidas para los recuerdos 😅. ¿Alguien ya lo probó para ese uso? Me pregunto qué tan bien maneja rasguños severos o partes faltantes grandes.
Also das klingt ja richtig krass! 🚀 Kann mir vorstellen, wie praktisch das für alte Familienfotos wäre - mein Opa hätte sich sicher gefreut, wenn seine kaputten Kriegsfotos repariert werden könnten. Aber ich frage mich, ob diese KI am Ende vielleicht zu gut wird... Was, wenn jemand damit historische Fotos manipulieren will? Irgendwie gruselig, oder?
Flux AIのインペインティング機能、実際に使ってみたけどすごく自然な仕上がりで感動した!古い家族写真の傷もきれいに消せて、技術の進歩には驚くばかりです✨ でもAI編集が当たり前になるにつれ、偽画像問題がさらに深刻化するんじゃないかとちょっと不安…
Flux AI's inpainting is mind-blowing! I tried removing a random pole from a photo, and it was like it never existed. Super easy to use, but I wonder how it handles super complex backgrounds? 🤔
Flux AI inpainting sounds like magic! 🪄 Removing objects from photos effortlessly is a game-changer for my editing projects.
Flux AI's inpainting sounds like a game-changer for photo editing! I’m amazed at how it can seamlessly remove objects or restore old pics. Can’t wait to try it out on some family photos 📸. Anyone else blown away by this tech?


