


 Home
HomeMaster Audio Editing in DaVinci Resolve: Fairlight Guide for Professional Sound
Crystal-clear audio separates amateur productions from professional video content. DaVinci Resolve's Fairlight page provides filmmakers and content creators with sophisticated tools to perfect their sound design. This in-depth tutorial walks through essential techniques, optimal gear selection, and professional workflows to elevate your audio from basic recording to polished post-production mastering.
Key Points
The critical role of pristine audio in professional video production
Choosing microphones that match your recording environment and vocal characteristics
Optimizing recording spaces for minimal reflections and background noise
Mastering Fairlight's comprehensive audio editing toolkit
Implementing proper audio level normalization standards
Applying surgical EQ techniques for voice clarity
Understanding microphone polar patterns and their impact on recordings
Getting Started with Fairlight Audio Editing
Why Audio Quality Matters
Visuals may capture attention, but audio quality determines viewer retention. Professional-quality sound creates subconscious credibility while poor audio immediately signals amateur production. Unlike visual flaws that audiences often forgive, audio problems trigger an almost visceral negative reaction. This makes investing in proper recording techniques and mastering Fairlight's capabilities essential for serious content creators.
Confessions of a Non-Audio Engineer

Many visual creators initially feel intimidated by audio engineering's technical nature. The truth? You don't need to become a certified audio engineer to produce excellent sound. Focus on mastering fundamental recording principles and efficient editing workflows rather than obsessing over perfection. Consistent "great" audio outweighs occasional "perfect" takes that require excessive production time.
Embrace Imperfection: The Belgian Philosophy
The Belgian concept of "Straatje zonder eind" (endless street) perfectly illustrates the diminishing returns of chasing audio perfection. Every recording environment introduces minor imperfections - neighborhood sounds, HVAC systems, electrical hum. Professional workflows minimize these artifacts while recognizing that complete elimination often wastes time better spent on content creation. Prioritize achieving broadcast-quality clarity rather than impossible perfection.
Gear Essentials for Recording Audio
Microphone Selection: Oktava MK-012 and Alternatives

The Oktava MK-012 delivers remarkable sonic fidelity at its price point, capturing nuanced vocal characteristics impressively. As a small-diaphragm condenser, it achieves exceptional transient response perfect for speech intelligibility. However, condenser mics require well-treated spaces to prevent emphasized room reflections.
- Dynamic Microphones: Ideal for untreated spaces thanks to natural noise rejection (Shure SM7B, Electro-Voice RE20)
- Shotgun Microphones: Perfect for isolating voices in challenging environments (Sennheiser MKH 416, Rode NTG5)
- USB Microphones: Streamlined solutions for creators needing plug-and-play operation (Shure MV7, Rode NT-USB)
Audio Recorders: Zoom H5
The Zoom H5 strikes an ideal balance between professional features and portable convenience. Its high-quality preamps ensure clean gain staging while modular mic capsules adapt to various recording scenarios. For creators needing simpler operation, the Tascam DR-40X provides similar quality with streamlined controls.
Acoustic Treatment: Taming Your Recording Space
Effective acoustic treatment doesn't require expensive studio builds. Strategic placement of absorption materials transforms ordinary rooms:
- Moving blankets hung on walls dramatically reduce midrange reflections
- Bass traps constructed from rigid fiberglass panels control low-end buildup
- Portable reflection filters create immediate vocal booth effects
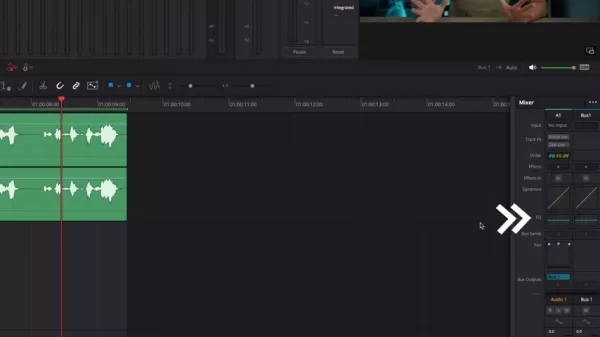
Audio Editing Workflow in DaVinci Resolve
Step 1: Normalizing Audio Levels
Professional normalization maintains consistent loudness without artificial compression artifacts. Target -16 LUFS for streaming platforms or -23 LUFS for broadcast, using Fairlight's loudness meters to verify compliance. Always leave 1dB of headroom to prevent clipping during final renders.
Step 2: Navigating to the Fairlight Tab
Fairlight's mixer provides broadcast-caliber tools disguised in an intuitive interface. Customize workspace layouts by dragging panels to create efficient editing flows matching your production needs.
Step 3: Setting Up the Track Order for Effects
The golden processing chain:
- Surgical EQ to remove problem frequencies
- Subtle compression for dynamic control (2-3dB gain reduction max)
- Saturation for harmonic enhancement
- Final limiting to catch transients
Step 4: Equalization (EQ)
Vocals typically require:
- High-pass filter at 80Hz to eliminate rumble
- Subtle cut around 250Hz to reduce muddiness
- Gentle boost at 3kHz-5kHz for speech intelligibility
- Air frequency enhancement at 12kHz+
Step 5: Addressing Problem Frequencies
Detect frequency buildup by:
- Soloing the track
- Creating narrow Q bell curve (+12dB boost)
- Sweeping frequencies until identifying harsh resonances
- Cutting problematic areas by 3-6dB
Advantages and Disadvantages of the Oktava MK-012
Pros
Remarkably accurate transient response for dialog clarity
Switchable polar patterns adapt to recording scenarios
Professional sound quality at accessible price point
Cons
Requires phantom power (48V)
Demands properly treated recording spaces
Lacks built-in shock mount requiring aftermarket solutions
FAQ
Do I need expensive equipment for good audio?
Professional results come from proper technique more than equipment cost. A $100 microphone in well-treated space outperforms a $1000 microphone in untreated rooms. Invest first in acoustics, then gear.
What is normalization, and why is it important?
Normalization ensures consistent playback volume across platforms preventing jarring level changes between clips. Modern loudness standards prioritize perceived volume over peak levels.
What is equalization (EQ), and how should I use it?
EQ shapes tonal balance by boosting or cutting specific frequencies. Start subtractively - remove unwanted frequencies before boosting desired characteristics.
Related Questions
How can I reduce background noise in my recordings?
Triple-protection approach:
- Prevent noise during recording through mic placement/acoustics
- Use Fairlight's spectral noise removal for broadband reduction
- Apply targeted notch filters to persistent tonal noises
What are the best plugins for audio editing in DaVinci Resolve?
While Fairlight's native tools suffice for most workflows, consider:
- iZotope RX for advanced noise reduction
- Waves Vocal Rider for dynamic volume automation
- FabFilter Pro-Q 3 for surgical EQ
Related article
 China Telecom Invests in Mianbi Intelligence, Raises Capital to 713,000 Yuan for LLM & Data Infra
The "national team" and the leading figure from Tsinghua University in the large model space are deepening their strategic alignment. On March 1, 2026, according to the latest business registration data from Qichacha, Beijing Mianbi Intelligent Techn
Taotian Group Accelerates AI-Native Restructuring, Grants Interns Free Token Quotas
TaoTian Group recently introduced the "AI Productivity Plan," designed to accelerate the integration of AI technology into e-commerce operations and R&D workflows through resource allocation and tool subsidies. The program is now available to all int
Glean targets enterprise AI infrastructure in land grab
The race to dominate enterprise AI is accelerating. Microsoft is embedding Copilot into Office, Google is integrating Gemini into Workspace, and both OpenAI and Anthropic are selling directly to corporations. Meanwhile, nearly every SaaS vendor now i
Related Special Topic Recommendations
writing
China Telecom Invests in Mianbi Intelligence, Raises Capital to 713,000 Yuan for LLM & Data Infra
The "national team" and the leading figure from Tsinghua University in the large model space are deepening their strategic alignment. On March 1, 2026, according to the latest business registration data from Qichacha, Beijing Mianbi Intelligent Techn
Taotian Group Accelerates AI-Native Restructuring, Grants Interns Free Token Quotas
TaoTian Group recently introduced the "AI Productivity Plan," designed to accelerate the integration of AI technology into e-commerce operations and R&D workflows through resource allocation and tool subsidies. The program is now available to all int
Glean targets enterprise AI infrastructure in land grab
The race to dominate enterprise AI is accelerating. Microsoft is embedding Copilot into Office, Google is integrating Gemini into Workspace, and both OpenAI and Anthropic are selling directly to corporations. Meanwhile, nearly every SaaS vendor now i
Related Special Topic Recommendations
writing
 Best AI Xianxia & Wuxia Assistants: Write Epic Cultivation Progression & Martial Arts Choreography
Discover the 2026 best AI assistants for crafting epic xianxia & wuxia tales. XIX.AI's curated list features top-rated, game-changing tools to master cultivation progression and martial arts choreography. Compare free vs paid options with real-world tests. Unlock your creative potential and start writing today!
 10 tools
 xix.ai
code
AI Mobile App Coding Tools: Generate Cross-Platform Flutter & React Native Code from Prompts
xix.ai
code
AI Mobile App Coding Tools: Generate Cross-Platform Flutter & React Native Code from Prompts
Discover the 2026 best AI mobile app coding tools for Flutter & React Native. Our curated, top-rated list features powerful, game-changing solutions that generate cross-platform code from prompts. Compare free vs paid options with real-world tests. Unlock faster development and build better apps. Explore the rankings on XIX.AI now!
10 tools
xix.ai
code
Best AI Chrome Extension Generators: Create Custom Browser Add-ons with Zero Coding Experience
Discover the 2026 best AI Chrome extension generators on XIX.AI. Our curated list features top-rated, must-try tools that let you create custom browser add-ons with zero coding. Compare free vs paid options, see real-world tests, and unlock your productivity. Explore the latest rankings and find your perfect tool today!
10 tools
xix.ai
Text-to-speech
Best AI Multilingual TTS: Generate Authentic Native-Accent Speech in 50+ Languages
Discover the 2026 best AI multilingual TTS tools for authentic native-accent speech in 50+ languages. Explore our top-rated, curated rankings with free vs paid comparisons and real-world tests. Find your perfect voice tool on XIX.AI and unlock global communication today.
10 tools
xix.ai
Meeting Assistant
Best AI Meeting Automation Tools for Smarter and Faster Collaboration
Discover the 2026 latest top-rated AI meeting automation tools for smarter, faster collaboration. Our curated list features powerful, game-changing solutions to automate notes, summaries, and action items. Compare free vs paid options with real-world tests and weekly updated rankings. Unlock peak team productivity. Explore the best picks now at XIX.AI.
10 tools
xix.ai
Prompt
AI Prompts for Infrastructure-as-Code: Deploy Terraform & Docker Configurations Safely
Discover the 2026 latest top-rated AI prompts for Infrastructure-as-Code. XIX.AI's curated selection helps you safely deploy Terraform & Docker configurations, automate cloud setups, and boost DevOps productivity. Compare free vs paid options with real-world tests. Explore now and unlock your AI edge.
10 tools
xix.ai

 Comments (2)
0/500
Comments (2)
0/500
![JamesBaker]()
Finally a guide that doesn't assume you're already a sound engineer! The Fairlight page always looked intimidating, but this breakdown of the essential tools for dialogue cleanup and mixing is exactly what I needed. Can't wait to try the noise reduction tips on my last vlog project. The audio quality in my videos is the next big thing I want to level up. 🎧
![JasonAnderson]()
Ich nutze Fairlight seit ein paar Monaten für Podcast-Schnitt. Die Busstruktur ist mächtig, aber für Einsteiger echt verwirrend. Hat jemand Tipps für bessere Workflows bei Dialogue Editing? Die automatische Lautstärkenanpassung spart mir immer Stunden 🙌
Crystal-clear audio separates amateur productions from professional video content. DaVinci Resolve's Fairlight page provides filmmakers and content creators with sophisticated tools to perfect their sound design. This in-depth tutorial walks through essential techniques, optimal gear selection, and professional workflows to elevate your audio from basic recording to polished post-production mastering.
Key Points
The critical role of pristine audio in professional video production
Choosing microphones that match your recording environment and vocal characteristics
Optimizing recording spaces for minimal reflections and background noise
Mastering Fairlight's comprehensive audio editing toolkit
Implementing proper audio level normalization standards
Applying surgical EQ techniques for voice clarity
Understanding microphone polar patterns and their impact on recordings
Getting Started with Fairlight Audio Editing
Why Audio Quality Matters
Visuals may capture attention, but audio quality determines viewer retention. Professional-quality sound creates subconscious credibility while poor audio immediately signals amateur production. Unlike visual flaws that audiences often forgive, audio problems trigger an almost visceral negative reaction. This makes investing in proper recording techniques and mastering Fairlight's capabilities essential for serious content creators.
Confessions of a Non-Audio Engineer
Many visual creators initially feel intimidated by audio engineering's technical nature. The truth? You don't need to become a certified audio engineer to produce excellent sound. Focus on mastering fundamental recording principles and efficient editing workflows rather than obsessing over perfection. Consistent "great" audio outweighs occasional "perfect" takes that require excessive production time.
Embrace Imperfection: The Belgian Philosophy
The Belgian concept of "Straatje zonder eind" (endless street) perfectly illustrates the diminishing returns of chasing audio perfection. Every recording environment introduces minor imperfections - neighborhood sounds, HVAC systems, electrical hum. Professional workflows minimize these artifacts while recognizing that complete elimination often wastes time better spent on content creation. Prioritize achieving broadcast-quality clarity rather than impossible perfection.
Gear Essentials for Recording Audio
Microphone Selection: Oktava MK-012 and Alternatives
The Oktava MK-012 delivers remarkable sonic fidelity at its price point, capturing nuanced vocal characteristics impressively. As a small-diaphragm condenser, it achieves exceptional transient response perfect for speech intelligibility. However, condenser mics require well-treated spaces to prevent emphasized room reflections.
- Dynamic Microphones: Ideal for untreated spaces thanks to natural noise rejection (Shure SM7B, Electro-Voice RE20)
- Shotgun Microphones: Perfect for isolating voices in challenging environments (Sennheiser MKH 416, Rode NTG5)
- USB Microphones: Streamlined solutions for creators needing plug-and-play operation (Shure MV7, Rode NT-USB)
Audio Recorders: Zoom H5
The Zoom H5 strikes an ideal balance between professional features and portable convenience. Its high-quality preamps ensure clean gain staging while modular mic capsules adapt to various recording scenarios. For creators needing simpler operation, the Tascam DR-40X provides similar quality with streamlined controls.
Acoustic Treatment: Taming Your Recording Space
Effective acoustic treatment doesn't require expensive studio builds. Strategic placement of absorption materials transforms ordinary rooms:
- Moving blankets hung on walls dramatically reduce midrange reflections
- Bass traps constructed from rigid fiberglass panels control low-end buildup
- Portable reflection filters create immediate vocal booth effects
Audio Editing Workflow in DaVinci Resolve
Step 1: Normalizing Audio Levels
Professional normalization maintains consistent loudness without artificial compression artifacts. Target -16 LUFS for streaming platforms or -23 LUFS for broadcast, using Fairlight's loudness meters to verify compliance. Always leave 1dB of headroom to prevent clipping during final renders.
Step 2: Navigating to the Fairlight Tab
Fairlight's mixer provides broadcast-caliber tools disguised in an intuitive interface. Customize workspace layouts by dragging panels to create efficient editing flows matching your production needs.
Step 3: Setting Up the Track Order for Effects
The golden processing chain:
- Surgical EQ to remove problem frequencies
- Subtle compression for dynamic control (2-3dB gain reduction max)
- Saturation for harmonic enhancement
- Final limiting to catch transients
Step 4: Equalization (EQ)
Vocals typically require:
- High-pass filter at 80Hz to eliminate rumble
- Subtle cut around 250Hz to reduce muddiness
- Gentle boost at 3kHz-5kHz for speech intelligibility
- Air frequency enhancement at 12kHz+
Step 5: Addressing Problem Frequencies
Detect frequency buildup by:
- Soloing the track
- Creating narrow Q bell curve (+12dB boost)
- Sweeping frequencies until identifying harsh resonances
- Cutting problematic areas by 3-6dB
Advantages and Disadvantages of the Oktava MK-012
Pros
Remarkably accurate transient response for dialog clarity
Switchable polar patterns adapt to recording scenarios
Professional sound quality at accessible price point
Cons
Requires phantom power (48V)
Demands properly treated recording spaces
Lacks built-in shock mount requiring aftermarket solutions
FAQ
Do I need expensive equipment for good audio?
Professional results come from proper technique more than equipment cost. A $100 microphone in well-treated space outperforms a $1000 microphone in untreated rooms. Invest first in acoustics, then gear.
What is normalization, and why is it important?
Normalization ensures consistent playback volume across platforms preventing jarring level changes between clips. Modern loudness standards prioritize perceived volume over peak levels.
What is equalization (EQ), and how should I use it?
EQ shapes tonal balance by boosting or cutting specific frequencies. Start subtractively - remove unwanted frequencies before boosting desired characteristics.
Related Questions
How can I reduce background noise in my recordings?
Triple-protection approach:
- Prevent noise during recording through mic placement/acoustics
- Use Fairlight's spectral noise removal for broadband reduction
- Apply targeted notch filters to persistent tonal noises
What are the best plugins for audio editing in DaVinci Resolve?
While Fairlight's native tools suffice for most workflows, consider:
- iZotope RX for advanced noise reduction
- Waves Vocal Rider for dynamic volume automation
- FabFilter Pro-Q 3 for surgical EQ


 China Telecom Invests in Mianbi Intelligence, Raises Capital to 713,000 Yuan for LLM & Data Infra
The "national team" and the leading figure from Tsinghua University in the large model space are deepening their strategic alignment. On March 1, 2026, according to the latest business registration data from Qichacha, Beijing Mianbi Intelligent Techn
China Telecom Invests in Mianbi Intelligence, Raises Capital to 713,000 Yuan for LLM & Data Infra
The "national team" and the leading figure from Tsinghua University in the large model space are deepening their strategic alignment. On March 1, 2026, according to the latest business registration data from Qichacha, Beijing Mianbi Intelligent Techn
 Taotian Group Accelerates AI-Native Restructuring, Grants Interns Free Token Quotas
TaoTian Group recently introduced the "AI Productivity Plan," designed to accelerate the integration of AI technology into e-commerce operations and R&D workflows through resource allocation and tool subsidies. The program is now available to all int
Taotian Group Accelerates AI-Native Restructuring, Grants Interns Free Token Quotas
TaoTian Group recently introduced the "AI Productivity Plan," designed to accelerate the integration of AI technology into e-commerce operations and R&D workflows through resource allocation and tool subsidies. The program is now available to all int
 Glean targets enterprise AI infrastructure in land grab
The race to dominate enterprise AI is accelerating. Microsoft is embedding Copilot into Office, Google is integrating Gemini into Workspace, and both OpenAI and Anthropic are selling directly to corporations. Meanwhile, nearly every SaaS vendor now i
Glean targets enterprise AI infrastructure in land grab
The race to dominate enterprise AI is accelerating. Microsoft is embedding Copilot into Office, Google is integrating Gemini into Workspace, and both OpenAI and Anthropic are selling directly to corporations. Meanwhile, nearly every SaaS vendor now i
Discover the 2026 best AI assistants for crafting epic xianxia & wuxia tales. XIX.AI's curated list features top-rated, game-changing tools to master cultivation progression and martial arts choreography. Compare free vs paid options with real-world tests. Unlock your creative potential and start writing today!
10 tools
xix.ai

Discover the 2026 best AI mobile app coding tools for Flutter & React Native. Our curated, top-rated list features powerful, game-changing solutions that generate cross-platform code from prompts. Compare free vs paid options with real-world tests. Unlock faster development and build better apps. Explore the rankings on XIX.AI now!
10 tools
xix.ai

Discover the 2026 best AI Chrome extension generators on XIX.AI. Our curated list features top-rated, must-try tools that let you create custom browser add-ons with zero coding. Compare free vs paid options, see real-world tests, and unlock your productivity. Explore the latest rankings and find your perfect tool today!
10 tools
xix.ai

Discover the 2026 best AI multilingual TTS tools for authentic native-accent speech in 50+ languages. Explore our top-rated, curated rankings with free vs paid comparisons and real-world tests. Find your perfect voice tool on XIX.AI and unlock global communication today.
10 tools
xix.ai

Discover the 2026 latest top-rated AI meeting automation tools for smarter, faster collaboration. Our curated list features powerful, game-changing solutions to automate notes, summaries, and action items. Compare free vs paid options with real-world tests and weekly updated rankings. Unlock peak team productivity. Explore the best picks now at XIX.AI.
10 tools
xix.ai

Discover the 2026 latest top-rated AI prompts for Infrastructure-as-Code. XIX.AI's curated selection helps you safely deploy Terraform & Docker configurations, automate cloud setups, and boost DevOps productivity. Compare free vs paid options with real-world tests. Explore now and unlock your AI edge.
10 tools
xix.ai

Finally a guide that doesn't assume you're already a sound engineer! The Fairlight page always looked intimidating, but this breakdown of the essential tools for dialogue cleanup and mixing is exactly what I needed. Can't wait to try the noise reduction tips on my last vlog project. The audio quality in my videos is the next big thing I want to level up. 🎧
Ich nutze Fairlight seit ein paar Monaten für Podcast-Schnitt. Die Busstruktur ist mächtig, aber für Einsteiger echt verwirrend. Hat jemand Tipps für bessere Workflows bei Dialogue Editing? Die automatische Lautstärkenanpassung spart mir immer Stunden 🙌


